

Terraform stacks is a way to orchestrate Terraform using Terraform
Terraform stacks are generally available. HCP Terraform in Europe is generally available. There is an opinionated path for how to migrate from workspaces to stacks as covered in my previous blog post:
When things are generally available they are ready to be used for production infrastructure. This blog post is a refresher of my older post on how to get started with Terraform stacks on Azure.

HCP Terraform in Europe has no direct impact on Terraform stacks, but I want to use HCP Terraform in Europe in this blog post. The main reason is that I am based in Europe and I want to make sure Terraform stacks are fully supported in Europe as in the US. If your HCP organization is based in the US, make sure to make the necessary changes to the Terraform configurations described in this blog post to be able to follow along.
Much of what I write in this post stays the same for HCP US. Essentially the two important differences are
- Projects in EU are shared between HCP and HCP Terraform, and they must be created using the HCP API.
- The hostname for HCP Terraform in EU is
app.eu.terraform.io. - When configuring the HCP provider in Terraform you must add
geography = "eu".
There is another difference related to billing. You need to establish a contract with IBM/HashiCorp to use paid features in EU. I am only a private citizen, so I will not do that. A consequence is that I will not be able to use deployment groups and automating approvals for my stack deployments.
I have an accompanying GitHub repository for this blog post. Use the code in this repository to set up the same infrastructure as I go through in the following sections.
What problem are we trying to solve?#
Before diving into Terraform stacks and how they work with Azure infrastructure we should define what problem we are trying to solve with Terraform stacks.
Stacks are intended for use-cases where you would normally have to manage many HCP Terraform workspaces and dependencies between them. This quickly becomes unmanageable at a large scale. Using stacks, you can replace sets of related workspaces with a single stack:
Stacks consists of components and deployments. A component is an abstraction of a Terraform module. All components in a stack are provisioned together using a deployment.
In the diagram above, we would create two components:
- networking
- compute
And we would create two deployments:
- dev
- prod
All components and all deployments are part of one stack. In this example we replace four workspaces with one stack, but we can envision much larger stacks than this.
With stacks, we would define components in .tfcomponent.hcl files and the deployments in .tfdeploy.hcl files using a declarative language extension to Terraform. Along with components and deployments, stacks come with a few other features and language constructs that we will see later in this blog post.
Building stacks#
In this section I will go through the steps from thinking about what I want to build with Terraform stacks, all the way to setting up the stack and running through the initial deployments.
Designing the stack#
If this is a green-field infrastructure deployment you should start by creating a high-level design of what stacks you will create, what components and deployments they will consist of, and how they are related to each other. A rough idea is better than no idea at all, and the design will help you when you sit down and write the necessary code.
The overall goal of my Terraform stacks project on Azure is this:
I want to provision a number of HashiCorp Nomad clusters for my organization. Each cluster represents an environment (dev, stage, prod, etc) and each cluster will be used for hosting running applications.
I will create two stacks:
- The first stack is the common-networking-stack that configures networking resources that are shared among many different projects in my organization. One of these projects is the Nomad cluster project.
- The second stack is the cluster-stack that configures the infrastructure for one Nomad cluster.
I have introduced a dependency between the two stacks on purpose to illustrate how you can pass data between stacks. The dependency can be visualized as in the following diagram.
The cluster-stack depends on the common-networking-stack. In the common-networking-stack we will create a virtual network and subnets for different environments. The virtual network and subnet IDs are used by the cluster-stack.
The initial stacks design I envision is shown in the following diagram:
The common-networking-stack contains one virtual network and multiple subnet resources. The cluster-stack contains a resource-group, a load balancer, and a VM scale set (VMSS).
Build Terraform modules#
There are four unique components between the two stacks. One of the components (the resource group component) is used in both of the stacks.
A component is a Terraform module. If you already know how to build a Terraform module, then you know everything you need to know to build components for Terraform stacks. As with normal Terraform modules you can either make it local (kept in the same repository as the stack configuration) or external (publish it to a private Terraform registry).
Since I want to share at least one module between two different stacks it makes sense to publish modules to my private registry.
In this section I will describe how the resource group module (and in extension the resource group component) is built and provisioned using Terraform. The other modules are built and published in a similar fashion, but each module has its own variables and outputs and internal details.
A good practice is to follow a structured Terraform module design. The resource group module has the following Terraform configuration files:
$ tree .
.
├── main.tf
├── outputs.tf
├── providers.tf
├── README.md
└── variables.tf
The providers.tf file specifies that the only required provider is the Azure provider:
terraform {
  required_providers {
    azurerm = {
      source  = "hashicorp/azurerm"
      version = "~> 4.52.0"
    }
  }
}
I will use the Azure provider in all of my components, so it is important that I keep the version constraints compatible for all components.
The variables.tf file configures two expected inputs:
variable "name_suffix" {
  description = "Resource group name suffix (e.g. rg-<suffix>)"
  type        = string
}

variable "location" {
  description = "Azure location name for resource group"
  type        = string
}
These same inputs will appear in all components. The name_suffix variable is for naming resources (in this case the resource group) and the location is for where the Azure resources will be created.
In main.tf the resource group itself is configured:
resource "azurerm_resource_group" "default" {
  name     = "rg-${var.name_suffix}"
  location = var.location
}
Finally, outputs.tf contains output values that other components will need to access:
output "id" {
  description = "Resource group ID"
  value       = azurerm_resource_group.default.id
}

output "name" {
  description = "Resource group name"
  value       = azurerm_resource_group.default.name
}
In my demo code I publish this module code (located in repos/components/resource-group) to a new GitHub repository and then as a VCS-connected module in my private registry:
resource "github_repository" "resource_group_component" {
  name         = "terraform-azurerm-resource-group"
  description  = "Terraform module to create an Azure Resource Group"
  homepage_url = "https://mattias.engineer"

  has_discussions = false
  has_downloads   = false
  has_issues      = false
  has_projects    = false
  has_wiki        = false

  gitignore_template = "Terraform"
  visibility         = "private"
}

locals {
  resource_group_component_path      = "${path.module}/repos/components/resource-group"
  resource_group_component_filenames = fileset(local.resource_group_component_path, "**")
  resource_group_component_file_paths = {
    for filename in local.resource_group_component_filenames : filename => "${local.resource_group_component_path}/${filename}"
  }
}

resource "github_repository_file" "resource_group_component" {
  for_each = local.resource_group_component_file_paths

  repository = github_repository.resource_group_component.name
  file       = each.key
  content    = file(each.value)
}

resource "tfe_registry_module" "resource_group_component" {
  initial_version = "1.0.0"
  vcs_repo {
    identifier         = github_repository.resource_group_component.full_name
    display_identifier = github_repository.resource_group_component.full_name
    branch             = "main"
    oauth_token_id     = data.tfe_oauth_client.github.oauth_token_id
  }

  depends_on = [
    github_repository_file.resource_group_component,
  ]
}
As mentioned above, the other three modules/components follow the same structure. Only the content of variables.tf, outputs.tf, and main.tf differ.
Configure components#
With all the underlying Terraform modules in place I can start to putting components together to form my stacks.
Components and related configuration all go into configuration files using the .tfcomponent.hcl file ending. Apart from the components a component configuration file contains variables, outputs, and provider configurations. Like with normal Terraform files (.tf files) all the .tfcomponent.hcl files in the same directory are merged and treated as one file by Terraform.
In this section I will continue to focus on the resource group component that is used in both of the stacks I am creating.
I create a variables.tfcomponent.hcl file to start with, one for each of my stacks. I add the two variables that I know my resource group module expects:
variable "name_suffix" {
  type        = string
  description = "Environment name"
}

variable "location" {
  type        = string
  description = "Azure location name"
}
Inputs, or variables, are configured using variable blocks. This is similar to how it works for normal Terraform configurations. Variables in a Terraform stack do not support validation blocks, but this is the only difference from normal Terraform variables.
Next I create a components.tfcomponent.hcl file where I add the resource group component block:
component "resource_group" {
  source  = "app.eu.terraform.io/mattias-fjellstrom/resource-group/azurerm"
  version = "1.0.0"

  providers = {
    # I will come back to how we configure providers in a later section
  }

  inputs = {
    name_suffix = var.name_suffix
    location    = var.location
  }
}
In the component block I configure the following:
- A
sourceargument indicating which Terraform module this component is based on. Here I reference the published module in my private registry. Since I am using HCP in Europe I use theapp.eu.terraform.iodomain. Note that in the demo code on GitHub the organization name is set to the correct value using a template expression together with thetemplatefile()function. - A
versionargument indicating which version of the Terraform module this component is using. - A
providersargument where I specify which provider instances to use, more on this in a later section about authentication to Azure. - An
inputsargument that takes an object of key/value pairs that will be passed to the module variables.
I add this component block to both of my Terraform stacks.
For the common-networking stack I add an additional component block for the virtual network:
component "virtual_network" {
  source  = "app.eu.terraform.io/mattias-fjellstrom/virtual-network/azurerm"
  version = "1.0.0"

  providers = {
    # I will come back to how we configure providers in a later section
  }

  inputs = {
    name_suffix         = var.name_suffix
    resource_group_name = component.resource_group.name
    location            = var.location
    cidr_block          = var.cidr_block
    subnets             = var.subnets
  }
}
This block looks similar to the one for the resource group. There is one important difference here: the virtual network component has an input for a resource group name. The value of this argument comes from the outputs of the resource group component. You reference outputs from one component using an expression like component.resource_group.<name of output>.
In this way we have configured an implicit dependency between the two components, similar to how we configure implicit dependencies between resources in normal Terraform configurations.
The two remaining components (for the cluster stack) are for the load balancer and the virtual machine scale-set (VMSS):
component "load_balancer" {
  source  = "app.eu.terraform.io/${hcp_organization_name}/load-balancer/azurerm"
  version = "1.0.0"

  providers = {
    # I will come back to how we configure providers in a later section
  }

  inputs = {
    resource_group_name = component.resource_group.name
    name_suffix         = var.name_suffix
    location            = var.location
    port                = 4646
    subnet_id           = var.subnet_id
  }
}

component "cluster" {
  source  = "app.eu.terraform.io/${hcp_organization_name}/nomad-vmss/azurerm"
  version = "1.0.0"

  providers = {
    # I will come back to how we configure providers in a later section
  }

  inputs = {
    resource_group_name     = component.resource_group.name
    name_suffix             = var.name_suffix
    location                = var.location
    port                    = 4646
    subnet_id               = var.subnet_id
    backend_address_pool_id = component.load_balancer.backend_address_pool_id
  }
}
All component inputs are configured with one of the following:
- A literal value (e.g.
port = 4646for the cluster component). - A variable reference (e.g.
location = var.locationfor all components). - A reference to a component output (e.g.
resource_group_name = component.resource_group.namein the cluster and load balancer components).
We can add outputs from our components. This is required if we want to start passing outputs between different stacks. Note that this is different from outputs that are part of the Terraform module code of a given component.
We add an output to our .tfcomponent.hcl files using an output block. For the common-networking stack I add two outputs:
output "virtual_network_id" {
  description = "Virtual network ID"
  type        = string
  value       = component.virtual_network.vnet_id
}

output "subnet_ids" {
  description = "Subnet IDs"
  type        = map(string)
  value       = component.virtual_network.subnet_ids
}
Note the difference from normal output blocks in .tf files: I add a type argument specifying what value type this output is.
I will come back to outputs in a later section when we look at how to pass data between different stacks.
Authenticate to Azure#
In the previous section I skipped important details about providers. In this section I will go through these details.
Like with normal Terraform configurations you configure what providers your stack will be using. For stacks you do this directly in a root-level required_providers block in your .tfcomponent.hcl files. For the cluster stack this block contains the following:
required_providers {
  azurerm = {
    source  = "hashicorp/azurerm"
    version = "~> 4.52.0"
  }

  cloudinit = {
    source  = "hashicorp/cloudinit"
    version = "~> 2.3.7"
  }

  tls = {
    source  = "hashicorp/tls"
    version = "~> 4.1.0"
  }
}
To clarify: there is no terraform block here. The required_providers block is a root-level block in the stacks language.
Many providers require configuration. To configure a provider you add a provider block to your .tfcomponent.hcl files. A provider block in the stacks language looks different from normal Terraform configurations. An example of how you configure the Azure provider in the stacks language is this:
provider "azurerm" "default" {
  config {
    features {}

    use_cli  = false
    use_oidc = true

    oidc_token      = var.identity_token
    client_id       = var.azure_client_id
    tenant_id       = var.azure_tenant_id
    subscription_id = var.azure_subscription_id
  }
}
The interesting things to note here are:
- The
providerblock has two labels. One for the type of provider (e.g.azurerm) and one for a symbolic name used in the source code (e.g.default). This removes the need to introduce provider aliases. Instead you just give your different provider instances (of the same type) different symbolic names. - The configuration of the provider goes into a
configblock inside of theproviderblock. The configuration inside of theconfigblock is the same as when you configure a provider in a normal Terraform configuration. - Although not shown here, the
providerblock supportsfor_each. This means you can dynamically create many provider instances of the same type using a map or a set. A good example of this would be to have a set of Azure subscription IDs and create one provider instance for each.
The Azure provider in the example above is configured to use OIDC authentication. This authentication flow is based on a mutual trust relationship set up between the two platforms (i.e. Azure and HCP Terraform). I won’t go through the details of how this is set up, but the code is available in the demo repository and you can also reference the following blog posts on the topic:


There are four variables used for the authentication. I add these to my variables.tfcomponent.hcl files:
variable "identity_token" {
  type      = string
  ephemeral = true
}

variable "azure_client_id" {
  type      = string
  ephemeral = true
}

variable "azure_subscription_id" {
  type      = string
  ephemeral = true
}

variable "azure_tenant_id" {
  type      = string
  ephemeral = true
}
All of the authentication-related variables are marked as ephemeral = true. This means the values will not be persisted to the state file. More on ephemerality in Terraform here:

Terraform Ephemeral Resources
We need to pass values to these variables. The details of where these values come from are part of the deployments that we cover in the next section.
Configure deployments#
With all the components in place we are ready to start talking about deployments. A deployment is one instance of all the components configured with actual values for all the inputs. If your components represent a class in an object-oriented programming language then the deployments would be instances (objects) of this class.
Deployments are configured in one or more .tfdeploy.hcl files. All .tfdeploy.hcl files in a directory are merged together and treated as one file for a stack.
In a deployment we configure concrete values for all the inputs (variables) that our components require.
For our common-networking stack we have a single deployment named common:
deployment "common" {
  inputs = {
    name_suffix = "common"
    location    = "swedencentral"
    cidr_block  = "10.100.0.0/16"
    subnets = {
      dev = {
        index       = 0
        name_suffix = "nomad-dev"
        size        = 8
      }
      prod = {
        index       = 1
        name_suffix = "nomad-prod"
        size        = 8
      }
    }

    identity_token        = identity_token.azurerm.jwt
    azure_client_id       = store.varset.azure.ARM_CLIENT_ID
    azure_tenant_id       = store.varset.azure.ARM_TENANT_ID
    azure_subscription_id = store.varset.azure.ARM_SUBSCRIPTION_ID
  }
}
The simplest form of a deployment block takes a single argument: inputs. In the inputs argument you provide values for all variable blocks in your variables.tfcomponent.hcl file.
For the authentication arguments I have not configured literal values, instead I reference two other types of blocks.
The first block is the identity_token block:
identity_token "azurerm" {
  audience = ["api://AzureADTokenExchange"]
}
This block handles authenticating to Azure. As mentioned before, this works because of a pre-established trust relationship with the Azure platform. Without this trust relationship you would not get a valid token out from this block.
We pass an identity token to the identity_token argument in the deployment using the reference identity_token.azurerm.jwt.
The second type of block is the store block:
store "varset" "azure" {
  name     = "AZURE-TERRAFORM-STACK-OIDC"
  category = "env"
}
The store block allows me to read a variable set that I have in my HCP Terraform environment. In the block above I read the variable set named AZURE-TERRAFORM-STACK-OIDC. This variable set contains a number of environment variables (category = "env"). Specifically I have stored variables named ARM_CLIENT_ID, ARM_TENANT_ID, and ARM_SUBSCRIPTION_ID. The values of these variables are passed to the corresponding variables that configures the Azure provider as we saw in the previous section.
To be able to read the variable set and its contents it must either be global (i.e. apply to my whole organization on HCP Terraform) or be assigned specifically to the project and/or stack that wants to read it.
For the cluster-stack I add two deployments, one for a dev environment and one for a prod environment:
deployment "dev" {
  inputs = {
    name_suffix = "nomad-dev"
    location    = "swedencentral"
    subnet_id   = upstream_input.common.subnet_ids["dev"]

    identity_token        = identity_token.azurerm.jwt
    azure_client_id       = store.varset.azure.ARM_CLIENT_ID
    azure_tenant_id       = store.varset.azure.ARM_TENANT_ID
    azure_subscription_id = store.varset.azure.ARM_SUBSCRIPTION_ID
  }
}

deployment "prod" {
  inputs = {
    name_suffix = "nomad-prod"
    location    = "swedencentral"
    subnet_id   = upstream_input.common.subnet_ids["prod"]

    identity_token        = identity_token.azurerm.jwt
    azure_client_id       = store.varset.azure.ARM_CLIENT_ID
    azure_tenant_id       = store.varset.azure.ARM_TENANT_ID
    azure_subscription_id = store.varset.azure.ARM_SUBSCRIPTION_ID
  }
}
These deployments look similar to what we saw before. In essence you just pass in concrete values for all the variables and each deployment will result in one concrete instance of each module.
Note how the subnet_id argument references an upstream_input block. I will cover what this is in the next section.
Pass data between stacks#
Even if Terraform stacks represent a way of deploying large scale infrastructure in a simple and scalable way you will still split your infrastructure in multiple stacks. With that arises the need to pass data from one stack to another stack.
The stack outputting data that is read in a different stack is called the upstream stack.
In my example the common-networking stack outputs data that is used in the cluster stack. It starts in the common-networking stack where I have added output blocks to my stack configuration (.tfcomponent.hcl files):
output "virtual_network_id" {
  description = "Virtual network ID"
  type        = string
  value       = component.virtual_network.vnet_id
}

output "subnet_ids" {
  description = "Subnet IDs"
  type        = map(string)
  value       = component.virtual_network.subnet_ids
}
These blocks tells Terraform stacks that each instance (deployment) of my stack components outputs these values.
To publish a concrete output from my stack I will need to add publish_output blocks to my .tfdeploy.hcl files:
publish_output "virtual_network_id" {
  description = "Virtual network ID"
  value       = deployment.common.virtual_network_id
}

publish_output "subnet_ids" {
  description = "Subnet IDs"
  value       = deployment.common.subnet_ids
}
The value argument of the publish_output blocks reference the corresponding output defined from my components.
Now we have published outputs from one stack, what is left is to consume the outputs as inputs in the cluster stack. I add an upstream_input block to my .tfdeploy.hcl files for the cluster stack:
upstream_input "common" {
  type   = "stack"
  source = "app.eu.terraform.io/mattias-fjellstrom/azure-terraform-stacks/common-networking"
}
For the upstream_input block I say that the input comes from a stack (type = "stack") and that the source is the stack named common-networking in the project named azure-terraform-stacks in the organization called mattias-fjellstrom on HCP EU (app.eu.terraform.io).
I can read the published values from this block using the reference upstream_input.common.<name of published output>. This is what I did in the deployments defined in the cluster stack:
deployment "prod" {
  inputs = {
    # other inputs omitted for brevity ...

    subnet_id = upstream_input.common.subnet_ids["prod"]
  }
}
If the output of an upstream stack changes it will automatically trigger a run for the downstream stack.
Deployment groups and automation#
As mentioned in the introduction: HCP EU requires a contract with IBM/HashiCorp for paid features. One of these paid features is deployment groups and automation related to those.
Every deployment belongs to a deployment group. If you do not explicitly define what deployment group a deployment belongs to it will belong to its default deployment group.
You can define your own deployment group in .tfdeploy.hcl files. You can build automation using deployment_auto_approve blocks where you configure a condition that will grant a deployment to proceed without an explicit approval. These rules can be added to deployment groups. This is currently the only type of automation you can add to deployment groups.
An example of configuring a deployment_auto_approve block and adding it to a deployment_group looks like this:
deployment_auto_approve "successful_plan" {
  check {
    condition = context.plan.applyable
    reason    = "The plan can't be applied"
  }
}

deployment_group "dev_group" {
  auto_approve_checks = [
    deployment_auto_approve.successful_plan
  ]
}
The deployment_auto_approve rule checks of the current terraform plan has produced an output that can be applied. In essence this means that the plan did not contain any errors. If the condition check fails the error message in reason is logged in the output for you to review.
The data you base decisions on in the deployment_auto_approve block is the context object. This contains details of the current Terraform operation, including details around what types of changes will happen (creating new resources, destroying old resources, updating resources). You can study the contents of the context object in the documentation.
When you have a custom deployment group and you have added one or more auto-approval conditions you can add deployments to the group to activate the automation:
deployment "dev" {
  deployment_group = deployment_group.dev_group

  inputs = {
    # ...
  }
}
A deployment can only belong to one deployment group.
If you use the default (implicit) deployment groups you can’t add any deployment_auto_approve blocks to it. Thus, if you are not using a premium HCP Terraform plan you are stuck using manual approvals.
Provision stacks#
I have added my components and my deployments. I have configured authentication to Azure, and I have passed data between different stacks. I am now ready to provision the stacks and start using them.
In the next section I will go through a few operational steps for stacks but before that we need to set up our stacks for the first time.
In the demo code I provision the stacks using Terraform. This includes setting up a repository for the stack configuration, and creating the stack resource itself and connecting it to the repository. The code to do this is shown next for the common-networking stack:
resource "github_repository" "common_networking_stack" {
  name         = "common-networking-stack"
  description  = "Terraform stack for common networking resources"
  homepage_url = "https://mattias.engineer"
  topics       = ["terraform", "stacks", "hcp"]

  has_discussions = false
  has_downloads   = false
  has_issues      = false
  has_projects    = false
  has_wiki        = false

  gitignore_template = "Terraform"
  visibility         = "private"
}

locals {
  common_networking_stack_path      = "${path.module}/repos/stacks/common-networking"
  common_networking_stack_filenames = fileset(local.common_networking_stack_path, "**")
  common_networking_stack_file_paths = {
    for filename in local.common_networking_stack_filenames : filename => "${local.common_networking_stack_path}/${filename}"
  }
}

resource "github_repository_file" "common_networking" {
  for_each = local.common_networking_stack_file_paths

  repository = github_repository.common_networking_stack.name
  file       = each.key

  content = each.key == "components.tfcomponent.hcl" ? templatefile(each.value, {
    hcp_organization_name = data.tfe_organization.current.name
  }) : file(each.value)
}

resource "tfe_stack" "common_networking" {
  name       = "common-networking"
  project_id = hcp_project.default.resource_id

  vcs_repo {
    identifier     = github_repository.common_networking_stack.full_name
    oauth_token_id = data.tfe_oauth_client.github.oauth_token_id
    branch         = "main"
  }

  depends_on = [
    github_repository_file.common_networking,
  ]
}
If you set up a stack using this method, make sure you add an explicit dependency to your stack resource waiting for the GitHub repository files to be created before the stack is created. Otherwise you will get multiple stack triggers happening at once after you have provisioned this infrastructure.
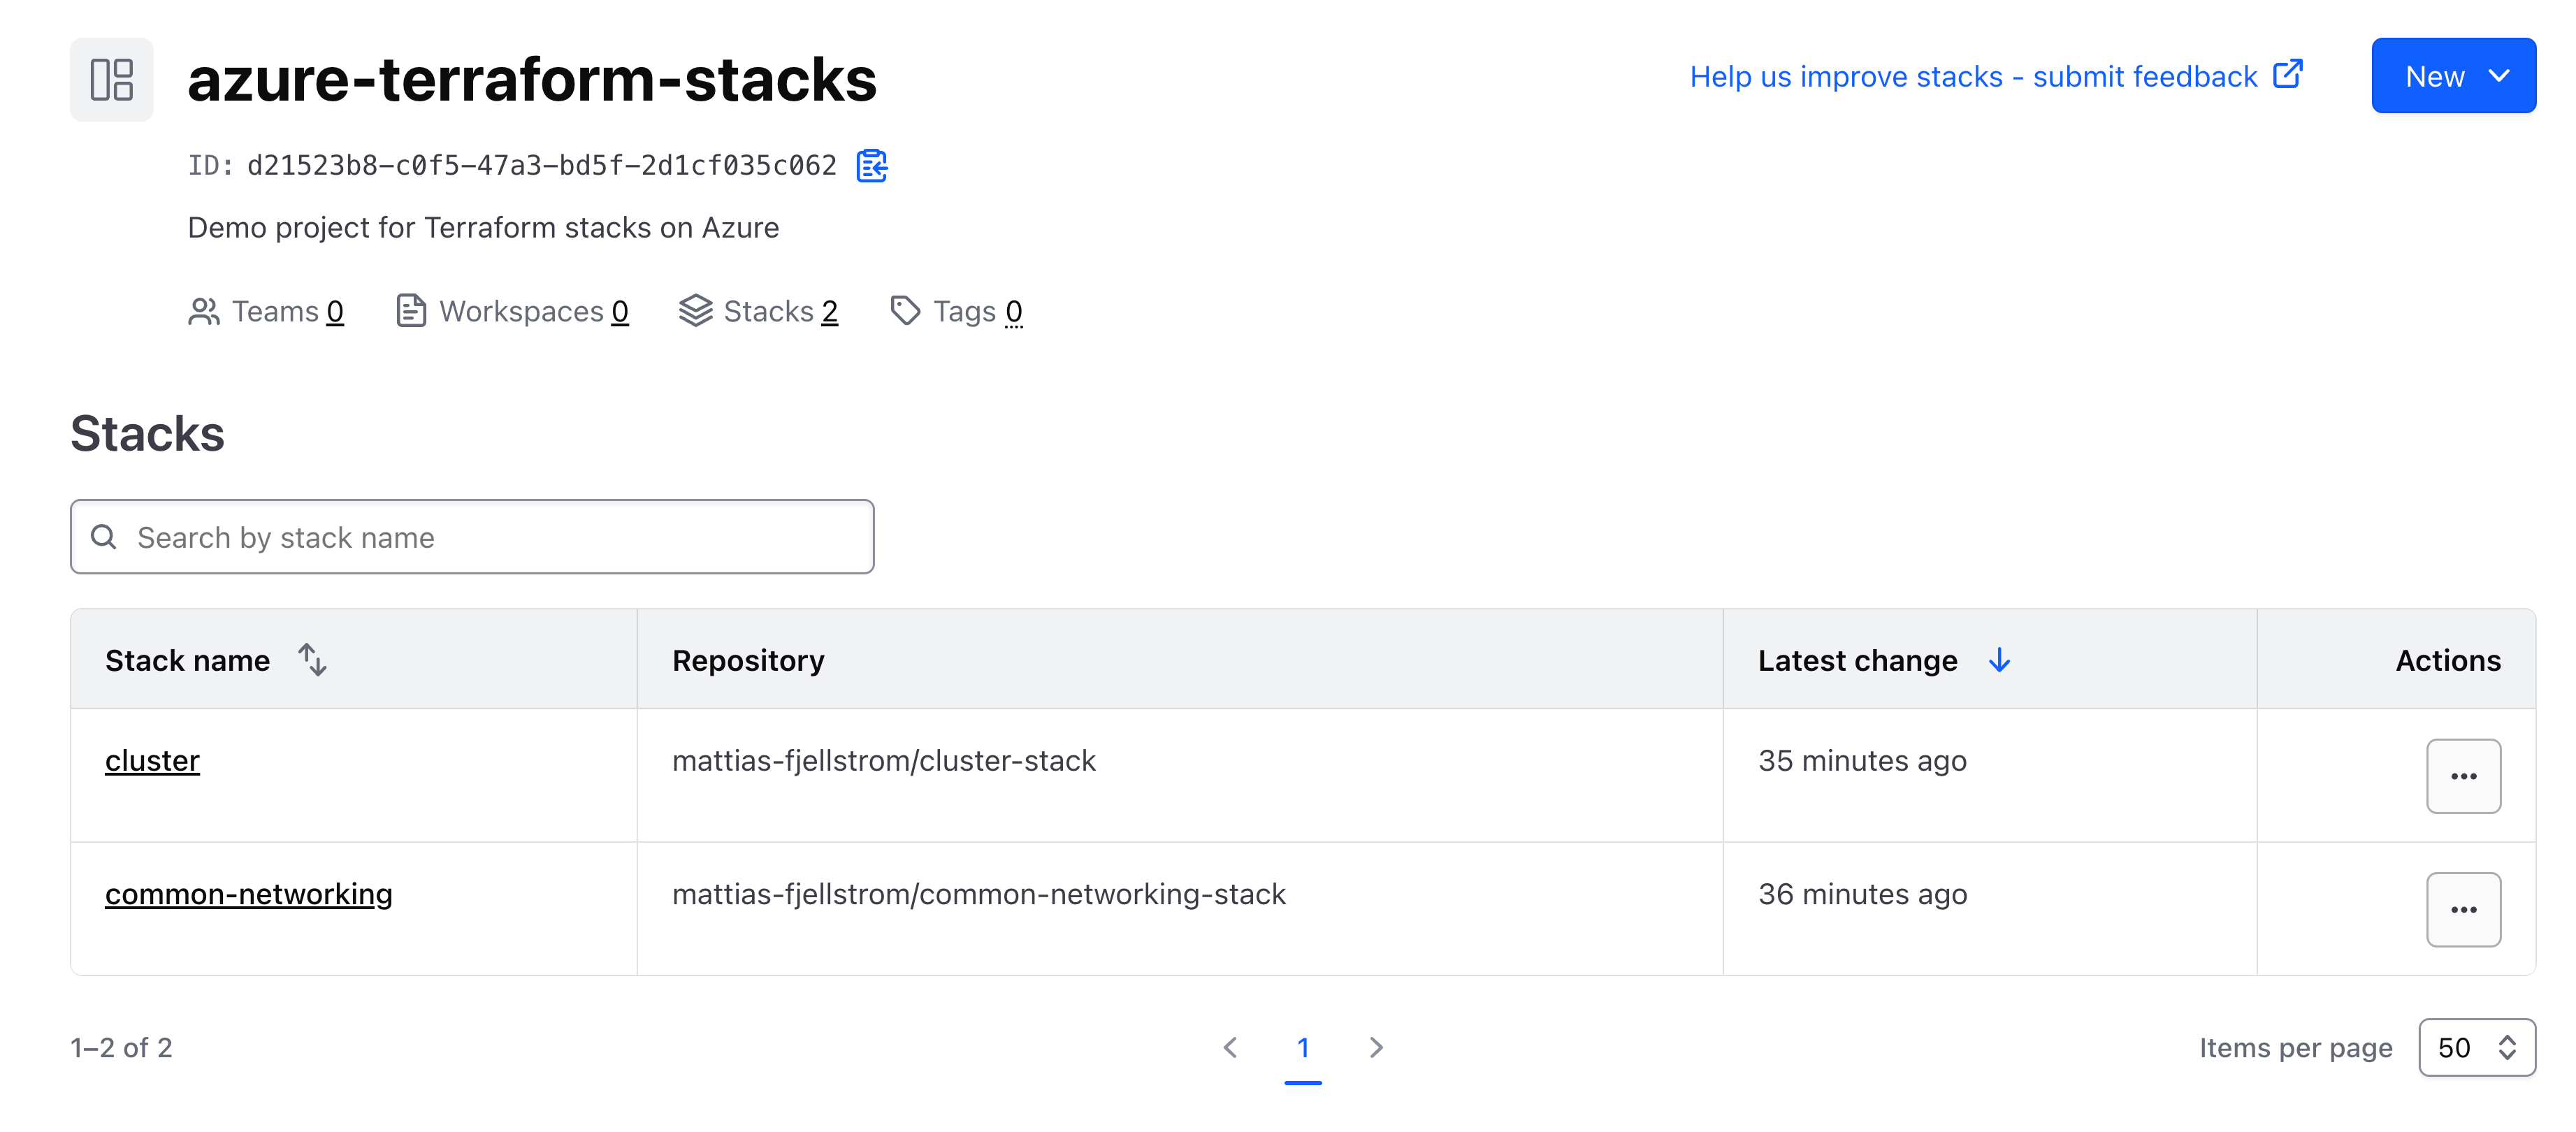
After provisioning the demo infrastructure I can see my two stacks on HCP Terraform:
To trigger a first run I can either open the common-networking stack and click on Fetch configuration from VCS or I can use the Terraform CLI. Login to HCP Terraform EU using terraform login app.eu.terraform.io in case you have not already done so. You will also need to set the TF_STACKS_HOSTNAME environment variable to app.eu.terraform.io to use the terraform stacks commands:
$ export TF_STACKS_HOSTNAME=app.eu.terraform.io
$ terraform stacks configuration fetch \
    -organization-name=mattias-fjellstrom \
    -project-name=azure-terraform-stacks \
    -stack-name=common-networking
Fetching stack configuration...

Configuration for Stack (id: 'st-nrmnkrpFfmjjmEbJ') was fetched
Configuration ID: stc-Wx328pQxCQnT8ocJ
Sequence Number: 1

See run at: https://app.eu.terraform.io/app/mattias-fjellstrom/<truncated>
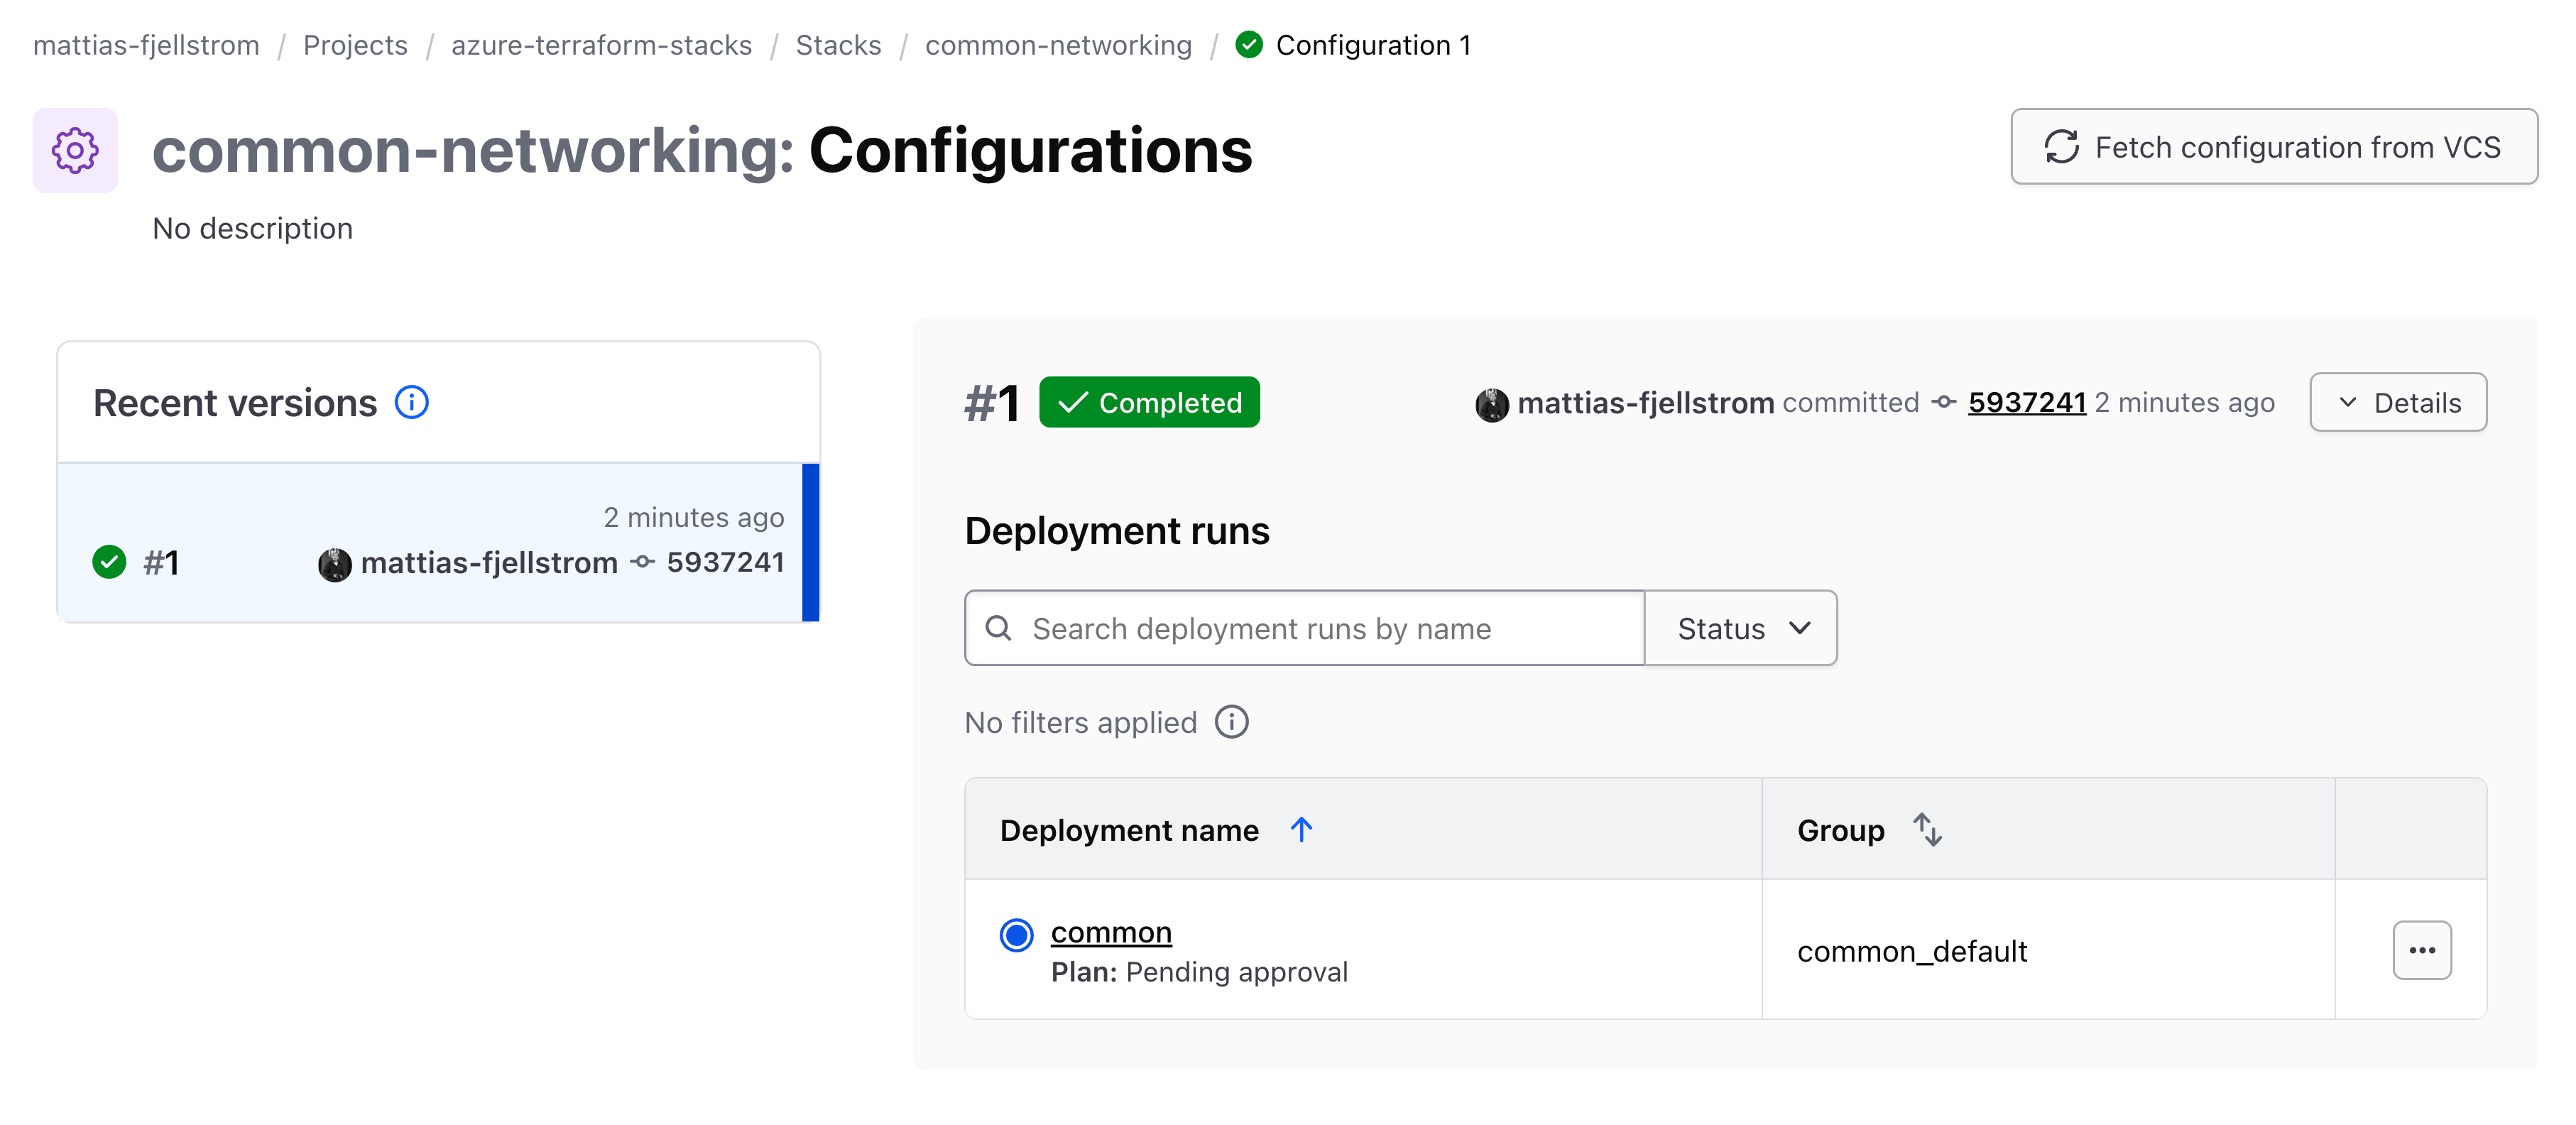
The UI indicates that the configuration was fetched and that the deployment named common has started:
We can continue to use the Terraform CLI to approve all plans so that the resources are provisioned. To do that we need to get the deployment run ID.
Use the following command to list the current deployment runs:
$ terraform stacks deployment-run list \
    -organization-name=mattias-fjellstrom \
    -project-name=azure-terraform-stacks \
    -stack-name=common-networking \
    -deployment-group-name=common_default

Deployment Run ID     |        Created At        |        Updated At        |
sdr-iP1v8D3ntePxiJWb  |    Nov 17, 2025 17:40    |    Nov 17, 2025 17:40    |
The deployment run ID is sdr-iP1v8D3ntePxiJWb. Approve all the plans for this deployment run:
$ terraform stacks deployment-run approve-all-plans \
    -deployment-run-id=sdr-iP1v8D3ntePxiJWb
Approving all plans for deployment run...
Deployment Run: 'sdr-iP1v8D3ntePxiJWb' approved all plans
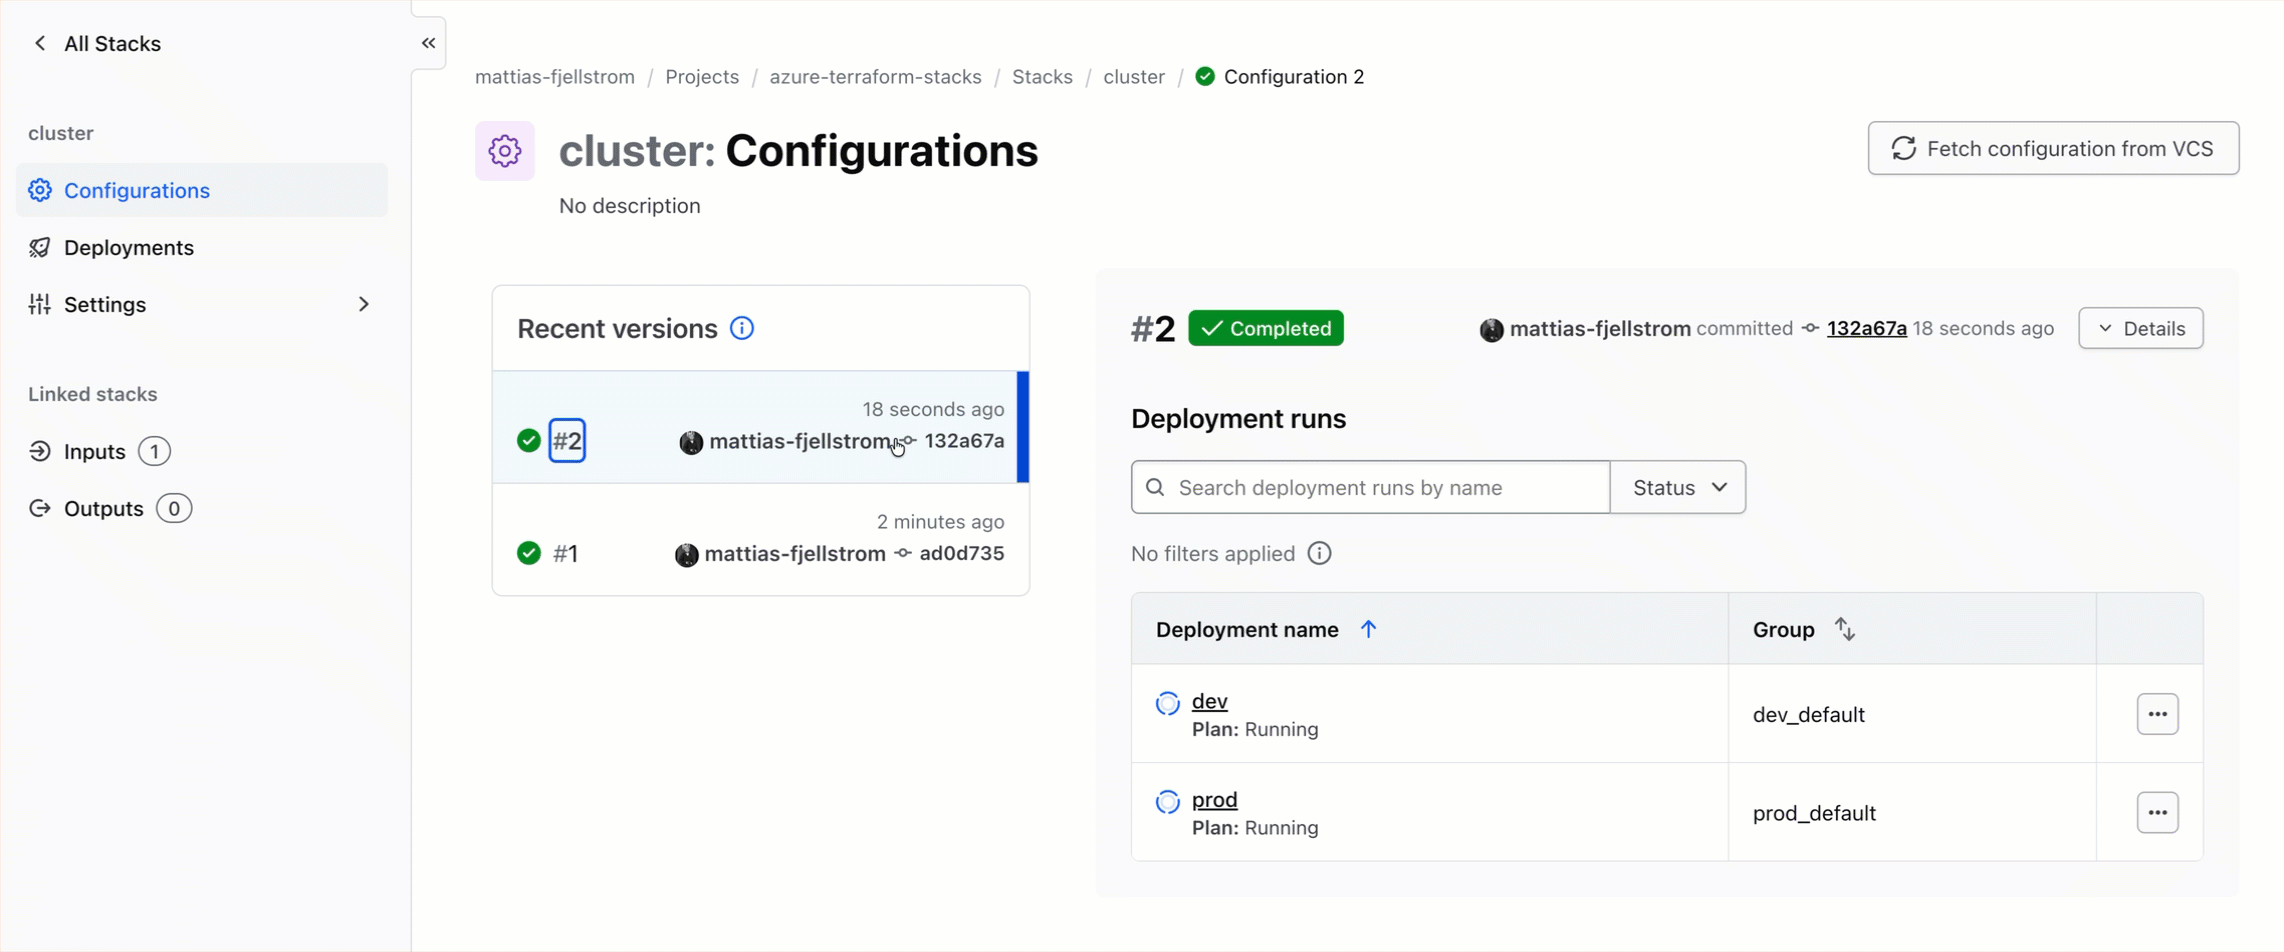
I also need to trigger my cluster stack. I could use the same Terraform CLI commands that I used above, or I can use the UI as illustrated in the video below.
After the cluster stack deployment is complete I have my infrastructure provisioned and ready to use.
Currently there is no convenient way to publish an output from a stack and make it available in a nice way from the user interface. The whole output from my stacks deployment is a working Nomad cluster, so I want to make sure it works as intended. I can find the IP address of the Nomad cluster by going to my Azure environment, and open the rg-nomad-dev (or rg-nomad-prod) resource group and find the public IP resource for the load balancer:
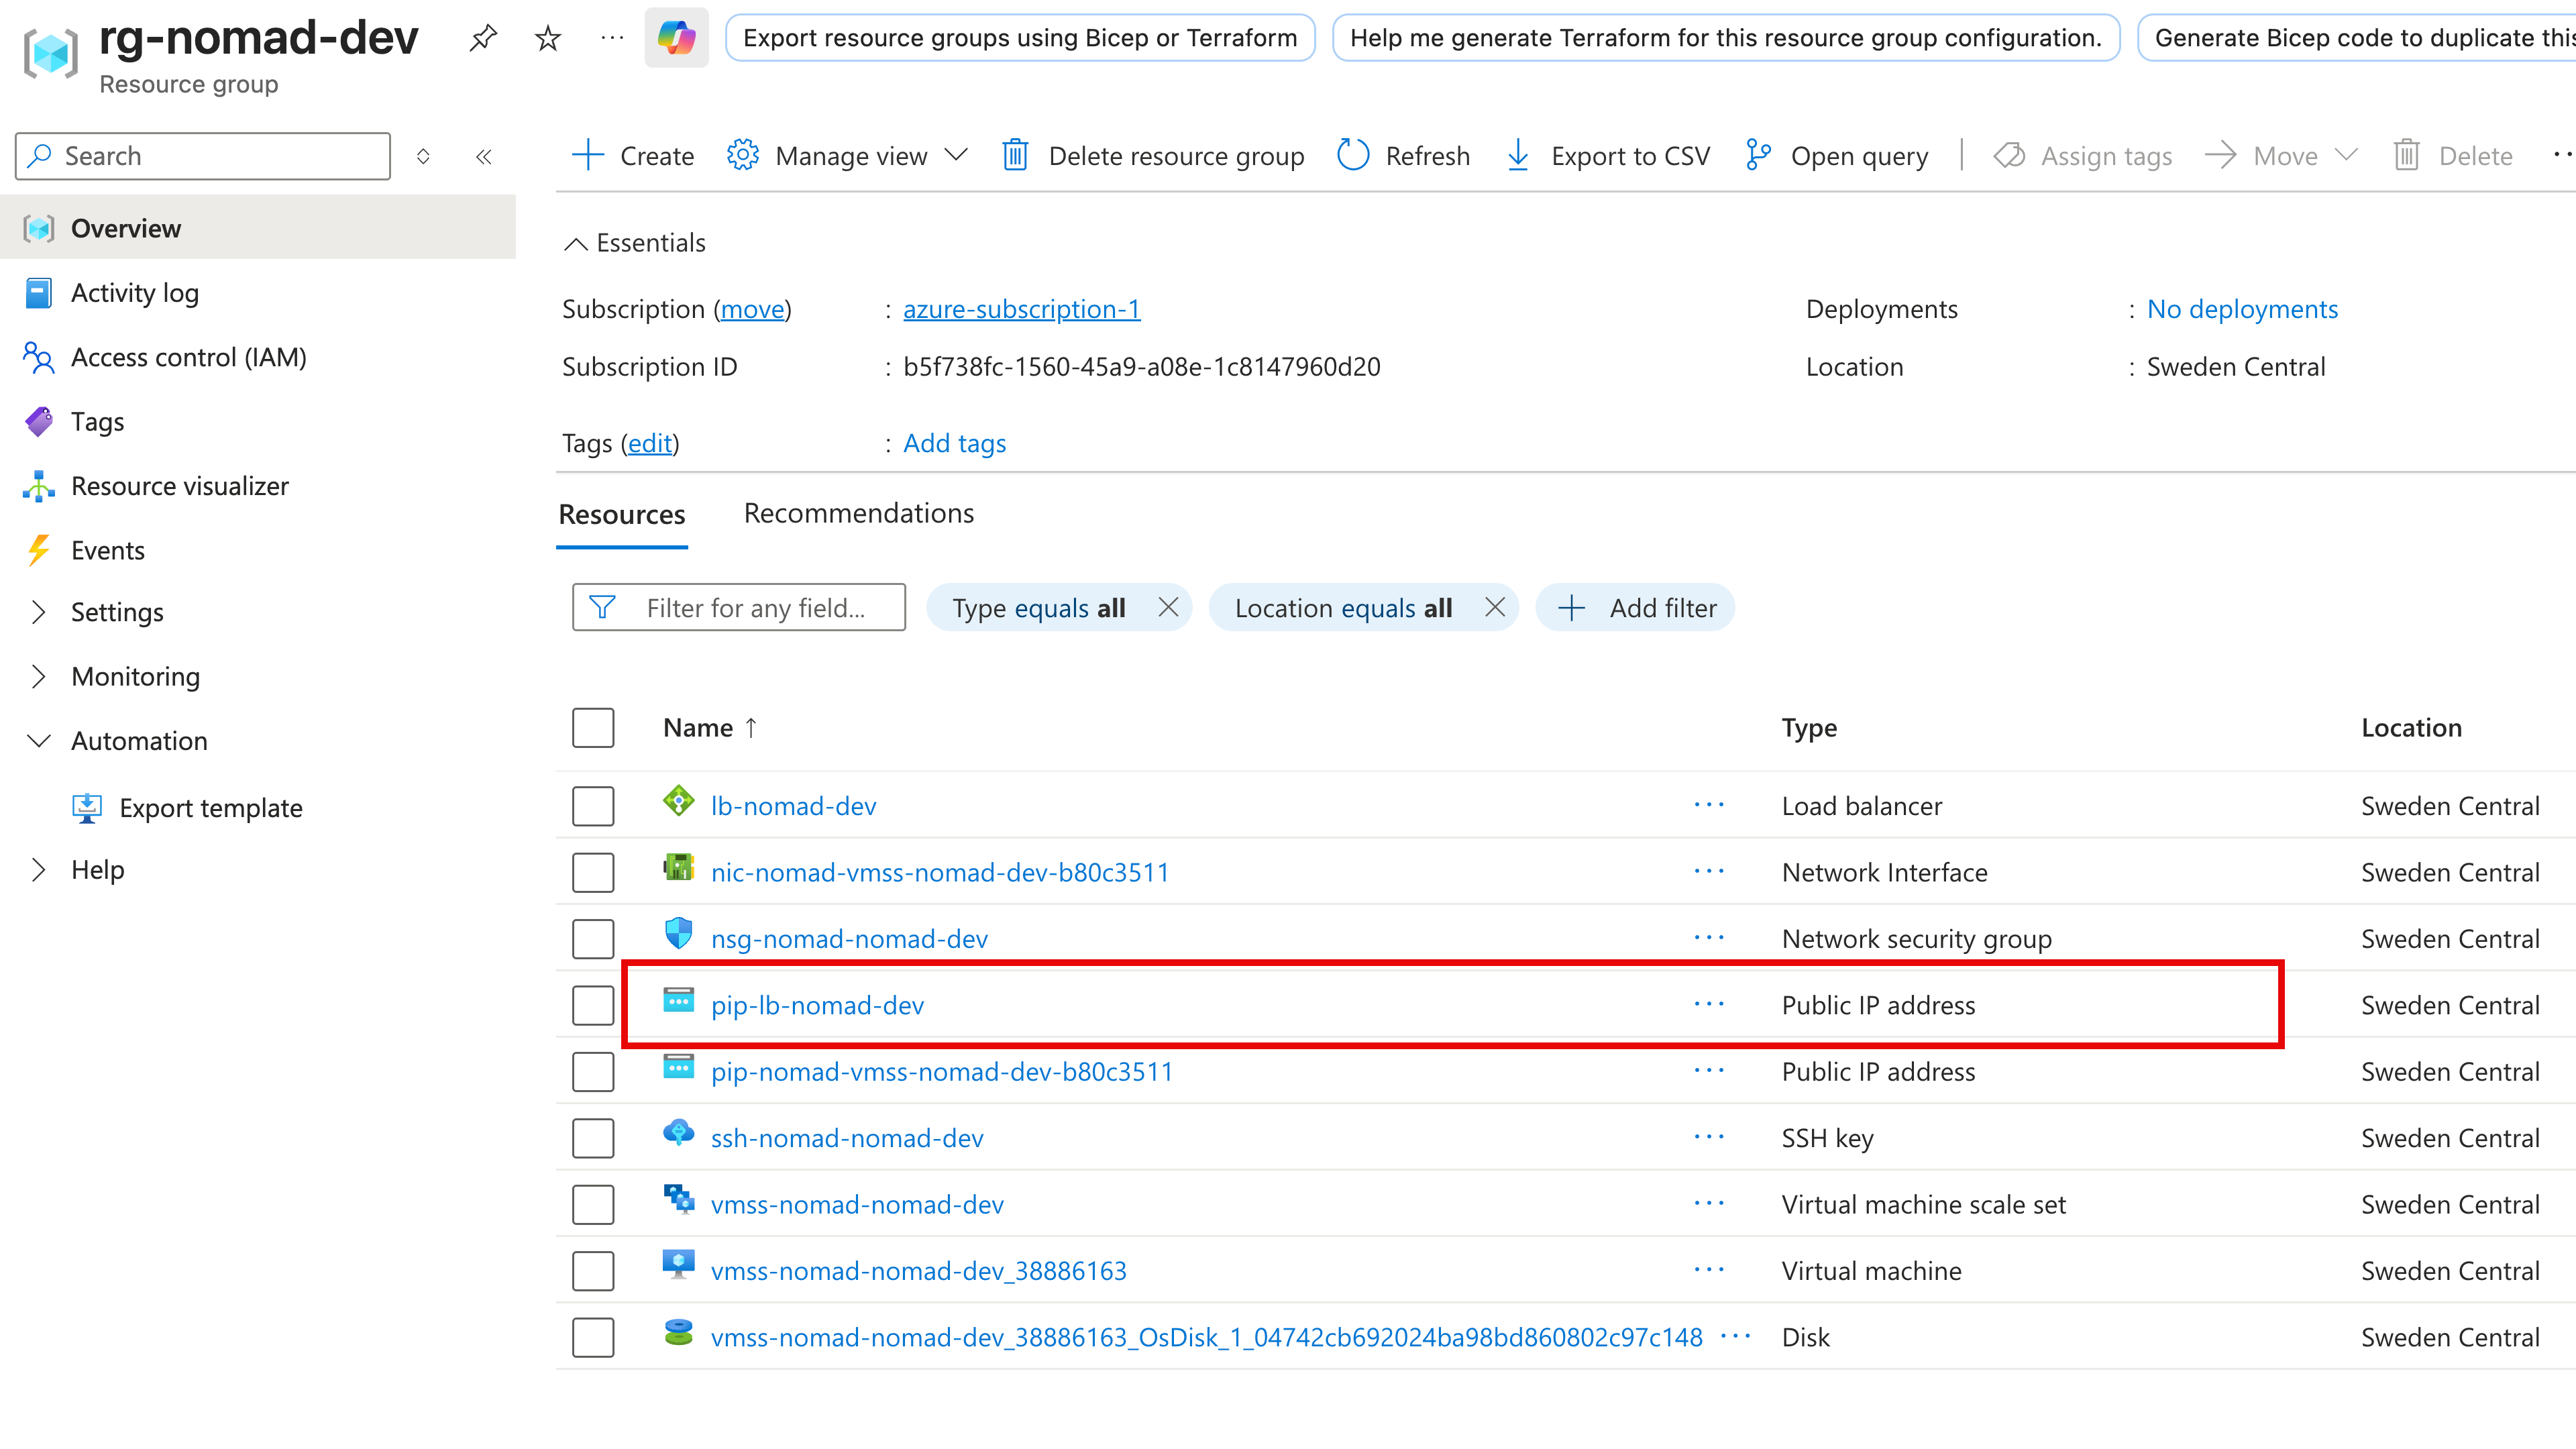
Clicking on that resource shows the IP address:
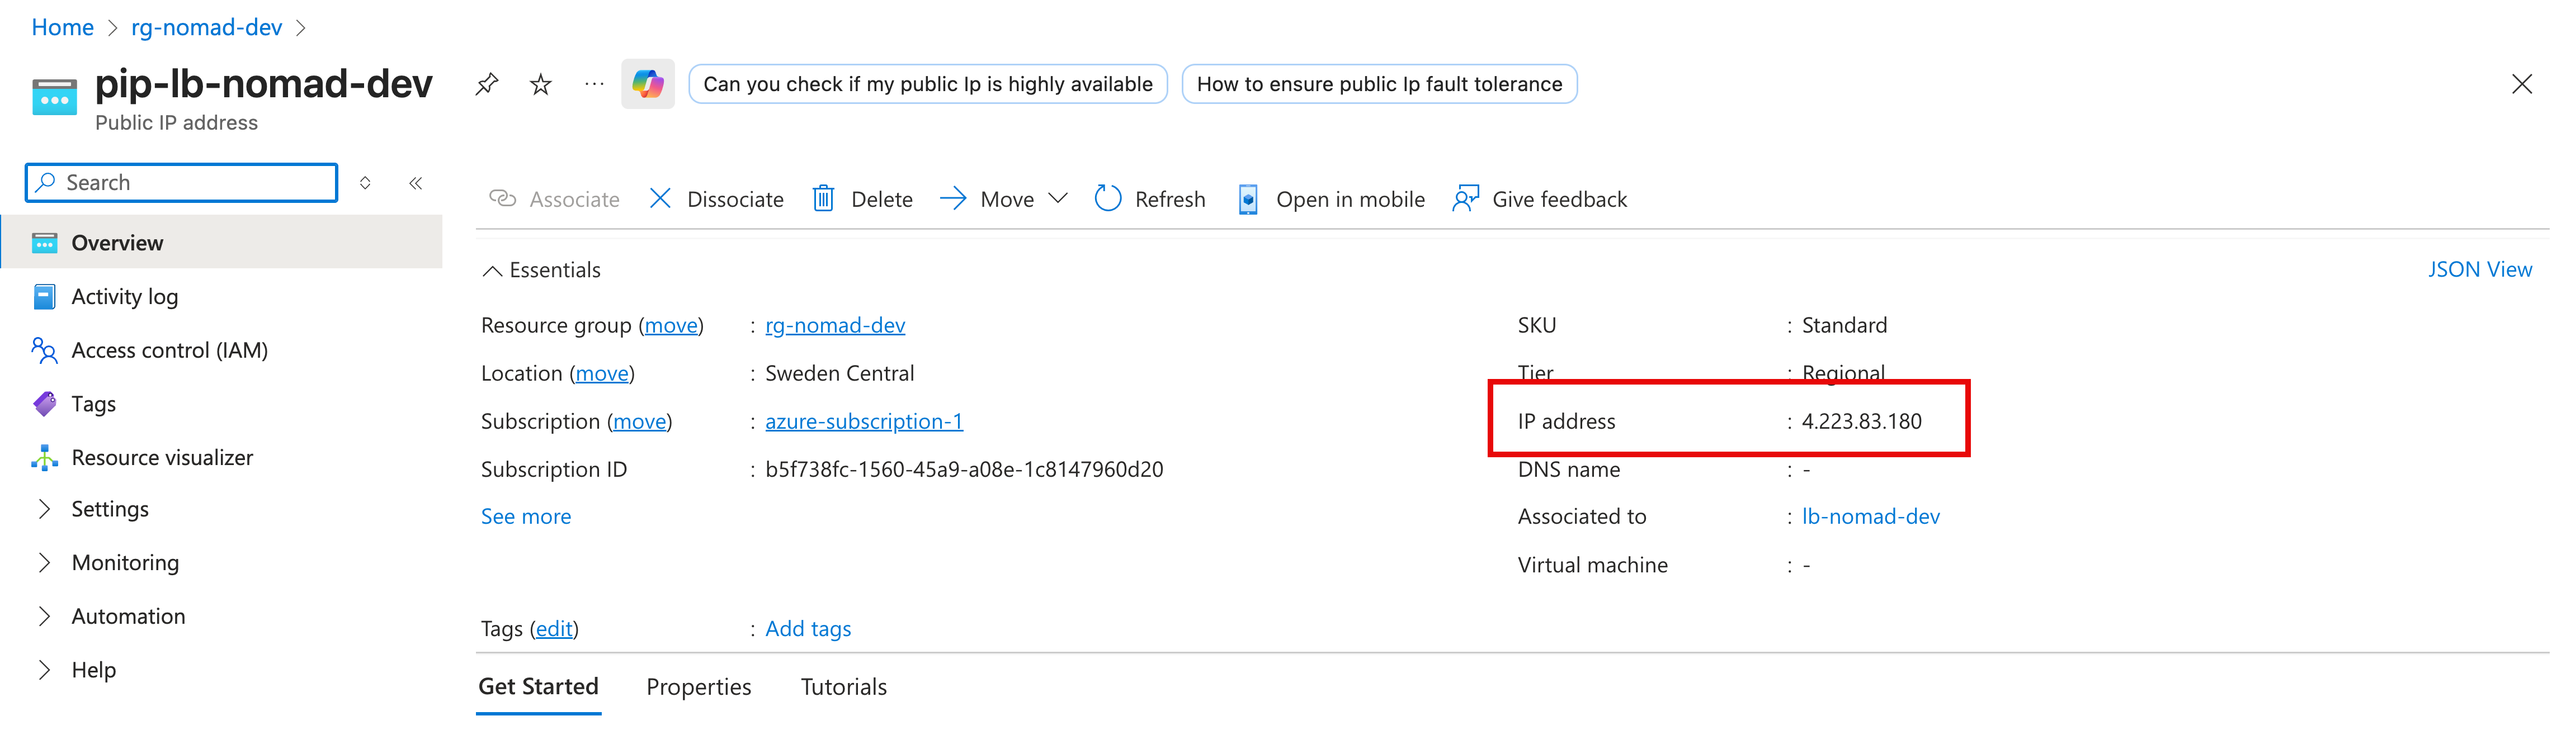
If I open a browser to http://4.223.83.180:4646 I come to the Nomad cluster admin interface:
Operating stacks#
Operating Terraform stacks is a lot like operating a HCP Terraform workspace. You make changes to the code, and you apply these changes.
Add and remove components#
To add a new component simply add a component block to your .tfcomponent.hcl files and configure it accordingly. You may have to add variables using variable blocks, and possible output blocks to expose outputs from the components. You have to make the corresponding changes in your deployments (e.g. passing in values for any new variable).
When you add a component and commit the code the component will be added to each deployment in your stack. As with any Terraform resource you need to take care so that you configure the resources in the component appropriately. This means care must be taken so that resources that require unique names do not get the same name in each deployment.
Removing a component simply means deleting the corresponding component block from your .tfcomponent.hcl files. If there were any variables that were exclusively used in this component you can remove the corresponding variable blocks and remove the values input for these variables in the deployment blocks.
When you remove a component and commit the code the resources for that component will be destroyed from each deployment in the next run.
Considerations when adding a component:
- Do you have an appropriate module published to your private Terraform registry? Or do you have the module code locally?
- What inputs does the component require? Do you need to add variables to your stack configuration?
- Do you need to update the
inputargument for your deployments to accommodate new variables? - Does the component expose outputs that you want to pass on to other stacks? If you you need to add
outputblocks andpublish_outputblocks to the stack, as well asupstream_inputblocks to the other (consumer) stack. - Do you need to configure additional providers for the new component? Do you need authentication credentials?
Add and remove deployments#
Adding and removing deployments is straight-forward. You simply add or remove deployment blocks and commit the code to trigger a new run that will make the corresponding change. Remember that a deployment creates one new provisioned instance of each component in your stack.
Update an upstream stack#
If you make an update to a stack that publishes an output, and that output changes value, you will automatically trigger a run in a downstream stack.
Often (but not always) the outputs you share from an upstream stack are attributes of long-lived resources. One example of this is the ID of a shared virtual network. In these situations it is unlikely that you will update the value of the shared virtual network ID.
Decommission a stack#
To decommission (destroy) a stack you have two options:
- Force-delete the stack, leaving any provisioned resources intact.
- Update the stack by removing all deployments and let Terraform destroy all infrastructure, then delete the stack.
If you want to manage the resources using some other means than the stack (e.g. using normal Terraform), you can use option 1 and then import or onboard the infrastructure in your other tool (e.g. using import blocks in Terraform). If your goal is to delete the infrastructure, then you should go with option 2.
Open your stack configuration and comment out (or delete) all deployment blocks from the code. Commit the change, and approve the run for each deployment. Terraform stacks will destroy all the infrastructure.
Once the run has completed you can safely delete the corresponding stack resource.
Interacting with stacks#
There are a few common ways you will interact with your Terraform stacks.
HCP Terraform UI#
Using the HCP Terraform UI is the most visual way to interact with Terraform stacks.
There are two main views of a stack. First is the list of configuration versions:
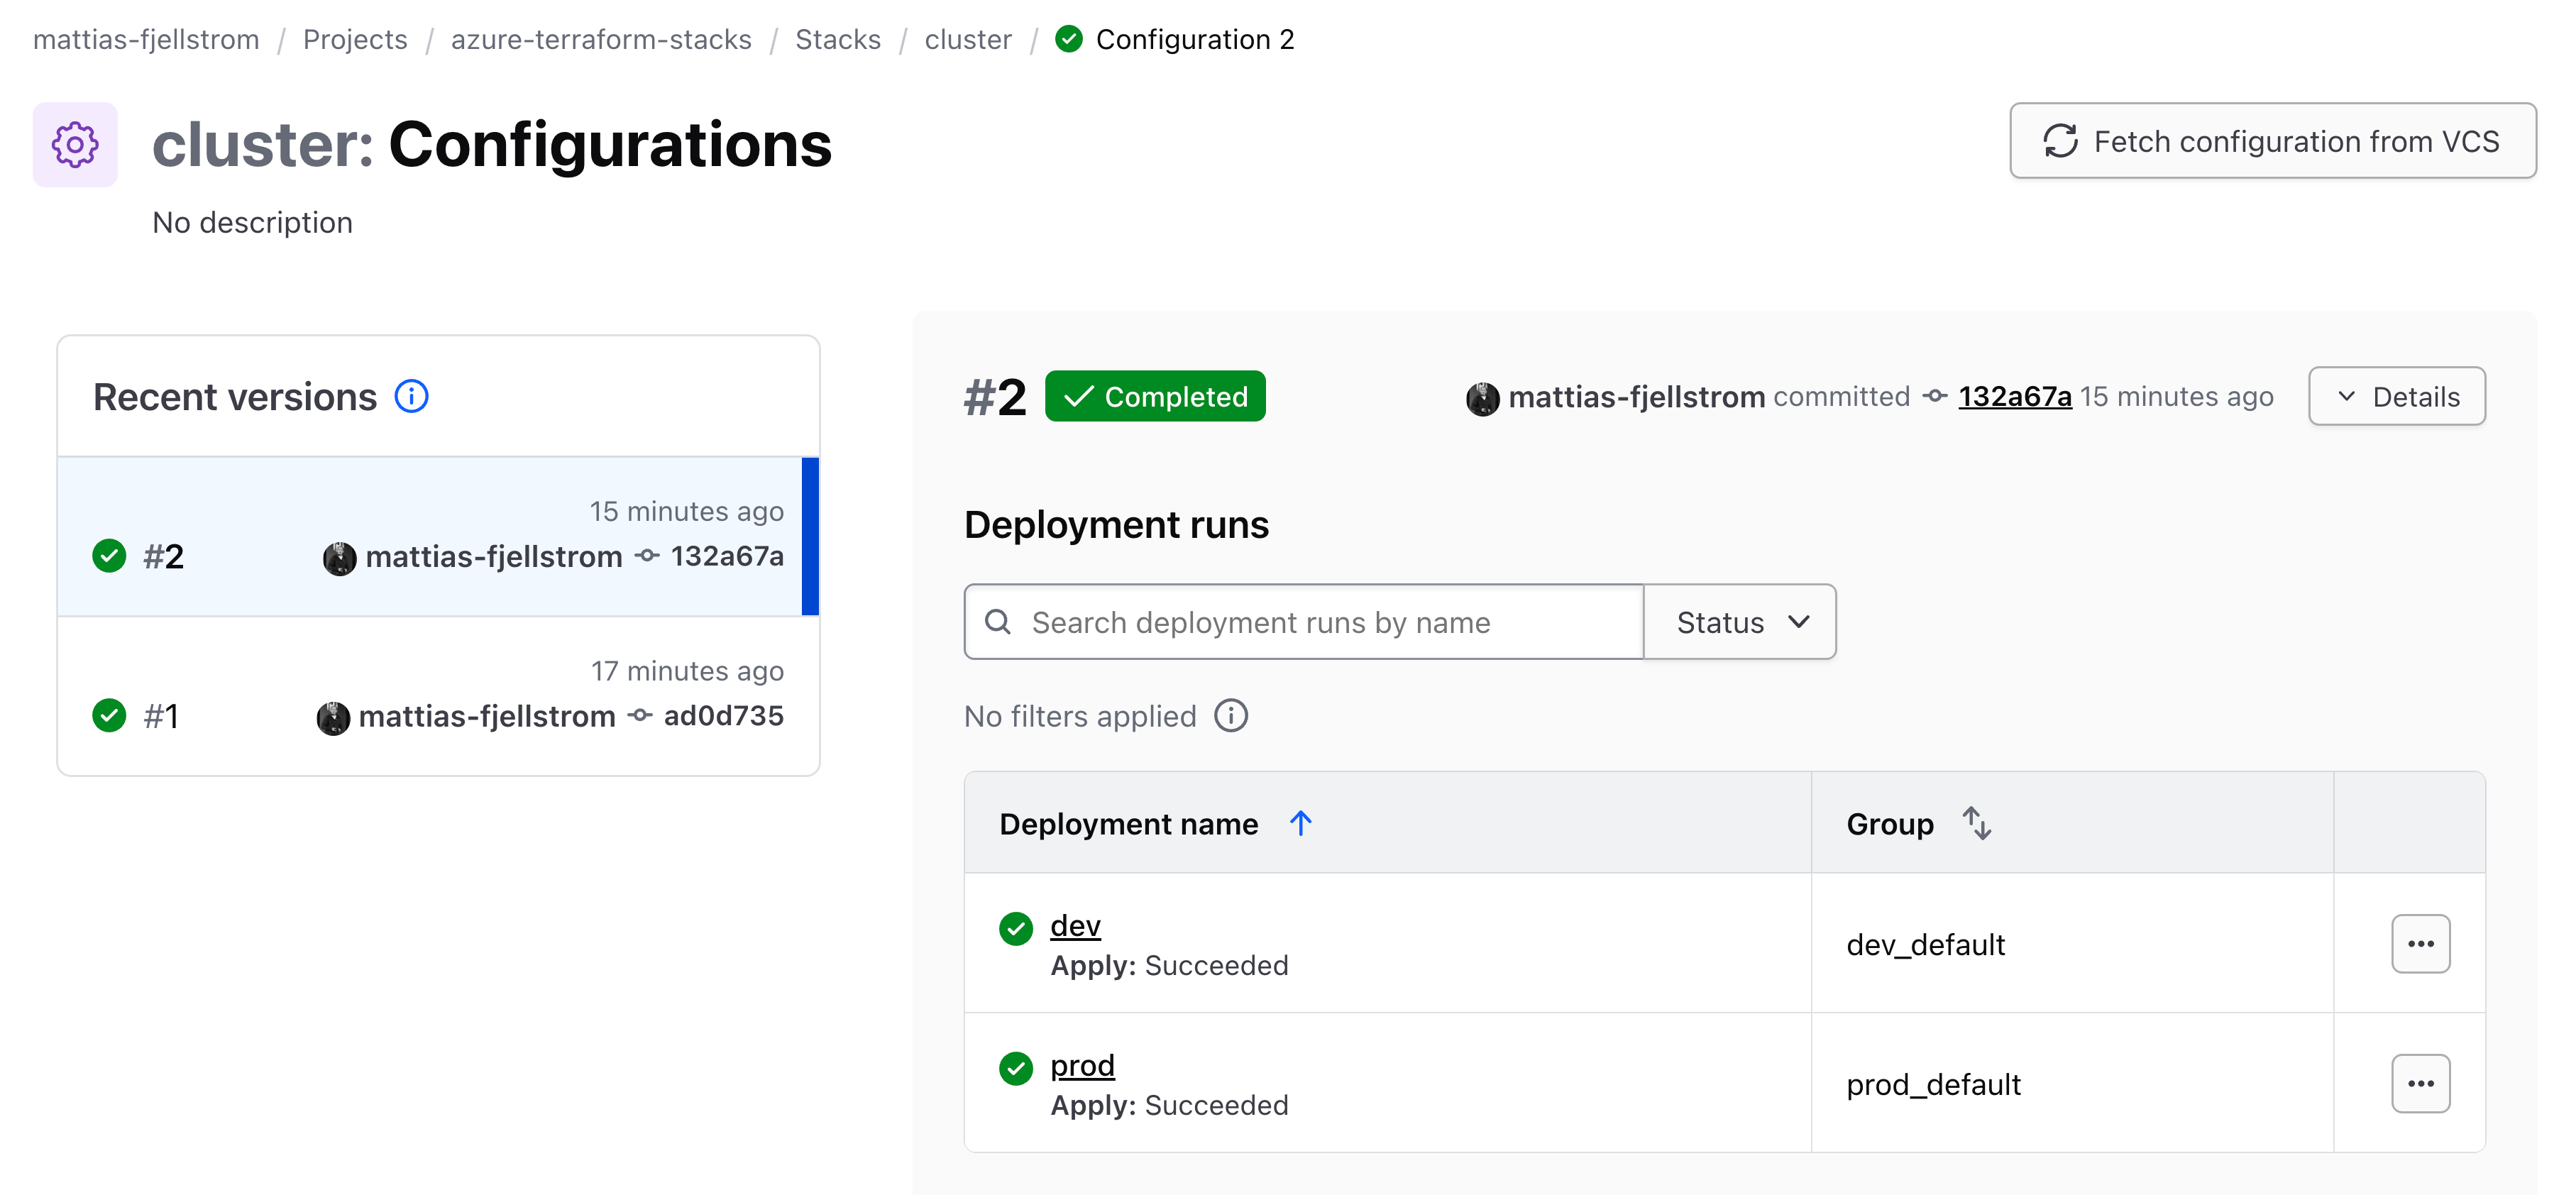
This view shows each configuration version. A configuration version corresponds to one commit to the stack repository. Think of it as a snapshot of the configuration files (.tfcomponent.hcl and .tfdeploy.hcl files) for that specific commit. You can click each configuration version to see details of what components it contains and which deployments are connected to it.
The other main view is the list of deployments:
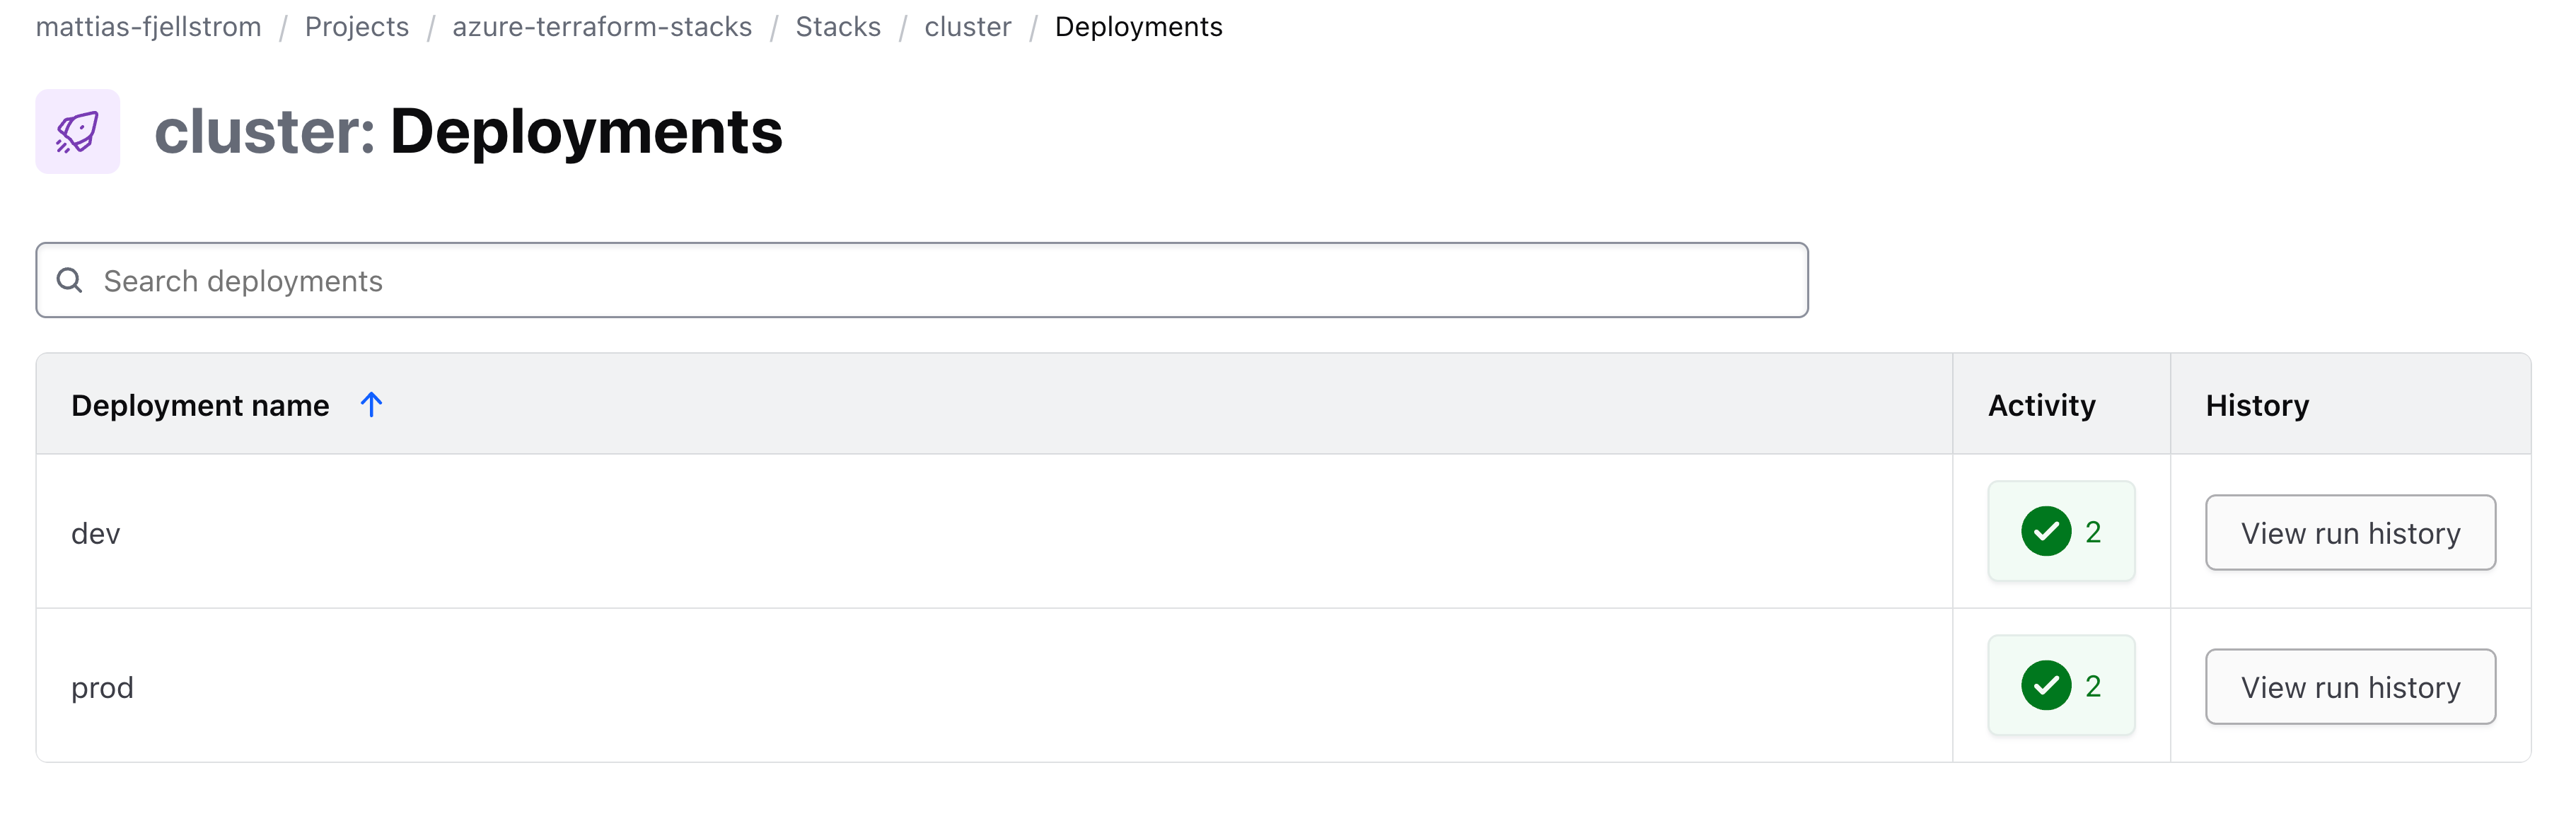
This view shows the current active deployments and the status of the latest configuration version of the deployment. Clicking into the status of the latest deployment run for one of the deployments shows the deployment timeline:
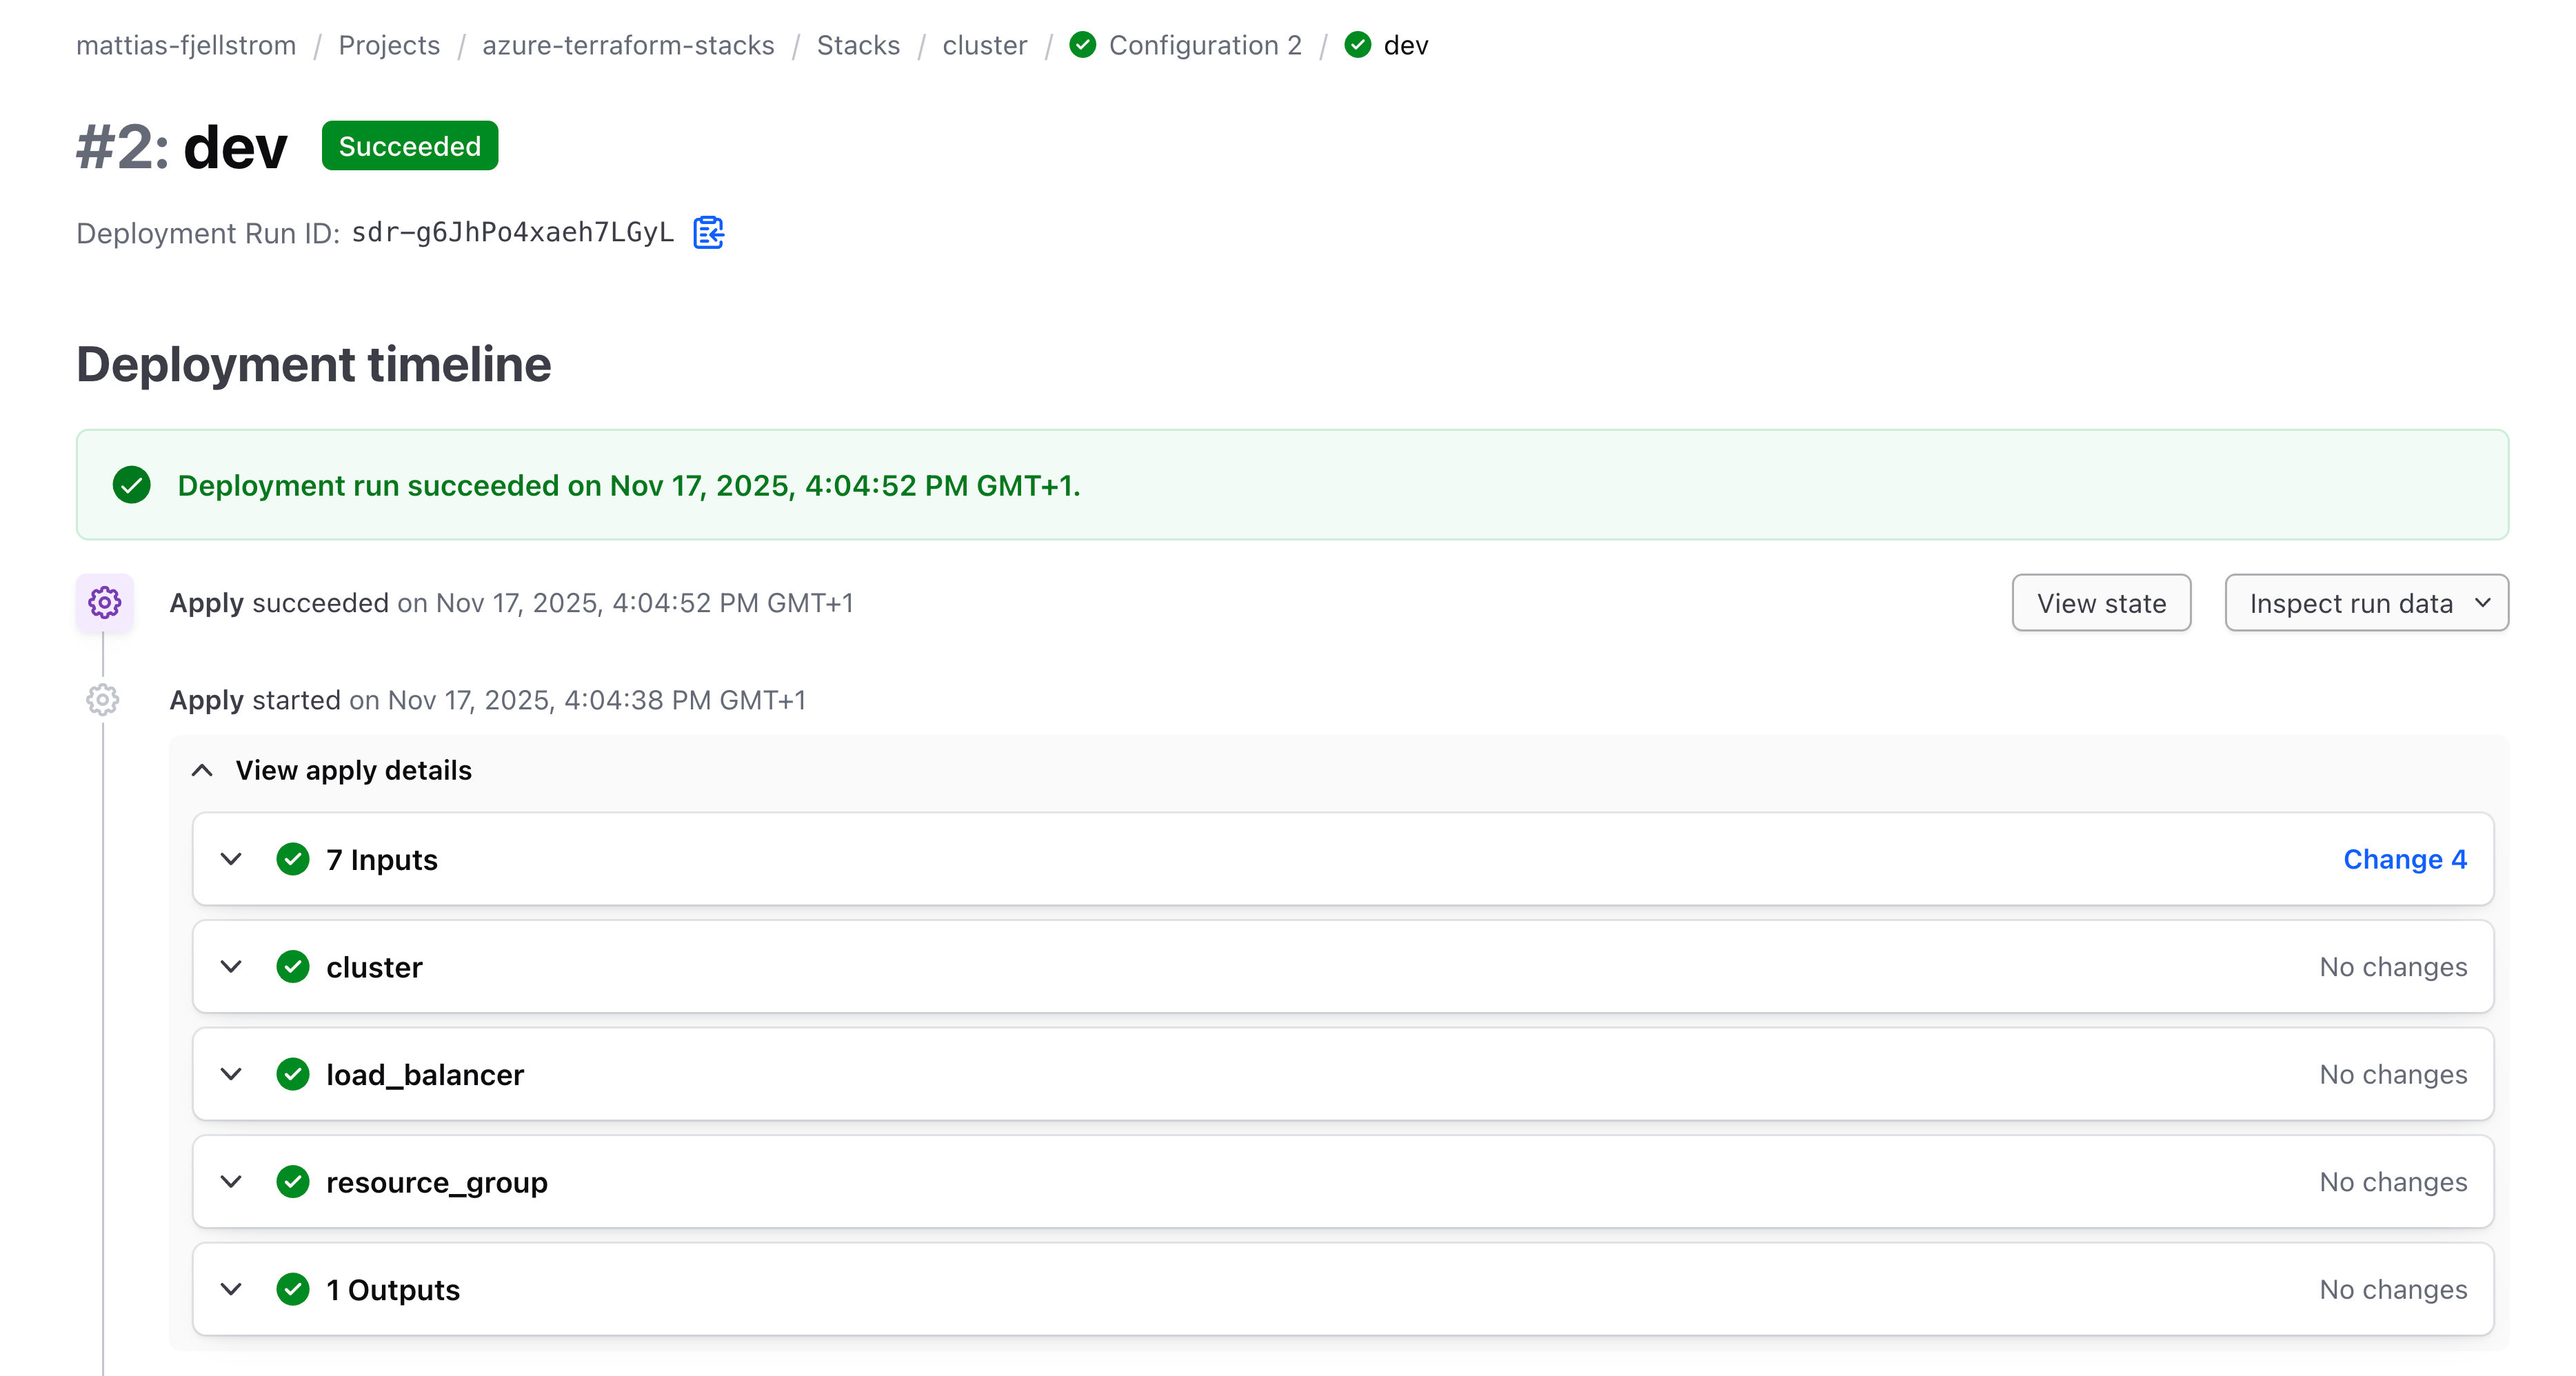
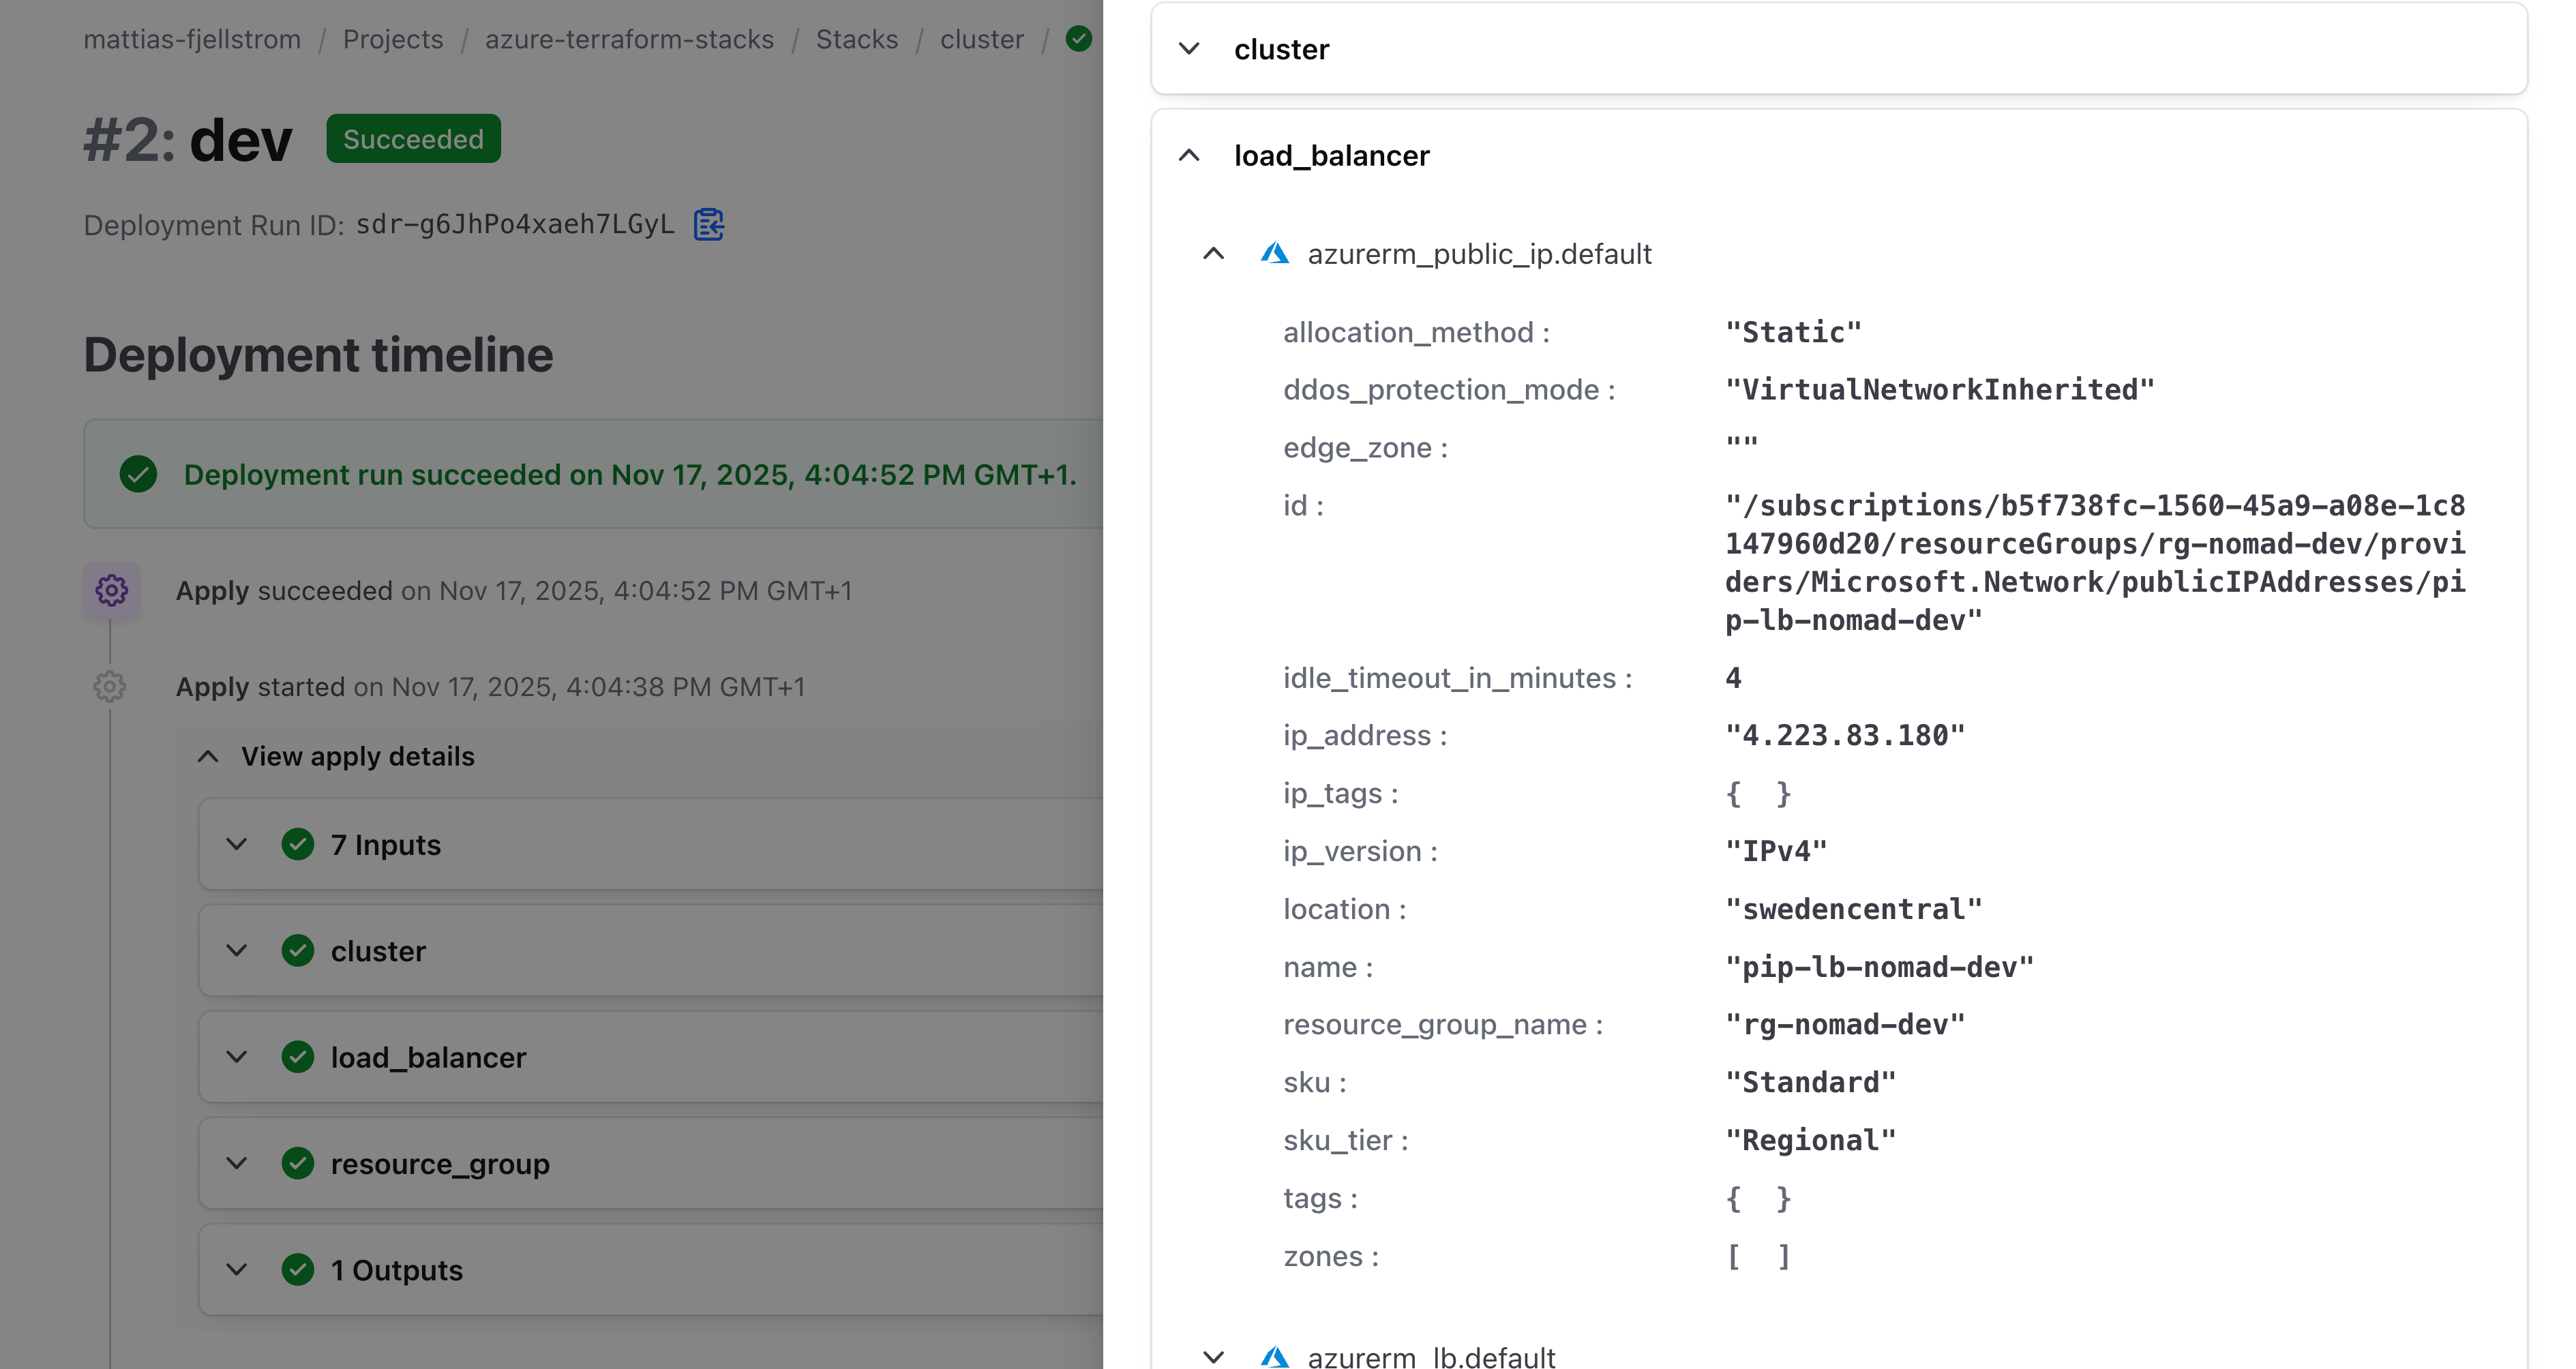
From here you can view the current state:
For a selected stack you can also view the stack inputs and outputs:
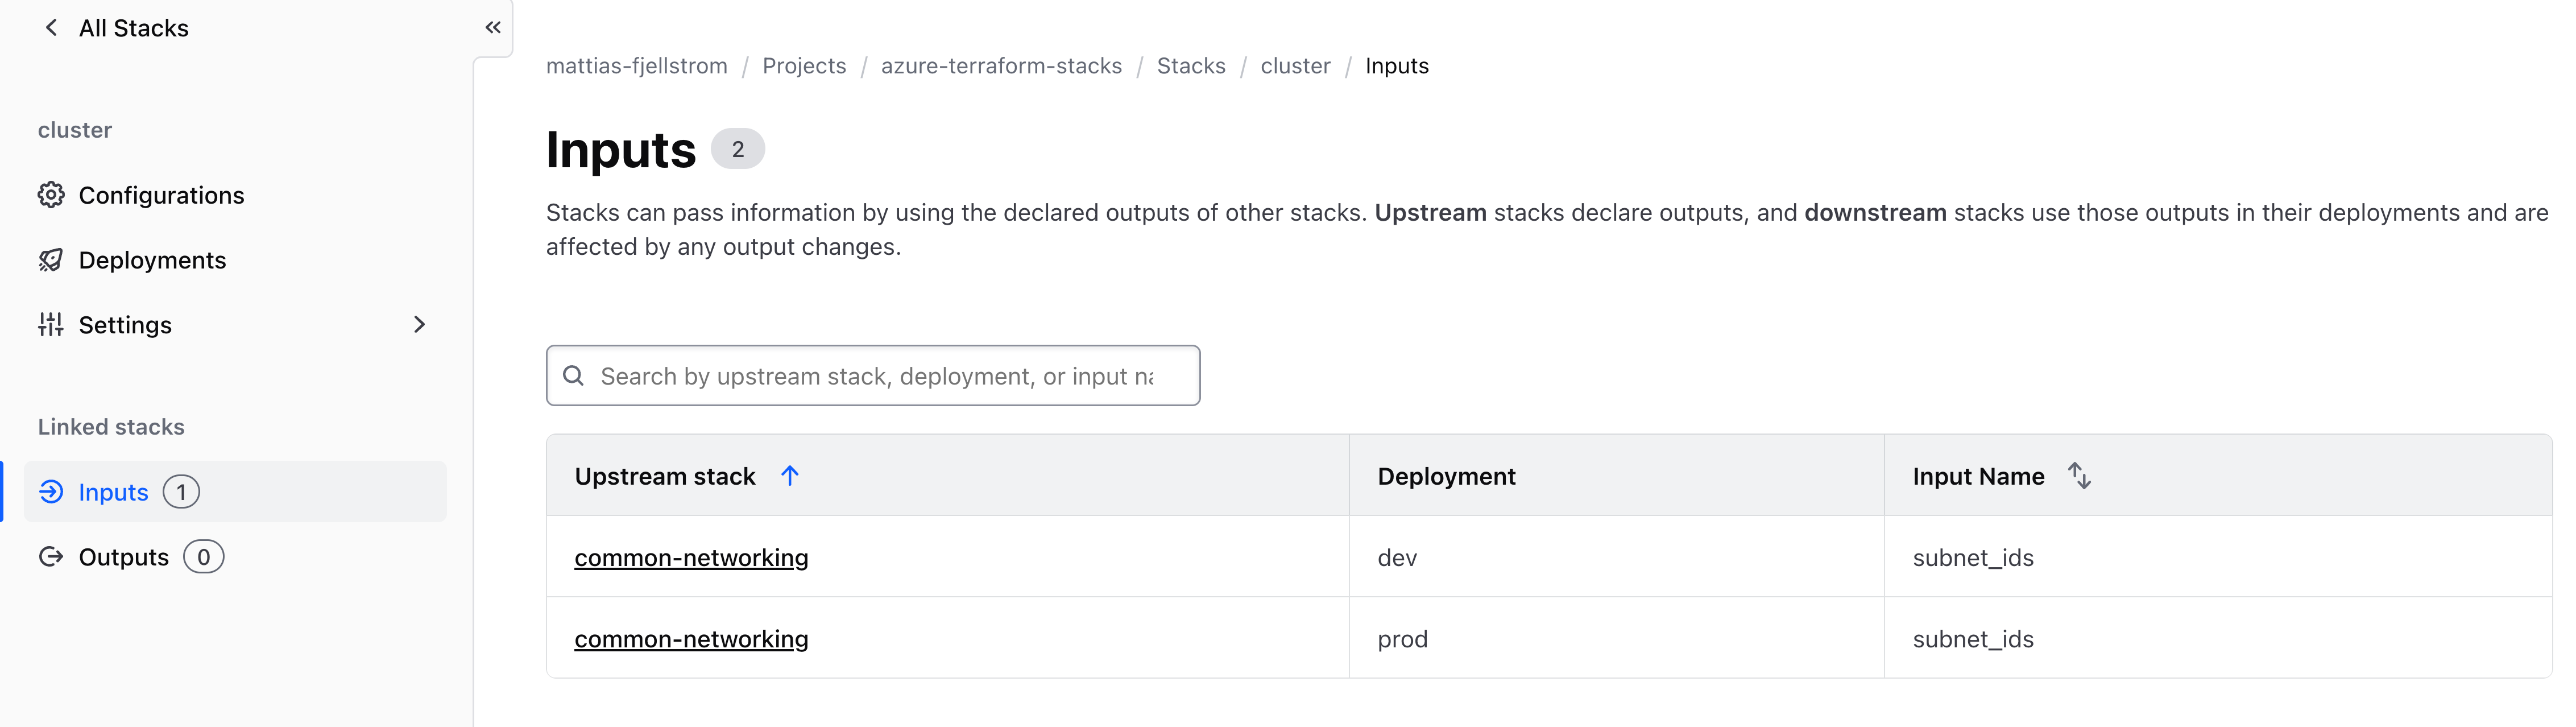
These list inputs from other upstream stacks, as well as any outputs consumed by downstream stacks.
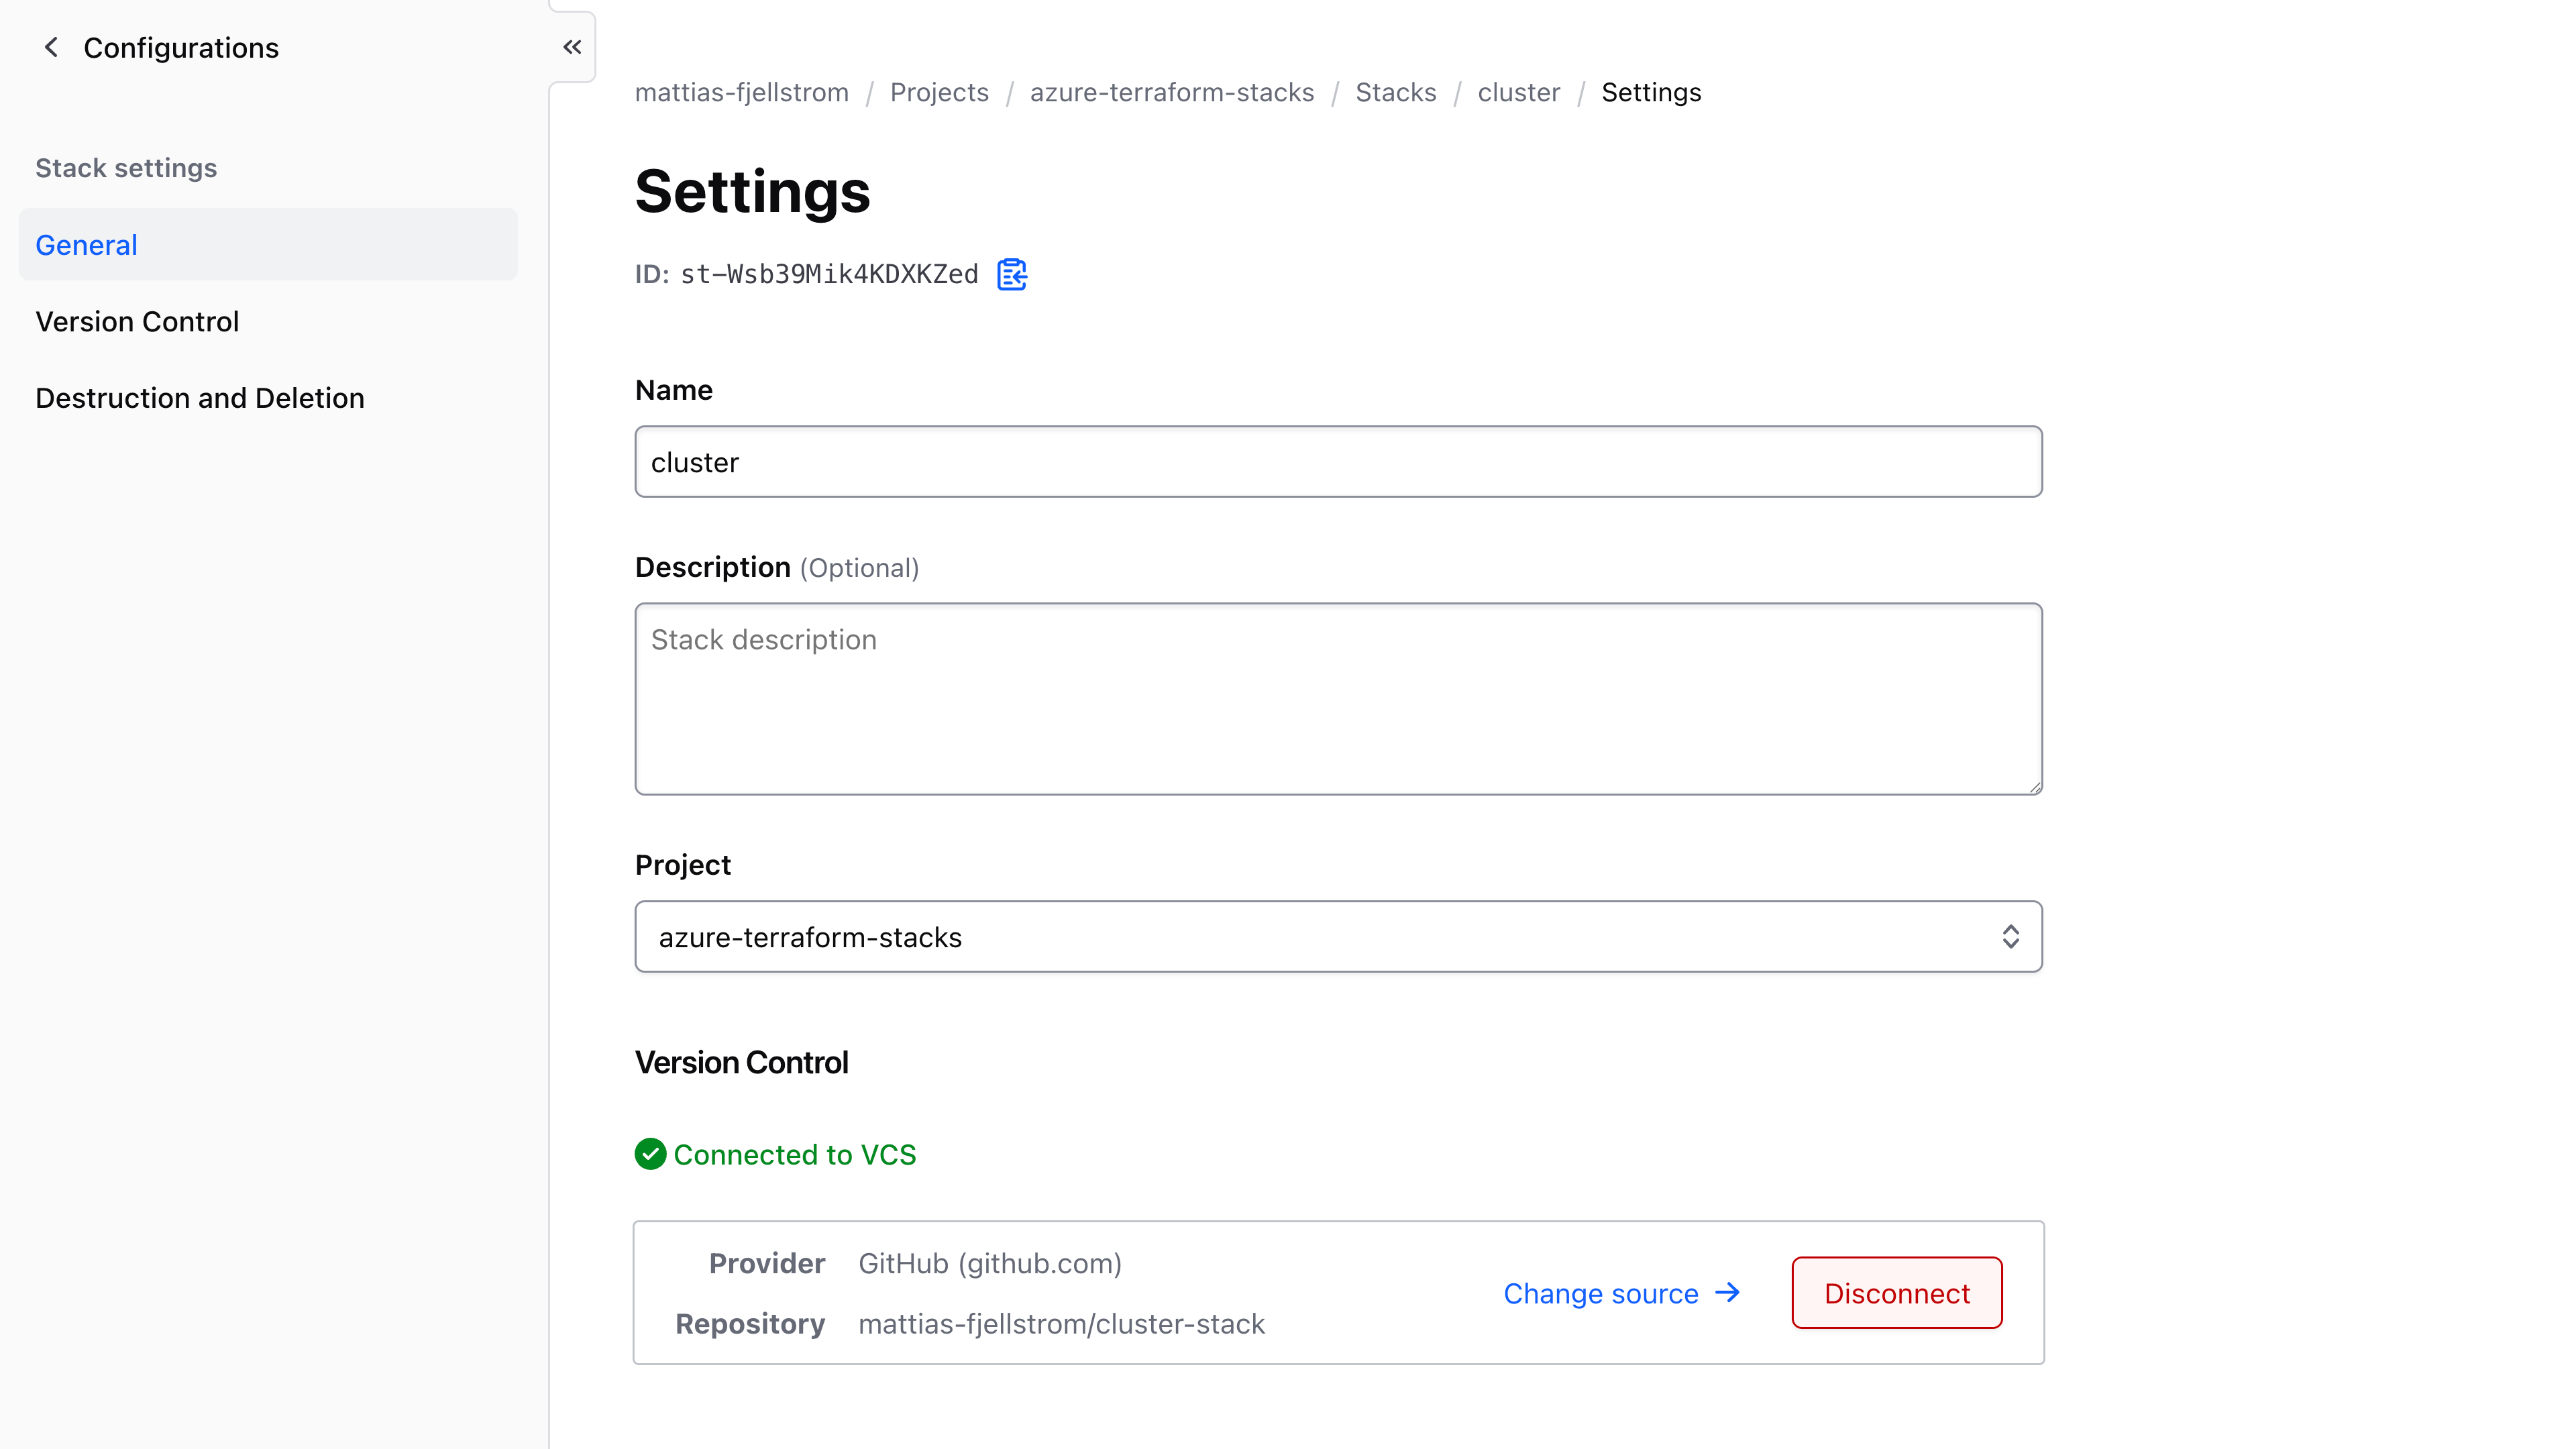
The settings menu for a stack allows you to configure the stack name and description, as well as the VCS connection:
From here you can also delete the stack.
HCP Terraform provider for Terraform#
The HCP Terraform provider for Terraform allows you to provision stack resources using Terraform.
First configure Terraform to use the HCP Terraform (TFE) provider and configure the provider to target HCP Terraform in EU:
terraform {
  required_providers {
    tfe = {
      source  = "hashicorp/tfe"
      version = "~> 0.70.0"
    }
  }
}

provider "tfe" {
  hostname     = "app.eu.terraform.io"
  organization = "mattias-fjellstrom"
}
To configure a VCS-connected stack, use the tfe_stack resource:
resource "tfe_stack" "cluster" {
  name       = "cluster"
  project_id = hcp_project.default.resource_id

  vcs_repo {
    identifier     = github_repository.cluster_stack.full_name
    oauth_token_id = data.tfe_oauth_client.github.oauth_token_id
    branch         = "main"
  }
}
Terraform CLI#
In an earlier section we saw examples of how to interact with Terraform stacks using the CLI.
Previously there was a dedicated Terraform stacks CLI, but this has now been integrated into the regular Terraform CLI. However, you will notice that the Terraform stacks commands differ from how the rest of the Terraform CLI works. Specifically take note of the following:
- The Terraform stacks commands do not (in general) respect the
TFE_*environment variables. There is usually aTF_STACKS_*alternative available. - There is no
-helpor-hflag for these commands, instead use-usage(e.g.terraform stacks -usage).
To get a feel for what you can do with the Terraform CLI for stacks:
$ terraform stacks -usage

Usage: terraform stacks [global options] <command> [args]

The available commands for execution are listed below.

Primary Commands:
  init              Prepare the configuration directory for further commands
  providers-lock    Write out dependency locks for the configured providers
  validate          Check whether the configuration is valid
  create            Create a stack
  list              List stacks for a given organization and/or project.
  version           Show the current Stacks Plugin version
  fmt               Reformat your Terraform Stacks configuration to a canonical format

Sub-commands:
  configuration     Manage stack configuration
  deployment-group  Manage deployment groups
  deployment-run    Manage deployment runs
If you use VCS-connected stacks on HCP Terraform chances are you will not use the Terraform CLI that much. But during stack design you will need to run the terraform stacks init command or the terraform stacks providers-lock command to generate the initial provider lock file that the stack requires.
The terraform stacks fmt command is also useful to format the stack configuration files.
If you want to run stack operations using the Terraform CLI see the sub-commands:
terraform stacks configurationterraform stacks deployment-groupterraform stacks deployment-run
Terraform stacks API#
As most other things on HCP Terraform you can use the API directly to interact with Terraform stacks.
Go to the HCP Terraform API documentation on stacks to get started.
Key Takeaways#
Terraform stacks are GA so you are encouraged to start using them for your production workloads.
I first worked on stacks over a year ago when they were in public preview. I thought the stacks UI was messy, and I found myself breaking my deployments and getting stuck quite often. Now, over a year later, I am pleased to see how the UI has been simplified and things seem to run much smoother.
I have yet to use Terraform stacks for production workloads, so I will wait until that day to make a final judgement!
In this blog post I went through most of what you will encounter when creating a stack and running it in your day-to-day operations. I skipped over some details about troubleshooting errors once they appear. This is the topic of another blog post, because this one is already a bit too long!
