

In the previous part we locked down the Consul and Nomad clusters to only allow private access via HashiCorp Boundary.

How do we expose Nomad jobs to the outside world in this setup? There are different options for how to do this on Microsoft Azure (in no particular order):
- Using a managed load balancer service: Azure Application Gateway, Azure load balancer, Azure Front Door, or Azure Traffic Manager.
- Using a third-party load balancer solution.
- Using Azure API Management.
- Set up a specific node group of Nomad clients that are accessible from the internet.
- And more …
In this blog post we will use the Azure application gateway managed load balancer service together with an Nginx job running on our Nomad cluster.
The source code for this part of the series is available on the accompanying GitHub repository.
But first: justfile#
The justfile from the previous parts contains some repetetive code. We can simplify this file a little bit. Create a generic Terraform recipe:
terraform command path:
  #!/bin/bash
  set -euo pipefail

  cd {{ path }}
  terraform init

  if [ "{{command}}" == "plan" ]; then
    terraform plan
  else
    terraform {{command}} -auto-approve
  fi
This command has two parameters: command and path. We will not use this recipe directly, instead we add additional recipes that in turn use this recipe:
platform command:
  just terraform {{command}} infrastructure/platform
This recipe can be run as just platform apply to apply the shared platform Terraform configuration. There are similar recipes for the other infrastructure components.
There are also group commands to apply and destroy all infrastructure components (remember that I do not include the HCP part in these commands to avoid having to recreate the Boundary cluster):
apply:
  just platform apply
  just consul apply
  just nomad apply
  just boundary apply
The justfile contains some additional refactoring and cleanup that is not discussed here, see the GitHub repository for the full details.
Exposing jobs on Nomad through an Azure application gateway#
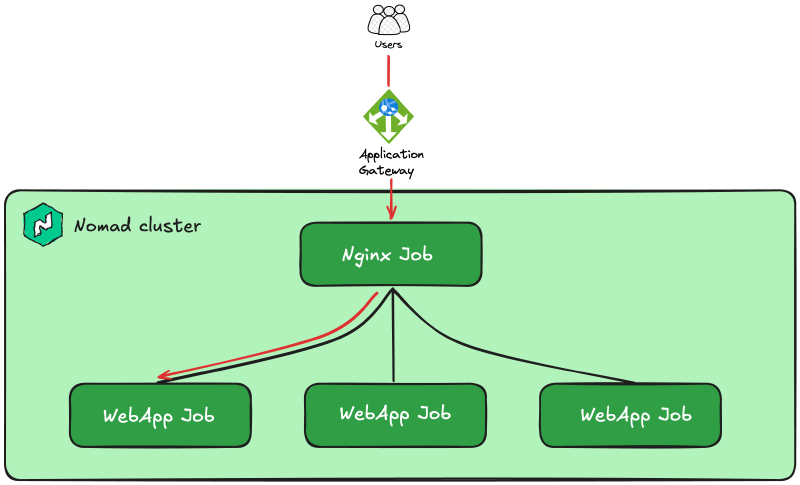
The plan is to provision an application gateway as the main entrypoint for applications running on Nomad. We will run an Nginx job on our Nomad cluster that is the first destination of requests coming from the application gateway.
The Nginx job run in one instance (we could run multiple instances if we wish) and listens on the static port 8080 on the Nomad client where it runs. Nginx forwards requests to other jobs in the cluster.
We will configure Nginx to send requests to the correct job based on the host header in the request. This will allow us to reach multiple different applications through the same entrypoint.
A simplfiied architecture of the important components in this setup is shown below:
To achieve this we will go through the following three high-level steps:
- Configure the application gateway resource
- Configure and run the Nginx job on Nomad
- Configure and run applications on Nomad and expose them to the outside world
Configure the application gateway resource#
The application gateway is a shared resource, so we add it to the platform infrastructure.
We will provision it to its own subnet in the virtual network:
resource "azurerm_subnet" "appgw" {
  name                 = "snet-appgw"
  virtual_network_name = azurerm_virtual_network.default.name
  resource_group_name  = azurerm_resource_group.default.name
  address_prefixes = [
    cidrsubnet(var.vnet_cidr_range, 8, 55),
  ]
}
The application gateway is supposed to be exposed to internet traffic. This means we need to open up for traffic from the internet. We add a network security group and expose port 80:
resource "azurerm_network_security_group" "appgw" {
  name                = "nsg-appgw"
  location            = azurerm_resource_group.default.location
  resource_group_name = azurerm_resource_group.default.name
}

resource "azurerm_subnet_network_security_group_association" "appgw" {
  subnet_id                 = azurerm_subnet.appgw.id
  network_security_group_id = azurerm_network_security_group.appgw.id

  depends_on = [
    azurerm_network_security_rule.appgw_gateway_manager,
  ]
}

resource "azurerm_network_security_rule" "appgw_http" {
  name                        = "allow_http"
  priority                    = 1000
  direction                   = "Inbound"
  access                      = "Allow"
  protocol                    = "Tcp"
  source_port_range           = "*"
  destination_port_ranges     = ["80"]
  source_address_prefix       = "*"
  destination_address_prefix  = "*"
  resource_group_name         = azurerm_resource_group.default.name
  network_security_group_name = azurerm_network_security_group.appgw.name
}
We will not configure TLS traffic in this post, so we open port 80 instead of port 443.
The application gateway that we will configure requires the ports in the range 65200-65535 to be open for traffic from the GatewayManager service tag. This is for internal Azure administration, but we need to explicitly open these ports:
resource "azurerm_network_security_rule" "appgw_gateway_manager" {
  name                        = "allow_gw_manager"
  priority                    = 1100
  direction                   = "Inbound"
  access                      = "Allow"
  protocol                    = "Tcp"
  source_port_range           = "*"
  destination_port_ranges     = ["65200-65535"]
  source_address_prefix       = "GatewayManager"
  destination_address_prefix  = "*"
  resource_group_name         = azurerm_resource_group.default.name
  network_security_group_name = azurerm_network_security_group.appgw.name
}
The application gateway is a public resource, so we must add a public IP address for it:
resource "azurerm_public_ip" "appgw" {
  name                = "pip-appgw"
  resource_group_name = azurerm_resource_group.default.name
  location            = azurerm_resource_group.default.location
  allocation_method   = "Static"
}
At this point we add a DNS A-record for the application gateway’s IP address. Later we can add CNAME-records for each unique applicaiton that we run that points at this A-record.
data "azurerm_dns_zone" "public" {
  name                = var.public_dns_zone_name
  resource_group_name = var.public_dns_zone_resource_group
}

resource "azurerm_dns_a_record" "appgw" {
  name                = "appgw"
  resource_group_name = data.azurerm_dns_zone.public.resource_group_name
  zone_name           = data.azurerm_dns_zone.public.name
  ttl                 = 60
  records = [
    azurerm_public_ip.appgw.ip_address,
  ]
}
I have a public DNS zone named hashicorp.mattiasfjellstrom.com which is the same name as the private DNS zone I provision (see previous posts in this series). The application gateway is available at appgw.hashicorp.mattiasfjellstrom.com.
The final piece to configure is the application gateway resource itself. This resource is arguably one of the more complex resources to configure on Azure in my opinion because you need to get all the details right. I wish there was a way to configure this resource split into multiple resources, but it is just one giant resource.
In this case the configuration is relatively easy because we only expose a HTTP listener, see the comments in the code for clarifications of each part.
resource "azurerm_application_gateway" "default" {
  name                = "appgw-nomad"
  resource_group_name = azurerm_resource_group.default.name
  location            = azurerm_resource_group.default.location

  # We could use a WAF SKU, but opt for the Standard SKU
  sku {
    name     = "Standard_v2"
    tier     = "Standard_v2"
    capacity = 2
  }

  # Add the application gateway to the dedicated subnet
  gateway_ip_configuration {
    name      = "primary"
    subnet_id = azurerm_subnet.appgw.id
  }

  # Configure port 80 as the "http" port
  frontend_port {
    name = "http"
    port = 80
  }

  # Connect the public IP we configured earlier
  frontend_ip_configuration {
    name                 = "primary"
    public_ip_address_id = azurerm_public_ip.appgw.id
  }

  # Add Nginx as the only backend pool
  # Nginx is currently not running, but that is OK
  backend_address_pool {
    name  = "nginx"
    fqdns = ["nginx.service.consul"]
  }

  # Nginx will be reached using HTTP on port 8080
  backend_http_settings {
    name                  = "default"
    protocol              = "Http"
    port                  = 8080
    cookie_based_affinity = "Disabled"
  }

  # Add a listener on the public HTTP interface (port 80)
  http_listener {
    name                           = "default"
    frontend_ip_configuration_name = "primary"
    frontend_port_name             = "http"
    protocol                       = "Http"
  }

  # route all traffic to nginx
  request_routing_rule {
    name                       = "nginx"
    priority                   = 100
    rule_type                  = "Basic"
    http_listener_name         = "default"
    backend_address_pool_name  = "nginx"
    backend_http_settings_name = "default"
  }
}
At this point you should provision all the infrastructure using just hcp apply followed by just apply. The provisioning step will take a while (mainly the Boundary cluster unless you have it running from before).
Configure and run the Nginx job on Nomad#
In this section, and in the following section, we will work on a different Terraform configuration that provisions infrastructure inside the Nomad cluster as well as on Azure. In the accompanying GitHub repository this code is located in the application directory in part09.
The provider configuration for this Terraform configuration is as follows:
terraform {
  required_providers {
    azurerm = {
      source  = "hashicorp/azurerm"
      version = "~> 4.3"
    }

    nomad = {
      source  = "hashicorp/nomad"
      version = "~> 2.5"
    }
  }
}

provider "azurerm" {
  subscription_id = var.azure_subscription_id

  features {}
}

provider "nomad" {}
Before we can run anything on Nomad we must bootstrap the ACL system.
Grab the output from the Nomad infrastructure provisioning (yours will look slightly different due to the domain name you are using):
$ just nomad-output
export NOMAD_ADDR=https://nomad.hashicorp.mattiasfjellstrom.com:443
export NOMAD_CACERT=$(pwd)/infrastructure/nomad/tls/nomad.hashicorp.mattiasfjellstrom.com-agent-ca.pem
export NOMAD_CLIENT_CERT=$(pwd)/infrastructure/nomad/tls/global-cli-nomad.hashicorp.mattiasfjellstrom.com.pem
export NOMAD_CLIENT_KEY=$(pwd)/infrastructure/nomad/tls/global-cli-nomad.hashicorp.mattiasfjellstrom.com-key.pem
Copy and set the environment variables from the output. Next, run the ACL bootstrap command:
nomad acl bootstrap
Accessor ID  = 9790f9db-7dac-a582-45d8-cb1f5154b432
Secret ID    = 189c7a2f-1e32-8605-4b94-1279734e83e8
Name         = Bootstrap Token
Type         = management
...
Set the secret ID as an environment variable:
$ export NOMAD_TOKEN=189c7a2f-1e32-8605-4b94-1279734e83e8
The Nginx jobspec we will use looks like this:
job "nginx" {
  datacenters = ["dc1"]

  group "nginx" {
    count = 1

    network {
      port "http" {
        static = 8080
      }
    }

    service {
      name = "nginx"
      port = "http"
    }

    task "nginx" {
      driver = "docker"

      config {
        image = "nginx"

        ports = ["http"]

        volumes = [
          "local:/etc/nginx/conf.d",
        ]
      }

      template {
        data = <<EOF ... EOF
        destination   = "local/load-balancer.conf"
        change_mode   = "signal"
        change_signal = "SIGHUP"
      }
    }
  }
}
Note the following details:
- The job is run with a
countof1. We could run additional instances to increase the resilience of this solution. - The static port of 8080 is allocated. Nginx will be available on port 8080 on the Nomad client where it runs.
- Nginx is run as a service named
nginx, which means it will be accessible onnginx.service.consulbecause we are using Consul in our cluster. - From the
volumesargument in thetaskstanza, together with thetemplatestanza, you can see that a configuration file will be created and placed in/etc/nginx/conf.d. The contents of the configuration file is left out from the code above but will be explained below.
The Nginx configuration file is generated using the Consul template syntax:
{{- range services -}}
{{- if .Tags | contains "public" -}}
upstream {{ .Name }} {
{{- range service .Name }}
  server {{ .Address }}:{{ .Port }};
{{ end -}}
}
{{ end -}}
{{ end }}

{{- range services -}}
{{- if .Tags | contains "public" -}}
server {
    listen 8080;
    server_name {{ .Name }}.${domain};
    location / {
        proxy_pass http://{{ .Name }};
        proxy_set_header Host $host;
        proxy_set_header X-Real-IP $remote_addr;
        proxy_set_header X-Forwarded-For $proxy_add_x_forwarded_for;
        proxy_set_header X-Forwarded-Proto $scheme;
    }
}
{{ end -}}
{{ end }}

server_names_hash_bucket_size 128;
The syntax is a bit messy, but in essence there is an upstream configuration created for each service/job running on Nomad that has a tag of public. This configuration adds the Nomad clients where the service runs together with the port that is allocated on that Nomad client. Then there is a corresponding server configuration created for each service where we make sure that only traffic destined for <service>.<domain> is sent. This means if we use the domain hashicorp.mattiasfjellstrom.com and we have a service named webapp1 it will receive traffic destined for webapp1.hashicorp.mattiasfjellstrom.com.
Note that the domain part in the server block is configured using variable substitution. This is because we provision the Nginx job using the templatefile function in Terraform:
resource "nomad_job" "nginx" {
  jobspec = templatefile("${path.module}/jobspec/nginx.nomad.hcl", {
    domain = var.dns_hosted_zone_name
  })
}
The configuration file will be updated each time a new service is added or removed in the Nomad cluster (or technically in the Consul service catalog).
Configure and run applications on Nomad and expose them to the outside world#
For the web applications we will use a sample application developed by HashiCorp. It responds with what client IP and port it runs on, and nothing else.
The jobspec for the web app looks like this:
job "${service_name}" {
  datacenters = ["dc1"]

  group "demo" {
    count = 3

    network {
      port "http" {
        to = -1
      }
    }

    service {
      name = "${service_name}"
      port = "http"

      tags = ["public"]

      check {
        type     = "http"
        path     = "/"
        interval = "2s"
        timeout  = "2s"
      }
    }

    task "server" {
      env {
        PORT    = "$${NOMAD_PORT_http}"
        NODE_IP = "$${NOMAD_IP_http}"
      }

      driver = "docker"

      config {
        image = "hashicorp/demo-webapp-lb-guide"
        ports = ["http"]
      }
    }
  }
}
The important piece to note here is that the app is tagged, tags = ["public"]. This will make sure that Nginx adds the corresponding configuration for this app in its configuration file.
This jobspec also uses a few template expressions because it is also configured in Terraform using the templatefile function:
resource "nomad_job" "webapp1" {
  jobspec = templatefile("${path.module}/jobspec/app.nomad.hcl", {
    service_name = "webapp1"
  })
}
We must also add a DNS CNAME-record for each app to give it an entrypoint:
resource "azurerm_dns_cname_record" "webapp1" {
  name                = "webapp1"
  resource_group_name = data.azurerm_dns_zone.default.resource_group_name
  zone_name           = data.azurerm_dns_zone.default.name
  ttl                 = 60
  record              = "appgw.${data.azurerm_dns_zone.default.name}"
}
Remember that the application gateway is available on appgw.<domain>? This is why we point the CNAME record for the app to the this value.
Let’s add another webapp named webapp2 as well, to make sure this works for multiple applications:
resource "nomad_job" "webapp2" {
  jobspec = templatefile("${path.module}/jobspec/app.nomad.hcl", {
    service_name = "webapp2"
  })
}

resource "azurerm_dns_cname_record" "webapp2" {
  name                = "webapp2"
  resource_group_name = data.azurerm_dns_zone.default.resource_group_name
  zone_name           = data.azurerm_dns_zone.default.name
  ttl                 = 60
  record              = "appgw.${data.azurerm_dns_zone.default.name}"
}
Provision the infrastructure for Nginx and the web applications by running terraform init, terraform plan, and terraform apply for the application infrastructure.
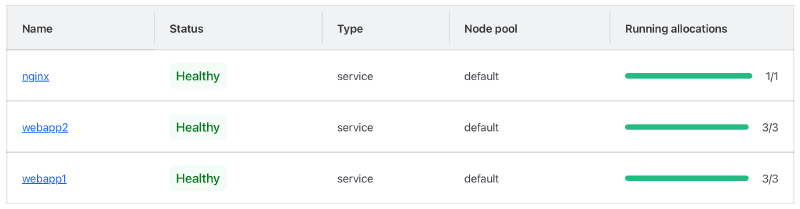
Once it is complete, open https://nomad.<domain> (in my case https://nomad.hashicorp.mattiasfjellstrom.com) in your browser and go to jobs. After a while all the jobs should be healthy and running:
Open the Nginx job, click on the running allocation ID, open the files tab, and browse to the nginx/local/load-balancer.conf file to see its contents:
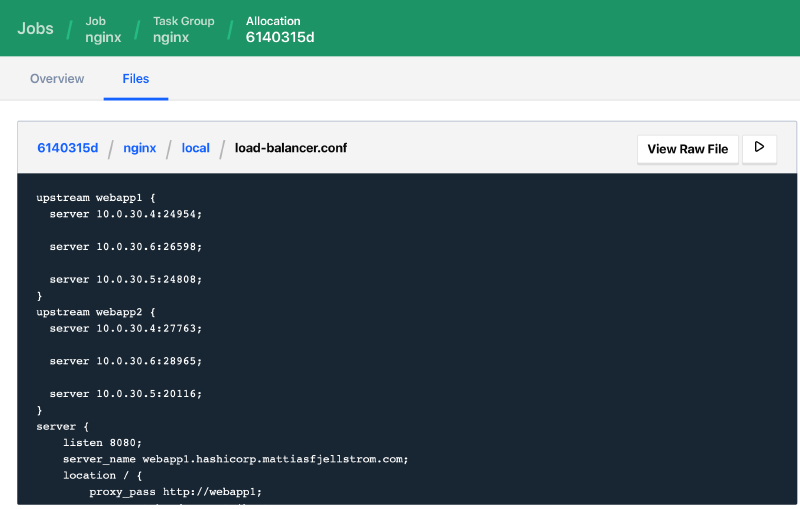
You can see how the file has been rendered for the current two running jobs (webapp1 and webapp2).
If I browse to webapp1.hashicorp.mattiasfjellstrom.com I get a response from my app:
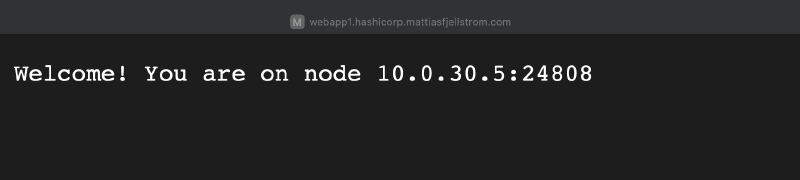
We have successfully expose an application running on our private Nomad cluster to the internet!
Summary of part 9#
In this part we provisioned an Azure application gateway and we were able to reach an application running on Nomad through the application gateway.
On Nomad we configured an Nginx job as an internal load balancer. The application gateway forwards traffic to Nginx on nginx.service.consul. This is possible since we configured a private DNS resolver in an earlier part in this series.
We now have a way to run applications on Nomad and reach them from the outside.
In the next part we will run a job on Nomad that use Consul service mesh. We will see what Consul intentions are and how we can allow or deny traffic using these.
Stay tuned!