

In the previous post we worked on strengthening the Consul cluster by enabling mTLS and gossip encryption. We also added a DNS name for the Consul cluster.

Both the Consul cluster and the Nomad cluster are exposed to the internet. In this blog post we will change that!
To achieve this we will introduce HashiCorp Boundary and set up private access to Nomad and Consul. We could self-host Boundary similar to what we are doing with Nomad and Consul. However, to simplify our lives we will use the SaaS version of Boundary known as HCP Boundary. After this change the only publicly exposed infrastructure will be our Boundary ingress worker.
The full source code for this part is available on the accompanying GitHub repository.
HashiCorp Boundary#
HCP Boundary is the SaaS version of Boundary. In this version the control plane is fully managed on the HashiCorp Cloud Platform (HCP). You also get access to two managed Boundary workers.
With Boundary we can remove public access to our Nomad and Consul clusters. The infrastructure that we are aiming for is this:
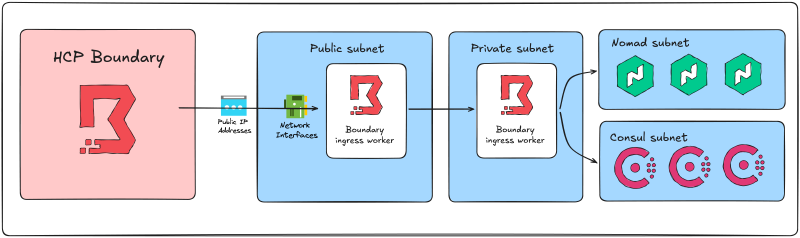
The arrows in the image above shows how you can picture the connection flow to either Consul or Nomad. However, note that the actual network connections are different than what is shown, but these details are beyond the scope of this blog post.
We will also set up transparent sessions which is a feature that allows you to seamlessly connect to Boundary targets using an alias. For instance, for SSH access to Nomad servers we will create an alias named nomad.server so that we can connect to the Nomad servers like this:
$ ssh nomad.server
The required SSH key will be injected into the session and we do not need to bother with these details ourselves. Note that there will still be “hardcoded” SSH keys in this setup because we have not introduced HashiCorp Vault yet which would be able to generate SSH keys on-the-fly.
Provision a HCP Boundary cluster#
We could add the HCP infrastructure to the shared platform Terraform root module. However, the Boundary cluster will have a longer lifetime than the shared platform. It takes a while to provision a Boundary cluster, so it will be convenient to handle it separately. Also, there will be a cost close to 0 dollars for the use of Boundary so it is no cost related to keeping the cluster running.
Configure the new Terraform root module to use the HCP provider:
terraform {
  required_providers {
    hcp = {
      source  = "hashicorp/hcp"
      version = "~> 0.108"
    }

    local = {
      source  = "hashicorp/local"
      version = "~> 2.5"
    }
  }
}
We also add the local provider because we will generate a file with values to pass to a different Terraform configuration.
Resources on HCP are grouped into projects. It makes sense to create a new project for the Boundary cluster:
resource "hcp_project" "default" {
  name        = "nomad-on-azure"
  description = "Resources related to the Nomad on Azure project"
}
Next, add the Boundary cluster itself:
resource "hcp_boundary_cluster" "default" {
  cluster_id = "boundary-cluster-${var.boundary_admin_username}"
  project_id = hcp_project.default.resource_id
  tier       = "Plus"

  username = var.boundary_admin_username
  password = var.boundary_admin_password

  maintenance_window_config {
    upgrade_type = "SCHEDULED"
    day          = "FRIDAY"
    start        = 4
    end          = 8
  }
}
We configure the plus-tier to be able to use transparent sessions later in this blog post. The cluster must be configured with an administrator user and password. This will be the main Boundary user that we will use, so make sure to set a strong password. Both the username and the password is passed in as variables.
Finally, prepare a file with necessary information that will be passed to another new Terraform root module for Boundary configuration:
resource "local_sensitive_file" "terraform_tfvars" {
  filename = "../boundary/terraform.tfvars"
  content  = <<-EOT
    boundary_addr           = "${hcp_boundary_cluster.default.cluster_url}"
    boundary_admin_username = "${var.boundary_admin_username}"
    boundary_admin_password = "${var.boundary_admin_password}"
  EOT
}
This resource creates a file named terraform.tfvars in a directory named boundary. In this directory we will later configure resources related to Boundary itself as well as workers running on Azure. The Boundary provider for Terraform requires these variables for authentication.
Provision a self-managed Boundary worker#
HCP Boundary comes with two managed Boundary workers. However, these are not able to connect to private targets in our Azure environment. Instead we should provision our own Boundary workers.
We will create two workers: an ingress worker and an egress worker. The ingress worker will have a public IP and is the entrypoint for connections to our Boundary targets. The egress worker will be a private virtual machine that is the one establishing the final connection to the targets.
Both workers are deployed as virtual machine scale-sets (VMSS) with a count of one instance each. We have previously gone through how to configure VMSS and related resources so we will not repeat this information again. The important piece to understand about Boundary workers is how each worker is configured.
Boundary workers are configured using a configuration file written in HCL. Ingress and egress workers are configured slightly different.
The ingress worker must have outbound access to the HCP Boundary control plane, and inbound access from clients (our laptop or the internet). The configuration worker is configured like this:
disable_mlock = true

hcp_boundary_cluster_id = "${local.hcp_boundary_cluster_id}"

listener "tcp" {
  address = "0.0.0.0:9202"
  purpose = "proxy"
}

worker {
  public_addr = "PUBLIC_IP"

  auth_storage_path                     = "/etc/boundary.d/worker"
  controller_generated_activation_token = "${boundary_worker.ingress.controller_generated_activation_token}"

  tags {
    type = ["worker", "azure", "ingress"]
  }
}
Note the following details:
- The ingress worker must know which HCP Boundary cluster to connect to. This is configured in the
hcp_boundary_cluster_idargument. - The ingress worker listens on port 9202, this port must be opened for client access (will be opened to the internet in my case).
- The
public_addrargument is set toPUBLIC_IP. This value will be replaced with the actual value of the public IP before Boundary starts. - A controller-generated activiation token is provided to the worker.
- The worker is tagged as
ingress.
The egress worker has a similar configuration file with a few differences:
disable_mlock = true

listener "tcp" {
  address = "0.0.0.0:9202"
  purpose = "proxy"
}

worker {
  public_addr       = "PUBLIC_IP"
  initial_upstreams = ["10.0.100.4:9202"]

  auth_storage_path                     = "/etc/boundary.d/worker"
  controller_generated_activation_token = "${boundary_worker.egress.controller_generated_activation_token}"

  tags {
    type = ["worker", "azure", "egress"]
  }
}
Note the following details:
- The value of the
public_addrargument will be replaced by the workers private IP. - The egress worker does not need to know anything about HCP Boundary, but it does need one or more
initial_upstreams. These are addresses to other workers upstreams of the egress worker. This value is currently hardcoded to the private IP of the ingress worker. - The worker is tagged as
egress.
In a separate Terraform configuration we will provision resources in this HCP Boundary cluster. Some of these resources are covered later in this blog post, but a few can be discussed right away.
Resources on Boundary are placed in scopes. At the top is the global scope. In the global scope you have organizations, and each organization can contain projects. Create one organization with one project:
resource "boundary_scope" "organization" {
  name     = "nomad-on-azure"
  scope_id = "global"

  auto_create_admin_role   = true
  auto_create_default_role = true
}

resource "boundary_scope" "project" {
  name     = "azure"
  scope_id = boundary_scope.organization.id

  auto_create_admin_role   = true
  auto_create_default_role = true
}
Boundary has the concept of hosts. A host is a computing element with a network address reachable from Boundary1. You can configure static hosts by specifying exact IP addresses or hostnames where the hosts are reached. You can also use dynamic host discovery on Azure. Each type of host (static and dynamic) is associated with a host catalog. We will create one static catalog for web hosts (UI/CLI) and one dynamic host catalog for SSH hosts:
resource "boundary_host_catalog_static" "web" {
  name     = "Azure Static Catalog"
  scope_id = boundary_scope.project.id
}

resource "boundary_host_catalog_plugin" "azure" {
  name        = "Azure Plugin Catalog"
  scope_id    = boundary_scope.project.id
  plugin_name = "azure"

  attributes_json = jsonencode({
    "disable_credential_rotation" = true,
    "tenant_id"                   = "${data.azuread_client_config.current.tenant_id}",
    "subscription_id"             = "${var.azure_subscription_id}",
    "client_id"                   = "${azuread_service_principal.boundary.client_id}",
  })

  secrets_json = jsonencode({
    "secret_value" = "${azuread_service_principal_password.boundary.value}"
  })
}
The dynamic host catalog (also known as a plugin catalog) must be configured with a client ID and secret (the details of how these are configured is left out of this blog post, see the accompanying git repository).
To store credentials (or to configure dynamic credentials) Boundary also has the concept of credential stores. We add one credential store to our infrastructure:
resource "boundary_credential_store_static" "azure" {
  name     = "azure-credential-store"
  scope_id = boundary_scope.project.id
}
Infrastructure changes to Consul and Nomad#
To remove public access to Consul and Nomad we will need to perform the following changes:
- Remove the public load balancers with their public IPs, add an internal load balancer for the Nomad cluster (the Consul cluster already has one).
- Add a NAT gateway to the virtual network and connect this to the Nomad and Consul subnets to allow the servers to reach the internet.
- Replace the public DNS record for each cluster with a corresponding private DNS record.
The NAT gateway resource is added to the shared platform infrastructure. It requires a public IP and you need to associate the public IP with the NAT gateway. All in all these three resources are added to the shared platform:
resource "azurerm_public_ip" "nat" {
  name                = "pip-nat-gateway"
  location            = azurerm_resource_group.default.location
  resource_group_name = azurerm_resource_group.default.name
  allocation_method   = "Static"
  sku                 = "Standard"
}

resource "azurerm_nat_gateway" "default" {
  name                = "natgw-shared-platform"
  location            = azurerm_resource_group.default.location
  resource_group_name = azurerm_resource_group.default.name
  sku_name            = "Standard"
}

resource "azurerm_nat_gateway_public_ip_association" "default" {
  nat_gateway_id       = azurerm_nat_gateway.default.id
  public_ip_address_id = azurerm_public_ip.nat.id
}
You must associate the NAT gateway with the relevant subnets (Boundary, Consul, and Nomad). This is achieved using the azurerm_subnet_nat_gateway_association resource that is added to each cluster infrastructure:
data "azurerm_nat_gateway" "default" {
  name                = "natgw-shared-platform"
  resource_group_name = "rg-shared-platform"
}

resource "azurerm_subnet_nat_gateway_association" "default" {
  subnet_id      = azurerm_subnet.default.id
  nat_gateway_id = data.azurerm_nat_gateway.default.id
}
Apart from this you do not need to make any additional changes, outbound access will now be granted to the virtual machines in the private subnets.
Replacing the public DNS records with private DNS records means we must create a private DNS zone (I give it the name hashicorp.mattiasfjellstrom.com like my public zone I have been using) and link this private DNS zone to the virtual network. This infrastructure is added to the shared platform:
resource "azurerm_private_dns_zone" "default" {
  name                = var.private_dns_zone_name
  resource_group_name = azurerm_resource_group.default.name
}

resource "azurerm_private_dns_zone_virtual_network_link" "default" {
  name                  = "default"
  private_dns_zone_name = azurerm_private_dns_zone.default.name
  resource_group_name   = azurerm_resource_group.default.name
  virtual_network_id    = azurerm_virtual_network.default.id
}
Update the DNS part for Nomad and Consul by switching from azurerm_dns_zone to azurerm_private_dns_zone and from azurerm_dns_a_record to azurerm_private_dns_a_record resource types:
data "azurerm_private_dns_zone" "default" {
  name = var.dns_hosted_zone_name
}

resource "azurerm_private_dns_a_record" "default" {
  name                = "consul"
  zone_name           = data.azurerm_private_dns_zone.default.name
  resource_group_name = data.azurerm_resource_group.dns.name
  ttl                 = "60"

  records = [
    azurerm_lb.private.frontend_ip_configuration[0].private_ip_address,
  ]
}
Make sure to point each A-record on the private load balancer private IP address.
Private access to Consul (and Nomad)#
Consul is now provisioned in a private network with private DNS records. Everything is private - so how do we access it? This requires some configuration on the Boundary side!
We want to access the Consul UI/CLI as well as being able to SSH into the Consul servers (and clients). We will consider each of these use cases separately below.
For SSH access we will use Boundary host discovery for Azure. Specifically, we will look for virtual machines with a tag name of consul and a tag value of server:
resource "boundary_host_set_plugin" "consul" {
  name            = "consul-host-set"
  host_catalog_id = boundary_host_catalog_plugin.azure.id
  attributes_json = jsonencode({
    "filter" = "tagName eq 'consul' and tagValue eq 'server'"
  })
}
Next we add the SSH key for the Consul servers to the Boundary credential store we set up earlier:
resource "boundary_credential_ssh_private_key" "consul" {
  name                = "consul-ssh-key"
  credential_store_id = boundary_credential_store_static.azure.id
  username            = "azureuser"
  private_key         = file("../consul/servers/ssh_keys/servers.pem")
}
Finally we create a Boundary target for the consul server SSH access. A target is the combination of a Boundary host, with a port, required credentials and details of how the connection to the target should flow (using ingress and egress worker filters):
resource "boundary_target" "consul_ssh" {
  name        = "consul-servers-ssh"
  description = "Consul servers on Azure"
  scope_id    = boundary_scope.project.id

  type         = "ssh"
  default_port = "22"

  ingress_worker_filter = "\"ingress\" in \"/tags/type\""
  egress_worker_filter  = "\"egress\" in \"/tags/type\""

  host_source_ids = [
    boundary_host_set_plugin.consul.id,
  ]

  injected_application_credential_source_ids = [
    boundary_credential_ssh_private_key.consul.id,
  ]
}
We tell Boundary that the inbound connection should happen through workers with a type of ingress, and the egress connection should be established by a worker with a type of egress. The dynamic host set for Consul is configured as the host_source_ids, and the SSH key is configured as an injected credential. Boundary has two types of credentials: injected or brokered. Injected credentials are handled completely transparent to the end user, while brokered credentials are provided to the user (and they can see/copy these credentials).
The final piece to configure is a Boundary alias. An alias points to a target, but allows us to use a friendly name to connect to the target instead of a random ID (the target ID). Add an alias named consul.server to the Consul SSH target:
resource "boundary_alias_target" "consul_ssh" {
  name           = "consul-servers-ssh"
  scope_id       = "global"
  value          = "consul.server"
  destination_id = boundary_target.consul_ssh.id
}
For Consul UI/CLI access we will not use dynamic host discovery. This is because the UI is exposed through an internal load balancer. Instead we add a static host for the internal load balancer to our static host catalog:
resource "boundary_host_static" "consul_http" {
  name            = "Consul UI"
  address         = "10.0.10.4"
  host_catalog_id = boundary_host_catalog_static.web.id
}
We add the static host to a static host set:
resource "boundary_host_set_static" "consul_http" {
  host_catalog_id = boundary_host_catalog_static.web.id
  host_ids = [
    boundary_host_static.consul_http.id,
  ]
}
Since there are no credentials required (except for a valid certificate but this is configured in our laptop/browser) we can go ahead and configure a target:
resource "boundary_target" "consul_http" {
  name        = "consul-servers-http"
  description = "Consul servers UI on Azure"
  scope_id    = boundary_scope.project.id

  type         = "tcp"
  default_port = "443"

  ingress_worker_filter = "\"azure\" in \"/tags/type\""
  egress_worker_filter  = "\"azure\" in \"/tags/type\""

  host_source_ids = [
    boundary_host_set_static.consul_http.id,
  ]
}
Note that the target is for port 443. We decided that instead of trying to remember which port the UI is exposed on for Consul and Nomad we expose port 443 on the load balancer and point it at the correct backend port. Then we do not need to specify a port in our browser. The target type is tcp. Boundary has two types of targets: ssh and tcp. SSH targets support credential injection, but this is not true for TCP targets.
Finally, add an alias for the Consul HTTP target:
resource "boundary_alias_target" "consul_http" {
  name                      = "consul-servers-http"
  scope_id                  = "global"
  value                     = "consul.${var.domain}"
  destination_id            = boundary_target.consul_http.id
  authorize_session_host_id = boundary_host_static.consul_http.id
}
Private access for Nomad (clients and servers) is configured in the exact same way as for Consul, so we do not need to look at the details here.
Verifying access#
With all the new infrastructure in place it is time to provision it and see if it works!
Run through terraform init, terraform plan and terraform apply for all the infrastructure pieces. If you want to use the justfile in the repository you can run the following command:
$ just hcp-apply apply
This first runs the hcp-apply recipe that sets up a HCP project and HCP Boundary cluster, followed by the apply recipe that provisions all the other infrastructure pieces. As mentioned before, I treat the HCP infrastructure separately because I do not want to tear it down and provision it again all the time (because it is a bit time-consuming).
While everything is being provisioned you can install the Boundary client on your computer.
Open the Boundary desktop client and enter your HCP Boundary cluster ID, then sign in with the administrator user that you have set up. Once you are signed in you are met with the following list of targets:

You could connect to a target via the Boundary desktop client, but to explore if the transparent sessions work you can just connect to an alias from your terminal:
$ ssh nomad.servers
azureuser@nomad-serversRA0MSI:~$ # ...
We can also verify that the UI works (Nomad shown in the following image):
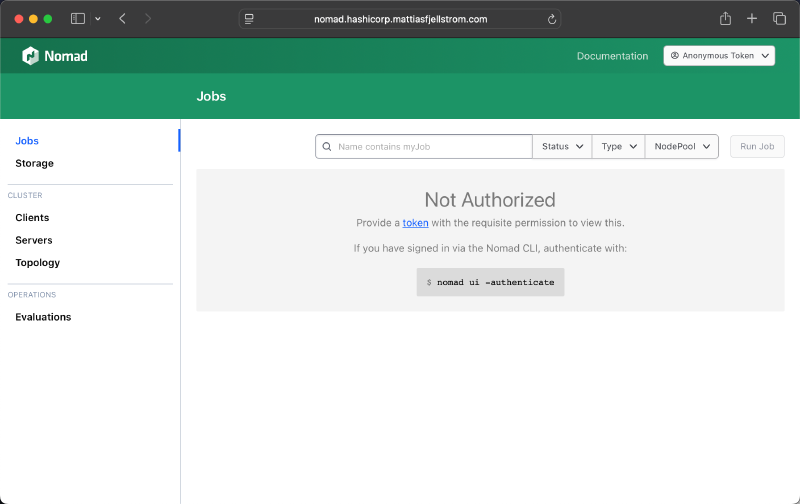
Remember that the UI is now exposed on port 443, so no special port should be used when accessing the UI.
We can similarly access Nomad (and Consul) using the CLI. Just configure the required environment variables like before (using port 443 instead of 4646 for Nomad):
$ export NOMAD_ADDR=https://nomad.hashicorp.mattiasfjellstrom.com:443
$ export NOMAD_CACERT=$(pwd)/infrastructure/nomad/tls/nomad.hashicorp.mattiasfjellstrom.com-agent-ca.pem
$ export NOMAD_CLIENT_CERT=$(pwd)/infrastructure/nomad/tls/global-cli-nomad.hashicorp.mattiasfjellstrom.com.pem
$ export NOMAD_CLIENT_KEY=$(pwd)/infrastructure/nomad/tls/global-cli-nomad.hashicorp.mattiasfjellstrom.com-key.pem
$ nomad acl bootstrap
Accessor ID  = ea7f1178-cb9b-3d78-f4de-33b2f0b5d89f
Secret ID    = 3e4d153a-438e-ba7e-19ce-9e50e14ac7e3
...
Summary of part 8#
In this part we have gone from exposing our Nomad (and Consul) cluster to the public to locking down access through HashiCorp Boundary. Now we are at a point where we could leave the Consul and Nomad clusters running (if we feel like paying for it) without worrying about keeping our kingdom open to the internet.
In the next part we will return to Nomad again. We will start exploring how we can expose applications running on our Nomad cluster to the outside world.
Stay tuned!
From the Boundary documentation https://developer.hashicorp.com/boundary/docs/concepts/domain-model/hosts ↩︎