
In the previous part we enabled mTLS for server and client traffic, and we enabled gossip encryption. These are two major security features that makes sure the traffic in transit is encrypted.
A glaring issue is still that anyone with access to a valid certificate to talk to the Nomad cluster can do whatever they want inside of the cluster. To rectify this situation we need to enable the acccess control list (or ACL) feature.
The Nomad ACL system comes with a few concepts we need to learn about: policies, roles, and tokens.
We will take our Nomad cluster one step further in this blog post by going from the Nomad community edition to Nomad Enterprise. This is primarily because we will introduce namespaces which is an enterprise feature.
Finally, the current Terraform configuration is one mono-configuration. In the real world it is rare that we would bring up our Consul and Nomad clusters through one and the same Terraform configuration. It would be more realistic to split the Terraform configuration into multiple parts. So this is what we will do in this part! However, for now we will still only use a single Azure virtual network with separate subnets for each type of deployment (Consul servers, Nomad servers, and Nomad clients).
The final state of the source code after this part can be found in the accompanying GitHub repository.
Let’s get started!
Nomad Enterprise#
The first task we will tackle is to go from Nomad community edition to Nomad Enterprise.
To enable Nomad Enterprise we need to do two things:
- Add a Nomad Enterprise license to the Nomad servers (not the clients).
- Download the Nomad Enterprise binary instead of the community edition binary we have been using so far.
If you have a Nomad Enterprise license, add it to a file named nomad.hclic on a path reachable from Terraform. In this example the file is located in ../license/ relative to the Terraform code for the Nomad servers.
Update the cloudinit configuration to add the Nomad Enterprise license file to the servers:
locals {
  nomad = {
    cloudinit_files = {
      write_files = [
        {
          path    = "/etc/nomad.d/license/nomad.hclic"
          content = file("../license/nomad.hclic")
        },
        # other files omitted ...
      ]
    }
  }
}
Update the Nomad server configuration file. Add the license_path argument to the server stanza:
# the rest of the file omitted ...
server {
  enabled          = true
  bootstrap_expect = 3
  encrypt          = "${random_bytes.nomad_gossip_key.base64}"
  license_path     = "/etc/nomad.d/license/nomad.hclic"
}
You need to make sure that the Nomad user on the server owns the license file. The current cloudinit script already takes care of this.
Enable ACL#
Enabling the ACL system requires that we update the server and client configuration files.
For both the server and client configurations, add the acl stanza at the root level:
acl {
  enabled = true
}
This might seem like a trivial change. However, there is more work to be done after we have provisioned the cluster and want to start using it to do things in Nomad. We will return to this later in the blog post.
Refactor Terraform configurations#
The source code for this part in the accompanying GitHub repository reveals that a lot of changes has been introduced.
It will not benefit anyone to go through these changes in detail. However, most of the changes are outlined in the following list:
- There is a separate platform Terraform configuration for common parts. Currently this Terraform configuration consists of an Azure virtual network.
- There are separate Terraform configurations for Consul servers, Nomad servers, and Nomad clients.
- Each configuration provisions a subnet to the platform virtual network.
- The Consul cluster now has an Azure load balancer and the Consul servers expose the Consul UI (see next section)
- To simplify running Terraform commands a justfile has been created. Just is similar to Make. See the just GitHub repository to learn more.
Apart from these changes all the necessary Terraform configuration files have been added to each configuration to make them standalone.
Consul UI#
In the refactoring we took the opportunity to expose the Consul UI through an Azure load balancer. This is great for debugging purposes since we can see if and when Nomad servers and clients are registered in Consul.
The Consul UI is not enabled by default. This is in contrast to the Nomad UI.
To enable the Consul UI we need to update the Consul server configuration file by adding the addresses and ui_config stanzas:
addresses {
  http = "0.0.0.0"
}

ui_config {
  enabled = true
}
The Consul UI can be reached on http://<load balancer public IP>:8500/ui.
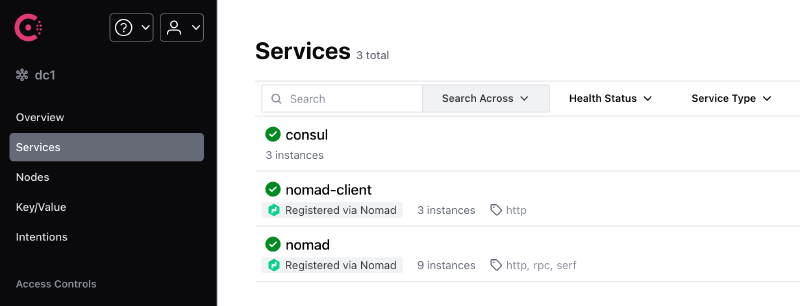
When you have successfully provisioned all the infrastructure you will be able to verify this through the Consul UI as shown in the following image:
Working with Nomad ACL#
If you have installed just you can use the justfile in the repository.
The justfile is similar to a Makefile. It is just for convenience to make it easier to issue commands.
The justfile contains a number of recipes. There are recipes for running terraform apply and terraform destroy for each of the different Terraform configurations. There are also dependencies between recipes. If you run just nomad-clients-apply to provision the Nomad clients, this will trigger a number of dependencies which include provisioning the platform, Consul servers, and Nomad servers.
So either go through provisioning each Terraform configuration individually, or run the following just command:
$ just nomad-clients-apply
...
Once everything is provisioned you can get the output from the Nomad server Terraform configuration and set the environment variables in your terminal:
eval $(just nomad-servers-output)
If we at this point try to list our server members we are met with an error:
$ nomad server members
Error querying servers: Unexpected response code: 403 (Permission denied)
This error message is expected when we have enabled the Nomad ACL system. To be able to do anything we need a Nomad token. The first token is obtained by performing the ACL bootstrap operation:
$ nomad acl bootstrap
Accessor ID  = bfbd2945-8890-9071-bc9a-d4aa5cf6465c
Secret ID    = 4c827567-ee52-8ad6-df3a-3becb167e61a
Name         = Bootstrap Token
Type         = management
Global       = true
Create Time  = 2025-07-07 19:57:25.190806686 +0000 UTC
Expiry Time  = <none>
Create Index = 9
Modify Index = 9
Policies     = n/a
Roles        = n/a
A token has an accessor ID which allows you to reference the token without exposing the secret value. The token value itself is the secret ID. Tokens can be of two different types: management and client. Management tokens are used for initial cluster configuration, like what we will do right now. Management tokens are like Vault root tokens, they can do anything inside of Nomad.
Set the secret ID value as the NOMAD_TOKEN environment variable:
$ export NOMAD_TOKEN=4c827567-ee52-8ad6-df3a-3becb167e61a
If you list the server members again it will work:
$ nomad server members
Name                        Address   Port  Status  Leader  Raft Version  Build       Datacenter  Region
nomad-servers8KH2F8.global  10.0.1.6  4648  alive   false   3             1.10.2+ent  dc1         global
nomad-serversCP0XIJ.global  10.0.1.5  4648  alive   false   3             1.10.2+ent  dc1         global
nomad-serversDVJ548.global  10.0.1.4  4648  alive   true    3             1.10.2+ent  dc1         global
Imagine now that we want to allow a development team named Team 1 to use a Nomad namespace in our cluster. They should be able to run jobs inside of this namespace, but no other namespace. They should not have any other permissions inside of Nomad.
To achieve this we can create a policy where we configure the required permissions for the given namespace.
An example policy document in HCL for Team 1 could look like this:
namespace "team1" {
  policy       = "read"
  capabilities = ["submit-job","dispatch-job","read-logs"]
}
This policy uses a predefined policy named read which includes necessary permissions to read things inside a namespace. In addition to this we add specific capabilities to allow the team to submit jobs, dispatch jobs, and read logs from the jobs.
We can create the policy using this policy document with the Nomad CLI. However, we are interested in managing resources in Nomad using Terraform, so let’s do that instead!
First of all, we might want to use similar policies for other teams. We can turn the policy shown above into a template in a file named team.hcl.tmpl:
namespace "${namespace}$" {
  policy       = "read"
  capabilities = ["submit-job","dispatch-job","read-logs"]
}
We create a new Terraform configuration for Nomad specific resources. In a main.tf file, tell Terraform that we will use the Nomad provider for Terraform:
terraform {
  required_providers {
    nomad = {
      source  = "hashicorp/nomad"
      version = "2.5.0"
    }
  }
}

provider "nomad" {}
The Nomad provider will read the environment variables that we have set (e.g. NOMAD_TOKEN, NOMAD_ADDR, etc). So we do not need to add any explicit configuration in the provider block.
Next, let’s create the namespace and the policy resources:
resource "nomad_namespace" "team1" {
  name        = "team1"
  description = "Namespace for Team 1"
}

resource "nomad_acl_policy" "team1" {
  name        = "team1"
  description = "Policy for Team 1"

  rules_hcl = templatefile("${path.module}/team.hcl.tmpl", {
    namespace = nomad_namespace.team1.name
  })
}
We could also use Terraform to generate an initial token with this policy attached:
resource "nomad_acl_token" "team1" {
name = "team1-token"
type = "client"
policies = [
nomad_acl_policy.team1.name,
]
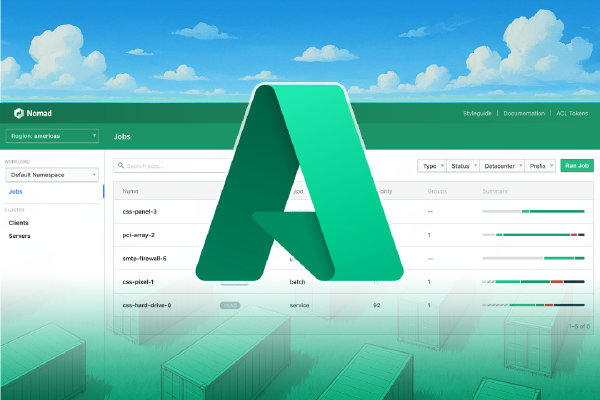
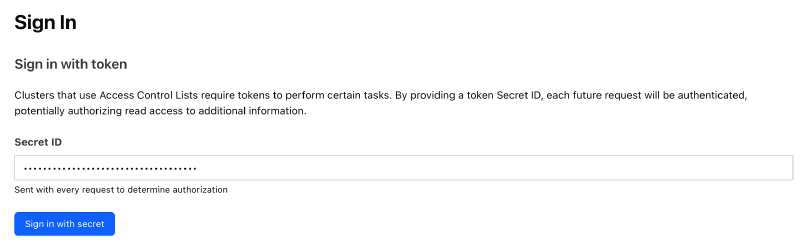
}Provision this Terraform configuration and grab the resuling token. Go to the Nomad UI (e.g. in my case nomad.hashicorp.mattiasfjellstrom.com:4646/ui) and sign in using the token:
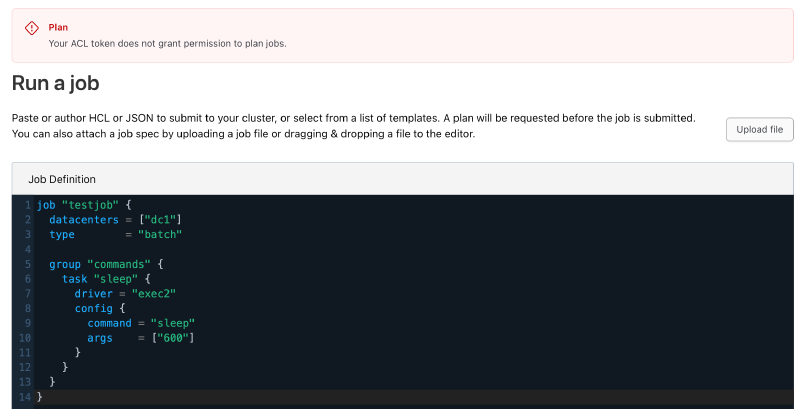
Once signed in, go to the jobs page and submit the following job:
job "testjob" {
  datacenters = ["dc1"]
  type        = "batch"

  group "commands" {
    task "sleep" {
      driver = "exec2"
      config {
        command = "sleep"
        args    = ["600"]
      }
    }
  }
}
You will be met with an error message that says Your ACL token does not grant permission to plan jobs. Oh no! Well, we never specified in which namespace this job would run. Nomad defaults to use the default namespace.
Update the job to include the namespace argument:
job "testjob" {
  datacenters = ["dc1"]
  type        = "batch"

  namespace = "team1"

  group "commands" {
    task "sleep" {
      driver = "exec2"
      config {
        command = "sleep"
        args    = ["600"]
      }
    }
  }
}
Run a new plan for the updated job:
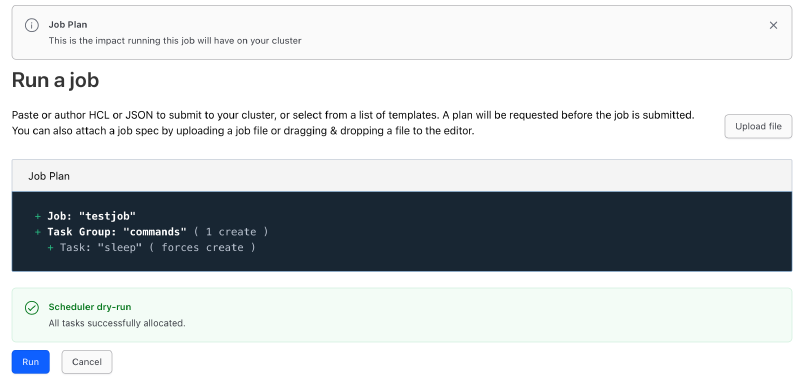
This time the plan was OK and we can click on Run to run the job.
What we did here was to create a policy that provided permissions inside a Nomad namespace. There are many other objects you can assign permissions for in Nomad. Most of these are operator/admin specific, and not relevant for development teams. For now we will not dive any deeper into the different permissions.
We created a token and attached a single policy to it. We could assign multiple policies. If we always assign a given set of policies to a token, it could be a good idea to group the policies into a role. You can create a role using Terraform like so:
resource "nomad_acl_role" "example" {
  name = "role1"

  policy {
    name = "policy1"
  }

  policy {
    name = "policy2"
  }

  policy {
    name = "policy3"
  }
}
Then when you create a token you can use the role instead of the policies:
resource "nomad_acl_token" "example" {
  name = "example"
  type = "client"

  role {
    id = nomad_acl_role.example.id
  }
}
If you have followed along and would like to remove all of the infrastructure we set up for this part there is a recipe in the justfile to destroy all the clusters in the correct order:
$ just destroy
...
Summary of Part 6#
A lot happened in this part!
First we switched from running Nomad community edition to run Nomad Enterprise. This does not change a lot, but it allows us to use Nomad namespaces inside our cluster. This is a way to run multiple tenants inside of the cluster.
Next we enabled the ACL system. This is a big change which means any interaction with Nomad must have a valid token with the correct permissions to perform the task you are trying to perform. With the ACL system enabled we must create a first Nomad token using the nomad acl bootstrap command. This results in the first management token, that has permissions to do anything inside of Nomad.
We spent a little time refactoring the Terraform configuration from the previous part. Most notably we split the Terraform configuration from a mono-configuration to multiple smaller configurations. There is a shared platform Terraform configuration, and one configuration each for the Consul servers, Nomad servers, and Nomad clients.
Finally, we went through an example of provisioning resources to the Nomad cluster using Terraform. Specifically, we created a namespace for a development team, added a policy to allow the team to use the namespace, and we created an initial token for the development team.
In the next part we will revisit Consul. Currently we use Consul for a single purpose: to form the Nomad cluster. We have neglected securing our Consul setup, but now it feels like a good time to secure this part of our infrastructure as well. Ultimately we want to use the Consul service catalogue, service discovery, and service mesh features.
Stay tuned!