

In the previous part we extended our Nomad cluster to include Nomad client agents (or just clients). It’s on the client that we run workloads. While we were at it we also started out first Nomad job on one of these clients.
The time has come to start thinking about security.
Why did we not start with security? Ideally we would have done just that.
However, I want to remind you about the premise of this blog post series: I am learning Nomad as I go! My experience with Nomad so far is close to non-existent. For me it is a more educational approach to get a basic cluster even working before I introduce a more complex (albeit more secure) configuration.
The specific security features we will introduce in this part are:
- TLS, or actually mTLS (mutual TLS).
- Gossip encryption.
Both of these security features concern encryption of traffic going in to, going out from, and taking place inside of, our Nomad cluster.
While we are at it we will add a DNS record so that we can access Nomad on a nice address (I will use nomad.hashicorp.mattiasfjellstrom.com) instead of a random IP-address.
You find the final source code for this part (and all other parts) in the accompanying GitHub repository. Look in the part05 directory.
There will be no change to the overall Azure infrastructure and architecture in this part, except for the addition of a DNS record where we can reach the Nomad servers.
Enabling TLS for Nomad servers and clients#
You can configure Nomad to use mTLS for HTTP and RPC traffic communication. Currently we have disabled this feature in our Nomad cluster. This is not ideal!
Generate TLS certificates#
The first step in rectifying this situation is to create certificates for our Nomad servers and clients.
The Nomad documentation recommends that you use a private certificate authority (CA) and not a public one. One option could use is to configure the PKI secrets engine on Vault. However, we have not introduced Vault into the mix yet and this is not the time for that.
A simpler approach is to use the built-in nomad tls commands to generate certificates. This command allows us to create a CA certificate, and certificates for each type of role (e.g. server or client).
We can create the CA certificate and key using the command:
$ nomad tls ca create
The outputs from this command are two files: nomad-agent-ca-key.pem and nomad-agent-ca.pem.
As mentioned in the introduction, later in this blog post we will add a DNS record for the Nomad servers. We need to make sure the certificates will work with the domain we add. To accommodate this we change the command to:
$ nomad tls ca create \
    -name-constraint="true" \
    -domain "$domain" \
    -additional-domain "$domain"
==> CA certificate saved to: nomad.hashicorp.mattiasfjellstrom.com-agent-ca.pem
==> CA certificate key saved to: nomad.hashicorp.mattiasfjellstrom.com-agent-ca-key.pem
Set the value of the domain variable to the domain you plan to use. In my case I set it like this: domain="nomad.hashicorp.mattiasfjellstrom.com".
Next we create certificates for each type of role. First for the Nomad servers:
$ nomad tls cert create \
    -server \
    -domain "$domain" \
    -additional-dnsname "$domain"
==> WARNING: Server Certificates grants authority to become a
    server and access all state in the cluster including root keys
    and all ACL tokens. Do not distribute them to production hosts
    that are not server nodes. Store them as securely as CA keys.
==> Using CA file nomad.hashicorp.mattiasfjellstrom.com-agent-ca.pem and CA key nomad.hashicorp.mattiasfjellstrom.com-agent-ca-key.pem
==> Server Certificate saved to global-server-nomad.hashicorp.mattiasfjellstrom.com.pem
==> Server Certificate key saved to global-server-nomad.hashicorp.mattiasfjellstrom.com-key.pem
Next for the Nomad clients:
$ nomad tls cert create \
    -client \
    -domain "$domain" \
    -additional-dnsname "$domain"
==> Using CA file nomad.hashicorp.mattiasfjellstrom.com-agent-ca.pem and CA key nomad.hashicorp.mattiasfjellstrom.com-agent-ca-key.pem
==> Client Certificate saved to global-client-nomad.hashicorp.mattiasfjellstrom.com.pem
==> Client Certificate key saved to global-client-nomad.hashicorp.mattiasfjellstrom.com-key.pem
Finally for certificates we can use to access Nomad via the CLI or UI from our own laptop:
nomad tls cert create \
    -cli \
    -domain "$domain" \
    -additional-dnsname "$domain"
==> Using CA file nomad.hashicorp.mattiasfjellstrom.com-agent-ca.pem and CA key nomad.hashicorp.mattiasfjellstrom.com-agent-ca-key.pem
==> Cli Certificate saved to global-cli-nomad.hashicorp.mattiasfjellstrom.com.pem
==> CLI Certificate key saved to global-cli-nomad.hashicorp.mattiasfjellstrom.com-key.pem
Technically we can use any of the roles (server, client, CLI) to access Nomad from our own laptop, but it is a bad practice to use the server and client certificates anywhere else than on the servers and the clients, respectively.
After this exercise you should have the following TLS certificates created:
$ tree .
.
├── global-cli-nomad.hashicorp.mattiasfjellstrom.com-key.pem
├── global-cli-nomad.hashicorp.mattiasfjellstrom.com.pem
├── global-client-nomad.hashicorp.mattiasfjellstrom.com-key.pem
├── global-client-nomad.hashicorp.mattiasfjellstrom.com.pem
├── global-server-nomad.hashicorp.mattiasfjellstrom.com-key.pem
├── global-server-nomad.hashicorp.mattiasfjellstrom.com.pem
├── nomad.hashicorp.mattiasfjellstrom.com-agent-ca-key.pem
└── nomad.hashicorp.mattiasfjellstrom.com-agent-ca.pem

1 directory, 8 files
Place all the certificates in a tls directory with the Terraform configuration.
Enable TLS on the Nomad servers#
Enabling TLS on the Nomad servers consists of two steps:
- Copy the relevant certificates to the Nomad servers.
- Update the Nomad server configuration.
In our Terraform configuration we have a local value where we prepare all the files we want to create on the Nomad servers through cloudinit. Add the TLS certificates to this local value:
locals {
  nomad_servers = {
    # other values omitted ...

    cloudinit_files = {
      write_files = [
        # other files omitted ...
        {
          path    = "/etc/nomad.d/tls/nomad.hashicorp.mattiasfjellstrom.com-agent-ca.pem"
          content = file("${path.module}/tls/nomad.hashicorp.mattiasfjellstrom.com-agent-ca.pem")
        },
        {
          path    = "/etc/nomad.d/tls/global-server-nomad.hashicorp.mattiasfjellstrom.com.pem"
          content = file("${path.module}/tls/global-server-nomad.hashicorp.mattiasfjellstrom.com.pem")
        },
        {
          path    = "/etc/nomad.d/tls/global-server-nomad.hashicorp.mattiasfjellstrom.com-key.pem"
          content = file("${path.module}/tls/global-server-nomad.hashicorp.mattiasfjellstrom.com-key.pem")
        }
      ]
    }
  }
}
We add the files to /etc/nomad.d/tls/. This directory will be created by cloudinit. We already run a command in our cloudinit scripts to make the Nomad user the owner of these files:
# other commands omitted ...
chown -R nomad:nomad /etc/nomad.d
The other step was to update the Nomad server configuration. All the configuration for TLS is contained within the tls stanza:
tls {
  http = true
  rpc  = true

  ca_file   = "/etc/nomad.d/tls/nomad.hashicorp.mattiasfjellstrom.com-agent-ca.pem"
  cert_file = "/etc/nomad.d/tls/global-server-nomad.hashicorp.mattiasfjellstrom.com.pem"
  key_file  = "/etc/nomad.d/tls/global-server-nomad.hashicorp.mattiasfjellstrom.com-key.pem"

  verify_server_hostname = true
  verify_https_client    = true
}
That is all we need to do on our Nomad servers!
Enable TLS on the Nomad clients#
Enabling TLS on the Nomad clients consists of the same two steps as for the servers:
- Copy the relevant certificates to the Nomad clients.
- Update the Nomad client configuration.
The code changes are similar as for the Nomad servers, but we should use the correct certificates we created for the clients:
locals {
  nomad_clients = {
    # other values omitted ...

    cloudinit_files = {
      write_files = [
        # other files omitted ...
        {
          path    = "/etc/nomad.d/tls/nomad.hashicorp.mattiasfjellstrom.com-agent-ca.pem"
          content = file("${path.module}/tls/nomad.hashicorp.mattiasfjellstrom.com-agent-ca.pem")
        },
        {
          path    = "/etc/nomad.d/tls/global-client-nomad.hashicorp.mattiasfjellstrom.com.pem"
          content = file("${path.module}/tls/global-client-nomad.hashicorp.mattiasfjellstrom.com.pem")
        },
        {
          path    = "/etc/nomad.d/tls/global-client-nomad.hashicorp.mattiasfjellstrom.com-key.pem"
          content = file("${path.module}/tls/global-client-nomad.hashicorp.mattiasfjellstrom.com-key.pem")
        }
      ]
    }
  }
}
Nomad is run as the root user on clients, so the permissions to these files will be taken care of automatically.
The changes to the Nomad client configuration looks like what we did for the servers, except for referencing the correct certificates:
tls {
  http = true
  rpc  = true

  ca_file   = "/etc/nomad.d/tls/nomad.hashicorp.mattiasfjellstrom.com-agent-ca.pem"
  cert_file = "/etc/nomad.d/tls/global-client-nomad.hashicorp.mattiasfjellstrom.com.pem"
  key_file  = "/etc/nomad.d/tls/global-client-nomad.hashicorp.mattiasfjellstrom.com-key.pem"

  verify_server_hostname = true
  verify_https_client    = true
}
That finishes up the changes to the Nomad clients!
Perform required changes in the Azure load balancer#
It turns out we have to make a small change in our load balancer.
Even if the Azure load balancer supports HTTPS health checks it will not work in this case when mTLS is enabled. Uploading certificates for use in health probes is not supported on the Azure load balancer.
We can’t have failing health checks because then no traffic will be sent to either of the servers.
To fix this we can update the health check to be a TCP probe instead:
resource "azurerm_lb_probe" "nomad_servers" {
  loadbalancer_id = azurerm_lb.nomad_servers.id
  name            = "nomad-status"
  protocol        = "Tcp"
  port            = 4646
}
This is not perfect, but it will have to do for now.
Enabling gossip encryption for Nomad servers#
A cluster of Nomad servers have one leader and multiple followers. The leader handles all write operations that the servers perform.
Nomad servers use the raft protocol to determine who is the leader. If the leader is disconnected from the cluster for some reason, a new leader is elected among the remaining servers.
This post is not a deep-dive into raft. If you want to learn more you can read details about this in the Nomad documentation or see Raft explained visually on The Secret Lives of Data.
Server members communicate with each other using a gossip protocol (through the Serf library). The purpose of this protocol is:
… [it] provides server membership management, cross-region requests, failure detection, and automatic clustering using a consensus protocol.1
This communication happens in plain text by default. You can configure a symmetric key encryption for the gossip protocol by providing an encryption key (the same key) to each server member in the cluster. Note that you do not need to give the key to the Nomad client members because they are not part of the gossip communication.
The Nomad CLI has a command you can use to generate a suitable encryption key:
$ nomad operator gossip keyring generate
Xk/Z1l4RqVmVjumuj0u7nf4mlAphCDNO3IIvVRtZlOg=
You can run this command on any machine where the Nomad binary is available, there is no connection between where you generate the key and where you plan to use it.
In our case we want to use Terraform to generate an encryption key, because this will simplify the automation for us. The random provider for Terraform seems like a good candidate to use for generating this key.
Add the random provider to the Terraform required providers:
terraform {
  required_providers {
    # other providers omitted ...

    random = {
      source  = "hashicorp/random"
      version = "~> 3.7"
    }
  }
}
The random provider does not require any mandatory configuration.
The gossip encryption key must be a base64-encoded string of 32 random bytes. Use the random_bytes resource type from the random provider to create this key:
resource "random_bytes" "nomad_gossip_key" {
  length = 32
}
Add this key to the server stanza of the Nomad server configuration. The relevant part is shown below:
# the rest of the configuration is omitted ...

server {
  enabled          = true
  bootstrap_expect = 3

  encrypt = "${random_bytes.nomad_gossip_key.base64}"
}
That is all we needed to do to encrypt the gossip communication between all the Nomad servers - that was easy!
Adding a DNS record for the Nomad UI#
In an ideal world we would have private network access to Nomad. We can configure this using Boundary in the future if we keep this blog series going for long enough! However, we will continue to allow the Nomad cluster to be publicly available.
We have configured TLS for our Nomad servers, and when we did that we also added an additional domain for the Nomad cluster: nomad.hashicorp.mattiasfjellstrom.com. Remember that if you follow along you will have to use your own available domain name.
We need to add this DNS record to our Terraform configuration.
In my case I have my DNS zones already configured in a different resource group on Azure. To reference this group, and the DNS zone within, I add two variables to the Terraform configuration:
variable "dns_resource_group_name" {
  description = "Name of the DNS resource group"
  type        = string
}

variable "dns_hosted_zone_name" {
  description = "Name of the DNS hosted zone"
  type        = string
}
Provide appropriate values for these to fit your context.
The DNS record should point at the public IP-address of the load balancer. This means we need to configure an A-record because this type of record associates a DNS name with an IP-address.
The Terraform code to configure the DNS record is shown below:
data "azurerm_resource_group" "dns" {
  name = var.dns_resource_group_name
}

data "azurerm_dns_zone" "default" {
  name = var.dns_hosted_zone_name
}

locals {
  dns = {
    nomad = "nomad"
  }
}

resource "azurerm_dns_a_record" "default" {
  name                = local.dns.nomad
  zone_name           = data.azurerm_dns_zone.default.name
  resource_group_name = data.azurerm_resource_group.dns.name
  ttl                 = "60"

  records = [azurerm_public_ip.nomad_servers_lb.ip_address]
}
Here we introduce a local value for DNS names. Currently it only contains Nomad, but we might add additional names later on.
That is all we need to configure for the DNS part. However, a good idea would be to now go back and update the part of our Nomad server and client cloudinit scripts where we read the TLS certificates. We could use this new local value together with the hosted zone name variable to avoid hardcoding the names of the certificates.
To illustrate what this looks like for the Nomad server configuration, see below. For the part where we read the contents of the files:
locals {
  nomad_servers = {
    # other values omitted ...

    cloudinit_files = {
      write_files = [
        # other files omitted ...
        {
          path    = "/etc/nomad.d/tls/${local.dns.nomad}.${var.dns_hosted_zone_name}-agent-ca.pem"
          content = file("${path.module}/tls/${local.dns.nomad}.${var.dns_hosted_zone_name}-agent-ca.pem")
        },
        {
          path    = "/etc/nomad.d/tls/global-server-${local.dns.nomad}.${var.dns_hosted_zone_name}.pem"
          content = file("${path.module}/tls/global-server-${local.dns.nomad}.${var.dns_hosted_zone_name}.pem")
        },
        {
          path    = "/etc/nomad.d/tls/global-server-${local.dns.nomad}.${var.dns_hosted_zone_name}-key.pem"
          content = file("${path.module}/tls/global-server-${local.dns.nomad}.${var.dns_hosted_zone_name}-key.pem")
        }
      ]
    }
  }
}
And the corresponding change in the server configuration file:
tls {
  http = true
  rpc  = true

  ca_file   = "/etc/nomad.d/tls/${local.dns.nomad}.${var.dns_hosted_zone_name}-agent-ca.pem"
  cert_file = "/etc/nomad.d/tls/global-server-${local.dns.nomad}.${var.dns_hosted_zone_name}.pem"
  key_file  = "/etc/nomad.d/tls/global-server-${local.dns.nomad}.${var.dns_hosted_zone_name}-key.pem"

  verify_server_hostname = true
  verify_https_client    = true
}
Access Nomad with TLS#
It is time to run terraform init, terraform plan, and terraform apply to provision the Nomad cluster.
Once the apply completes wait a minute for the Consul and Nomad clusters to form correctly. Now comes the challenge of how to access Nomad when TLS is enabled!
Access Nomad with TLS using the CLI#
First of all we need to tell our Nomad CLI where our Nomad cluster is. We can do that through the NOMAD_ADDR environment variable:
$ export NOMAD_ADDR=https://nomad.hashicorp.mattiasfjellstrom.com:4646
If we try to ask our Nomad cluster something at this point we are met with an error:
$ nomad server members
Error querying servers: Get "https://nomad.hashicorp.mattiasfjellstrom.com:4646/v1/agent/members": remote error: tls: certificate required
We must present a valid certificate because we have configured mTLS. We can set a few more environment variables for the CA certificate and the client (CLI) certificate and key:
$ export NOMAD_CACERT=$(pwd)/tls/nomad.hashicorp.mattiasfjellstrom.com-agent-ca.pem
$ export NOMAD_CLIENT_CERT=$(pwd)/tls/global-cli-nomad.hashicorp.mattiasfjellstrom.com.pem
$ export NOMAD_CLIENT_KEY=$(pwd)/tls/global-cli-nomad.hashicorp.mattiasfjellstrom.com-key.pem
If we repeat the command that failed before we now get a response:
$ nomad server members
Name                        Address   Port  Status  Leader  Raft Version  Build   Datacenter  Region
nomad-servers5AYDEP.global  10.0.2.6  4648  alive   false   3             1.10.2  dc1         global
nomad-servers9ARJCD.global  10.0.2.4  4648  alive   false   3             1.10.2  dc1         global
nomad-serversYXXJWK.global  10.0.2.5  4648  alive   true    3             1.10.2  dc1         global
We can also verify that we can see the Nomad clients:
$ nomad node status
ID        Node Pool  DC   Name                 Class   Drain  Eligibility  Status
ee8b5c8f  default    dc1  nomad-clientsBIN8VR  <none>  false  eligible     ready
20d5736d  default    dc1  nomad-clientsRJUINA  <none>  false  eligible     ready
549ed297  default    dc1  nomad-clientsRTJG2B  <none>  false  eligible     ready
If we want to be extra sure that the configuration is as we expect we can verify this. To verify that the gossip encryption is enabled, run the following command:
$ nomad agent-info -json | jq -r .stats.serf.encrypted
true
And to verify that mTLS is enabled, run the following command (some output is hidden for brevity):
$ nomad agent-info -json | jq -r .config.TLSConfig
{
  "VerifyHTTPSClient": true,
  "VerifyServerHostname": true,
  "CAFile": "/etc/nomad.d/tls/nomad.hashicorp.mattiasfjellstrom.com-agent-ca.pem",
  "CertFile": "/etc/nomad.d/tls/global-server-nomad.hashicorp.mattiasfjellstrom.com.pem",
  "EnableHTTP": true,
  "EnableRPC": true,
  "KeyFile": "/etc/nomad.d/tls/global-server-nomad.hashicorp.mattiasfjellstrom.com-key.pem"
}
Access Nomad with TLS using a browser#
The instructions for how to access Nomad through a browser when TLS is enabled will differ depending on your OS and your browser. The general steps are as follows:
- Convert the certificate to whatever format step 2 requires. On my MacBook I had to convert the certificate to PFX format.
- Add the CA certificate to the trusted CAs on your OS and/or browser. On my MacBook I added the
nomad.hashicorp.mattiasfjellstrom.com-agent-ca.pemfile to my Keychain Access. - Add the CLI certificate to the certificate store on your OS and/or browser. On my MacBook I added the PFX certificate I created to Keychain Access.
- Browse to the Nomad UI (in my case
https://nomad.hashicorp.mattiasfjellstrom.com) and use the certificate you uploaded in step 2 to access the site.
In my case, to create a PFX version of the certificate I ran the following command:
$ openssl pkcs12 \
  -export \
  -in global-server-nomad.hashicorp.mattiasfjellstrom.com.pem \
  -inkey global-server-nomad.hashicorp.mattiasfjellstrom.com-key.pem \
  -out nomad.pfx
Once all certificates were in place I pointed my browser to the Nomad URL. I get the following prompt in my browser:
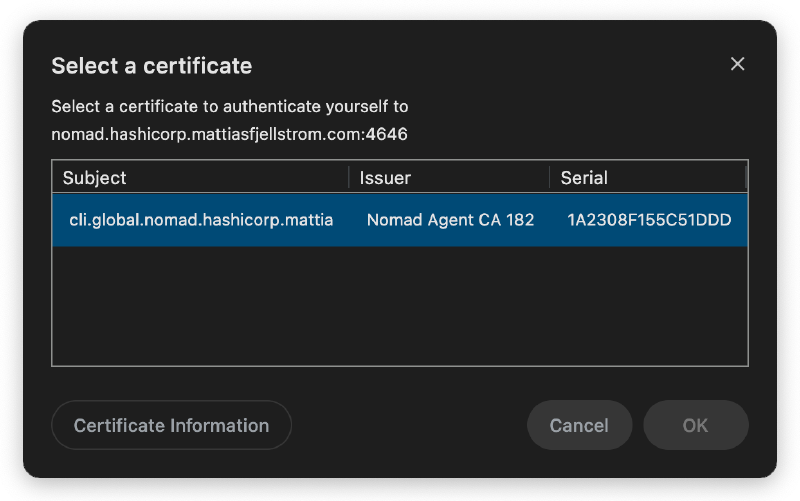
Once I select the certificate and click OK I reach the Nomad UI and can start interacting with it.
These steps are a bit inconvenient. However, in a production scenario you would manage the certificates using some other means (perhaps HashiCorp Vault) and you would also automate provisioning certificates to your developer’s machines.
Summary of Part 5#
In this part we have finally taken a big step in the right direction! We have enabled mutual TLS for all interactions with our Nomad cluster.
We also added a DNS record for the load balancer public IP and we were able to reach Nomad through the CLI and UI using this DNS record.
Things are starting to look good. However, there is one major security feature left in the Nomad environment that we have not yet enabled. I am talking about the Nomad access control list (ACL) system. This will be the topic of the next blog post in this series.
We will also do some refactoring of our Terraform configurations. Currently we deploy everything in one go, which is fine for the exploratory demo work we have been doing so far. Going forward we will start thinking about Consul and Nomad as separate systems, that most likely would not be deployed together like this in a real scenario. This is in preparation for the introduction of Vault into this mix!
Stay tuned!
From the Nomad documentation https://developer.hashicorp.com/nomad/docs/concepts/gossip ↩︎