
You can interact with Nomad via the Nomad CLI, UI, or directly with the API. You can use the Terraform provider for Nomad that uses the API under the hood.
In the last few parts of this series we have only interacted with Nomad using the CLI. In this part we will make sure we can access the Nomad UI as well.
While we are at it we will extend our infrastructure on Microsoft Azure to include an Azure load balancer that we can use to access our Nomad servers. We will remove the Nomad server public IPs so that we must go through the load balancer to reach the Nomad servers.

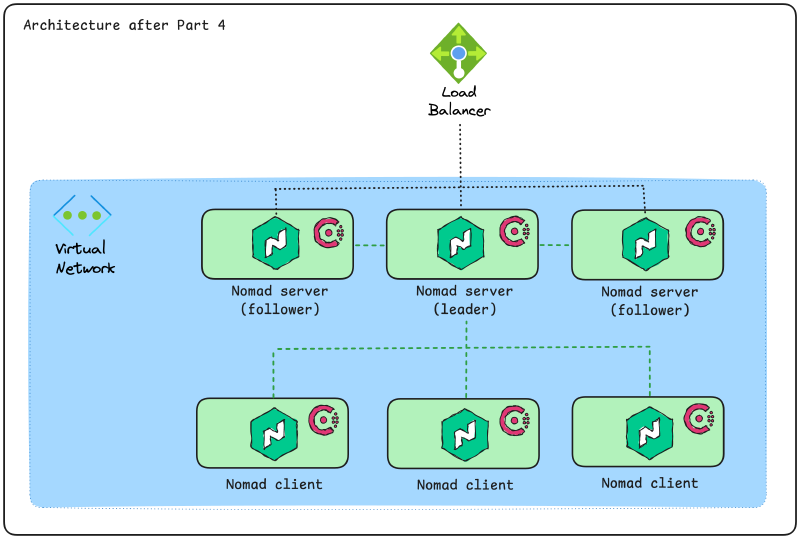
After this part we will have the following architecture on Azure (the Consul servers are not shown):
As always, the source code for this blog series is available on the accompanying GitHub repository.
Exposing the Nomad UI#
To expose the Nomad UI we actually don’t have to do anything. It turns out it is exposed by default.
If we want to explicitly add the required configuration for the Nomad UI we can do so using the ui stanza in the configuration file:
# the rest of the configuration omitted ...

ui {
  enabled = true
}
Each Nomad server or client can either expose the UI or not. You could designate certain machines to expose the UI but not on other machines.
There are more configuration options for the UI, but we only want it to be available so we leave the configuration like in the example above.
The default port for HTTP access on the Nomad servers and clients is 4646. If we want to use a different port, or just want to be explicit about what port is in use, we can add the ports stanza to the configuration file:
# the rest of the configuration omitted ...

ports {
  http = "4646"
}
That is all the configuration we need (or actually didn’t need) to add to enable the Nomad UI. Add this configuration to the Nomad servers.
Provision an Azure load balancer for our Nomad servers#
Instead of accessing the Nomad UI on a specific server that we select we could instead add a load balancer in front of our Nomad servers and access the UI that way. This is what we will do next!
The overall changes we need to make in our infrastructure Terraform code are:
- Add the Azure load balancer resource and required dependencies.
- Update our VMSS module to support Azure load balancer configuration.
- Update our VMSS module to support not provisioning public IPs for the VMSS instances.
- Update the NSG configuration for the Nomad servers to reflect the added load balancer.
Before we dig into the details we should cover what an Azure load balancer is.
An Azure load balancer (or just load balancer) works at layer 4 of the OSI model. It is one of four load balancing services on Azure, the other ones being Azure Application Gateway, Azure Front Door, and Azure Traffic Manager.
A load balancer can be private or public depending on what type of IP-address you assign to it. In the example that follows we will configure a public load balancer, which means we will provision a public IP-address for the load balancer.
The load balancer distributes traffic across its backend pools of virtual machines. The VMSS for the Nomad servers will make up the backend pool for our load balancer.
Health probes are used to determine if the virtual machines in the backend pool are healthy and can receive traffic. The load balancer sends health checks to the machines in the backend pool based on how the health probe is configured. For our Nomad servers we will send health probes to the /v1/agent/health endpoint.
How traffic is load balanced from the load balancer to the virtual machines in the backend pool is determined by the load balancer rules. We will have a single rule that sends traffic on port 4646 on the load balancer to port 4646 on the virtual machines in the backend pool. In addition to this we will create an inbound NAT rule to allow us to connect to the virtual machines on port 22 for SSH access. Load balancer rules are used for load balancing, inbound NAT rules are used for accessing specific ports on specific machines. They have overlapping concerns but are used in different contexts.
Add the Azure load balancer resource and required dependencies#
Since we want to create a public load balancer we first create a public IP-address:
resource "azurerm_public_ip" "nomad_servers_lb" {
  name                = "pip-nomad-servers-lb"
  location            = azurerm_resource_group.default.location
  resource_group_name = azurerm_resource_group.default.name
  allocation_method   = "Static"
}
The public IP address SKU and the load balancer SKU must match. The default SKU for the azurerm_public_ip resource is standard.
Next we can create the load balancer resource itself:
resource "azurerm_lb" "nomad_servers" {
  name                = "lb-nomad-servers"
  resource_group_name = azurerm_resource_group.default.name
  location            = azurerm_resource_group.default.location

  frontend_ip_configuration {
    name                 = "public"
    public_ip_address_id = azurerm_public_ip.nomad_servers_lb.id
  }
}
We can create the backend pool (or backend address pool) without adding any backend addresses to it. This connection is configured on the VMSS resource, not the other way around.
resource "azurerm_lb_backend_address_pool" "nomad_servers" {
  name            = "nomad-servers"
  loadbalancer_id = azurerm_lb.nomad_servers.id
}
The health probe will check the /v1/agent/health endpoint on port 4646 using the HTTP protocol:
resource "azurerm_lb_probe" "nomad_servers" {
  loadbalancer_id = azurerm_lb.nomad_servers.id
  name            = "nomad-status-leader"
  protocol        = "Http"
  port            = 4646
  request_path    = "/v1/agent/health"
}
The single load balancing rule sends all traffic on port 4646 on the load balancer to the corresponding port on the virtual machines in the backend pool:
resource "azurerm_lb_rule" "default" {
  name                           = "default"
  loadbalancer_id                = azurerm_lb.nomad_servers.id
  protocol                       = "Tcp"
  frontend_port                  = 4646
  backend_port                   = 4646
  frontend_ip_configuration_name = azurerm_lb.nomad_servers.frontend_ip_configuration[0].name
  probe_id                       = azurerm_lb_probe.nomad_servers.id
  backend_address_pool_ids = [
    azurerm_lb_backend_address_pool.nomad_servers.id,
  ]
}
Finally, the inbound NAT rule dedicates a number of ports (in the range 2222-2224) and maps these to port 22 on the virtual machines:
resource "azurerm_lb_nat_rule" "ssh" {
  name                           = "ssh"
  resource_group_name            = azurerm_resource_group.default.name
  loadbalancer_id                = azurerm_lb.nomad_servers.id
  protocol                       = "Tcp"
  frontend_port_start            = 2222
  frontend_port_end              = 2224
  backend_port                   = 22
  frontend_ip_configuration_name = azurerm_lb.nomad_servers.frontend_ip_configuration[0].name
  backend_address_pool_id        = azurerm_lb_backend_address_pool.nomad_servers.id
}
Update our VMSS module to support Azure load balancer configuration#
In the previous post in this series we created a VMSS Terraform module. In this module we did not account for any load balancers. To do this we need to add a new variable to our Terraform module that accepts a set of backend address pool IDs:
variable "lb_backend_address_pool_ids" {
  type        = set(string)
  description = "A set of backend address pool IDs for the load balancer to associate with"
  default     = []
}
We leave the default value as an empty set to not break the existing module usage.
In our VMSS resource we must add configuration for the backend address pool IDs inside of the ip_configuration block that is a sub-block to the network_interface block:
network_interface {
  # other configuration omitted ...

  ip_configuration {
    # other configuration omitted ...

    load_balancer_backend_address_pool_ids = length(var.lb_backend_address_pool_ids) > 0 ? var.lb_backend_address_pool_ids : null
    }
  }
}
We check if the length of the provided set is greater than 0. If so, we configure the provided backend address pool IDs. If not we set the argument to null, which essentially removes it from the configuration.
Update our VMSS module to support not provisioning public IPs for the VMSS instances#
In the same VMSS Terraform module we also hard-coded that a public IP-address will be attached to the virtual machines in the set. To remove this behavior we will first add another variable to configure if a public IP-address should be attached or not:
variable "assign_public_ip" {
  type        = bool
  description = "Whether to assign a public IP address to the VMSS instances"
  default     = true
}
We set the default value to true to not break the existing module usage.
Next, in the network_interface block of the VMSS resource we currently have the following public_ip_address configuration:
  network_interface {
    # other configuration omitted ...

    ip_configuration {
      # other configuration omitted ...

      public_ip_address {
        name = "pip-${var.vmss_name}"
      }
    }
  }
To conditionally add a public_ip_address block we need to use a dynamic block:
  network_interface {
    # other configuration omitted ...

    ip_configuration {
      # other configuration omitted ...

      dynamic "public_ip_address" {
        for_each = var.assign_public_ip ? [1] : []

        content {
          name = "pip-${var.vmss_name}"
        }
      }
    }
  }
In the dynamic block we check if we should assign a public IP. If we should, then we create one public_ip_address block. If not, then no block is added.
Update the NSG configuration for the Nomad servers to reflect the added load balancer#
The network security group (NSG) for the Nomad servers currently allows SSH connections from anywhere. Apart from that there are a few default rules added that allows traffic within the VNet to take place.
We still want to be able to access the server instances using SSH, so we leave the SSH rule in place for now:
resource "azurerm_network_security_rule" "nomad_servers_ssh" {
  name                        = "allow_ssh_from_lb"
  priority                    = 1000
  direction                   = "Inbound"
  access                      = "Allow"
  protocol                    = "Tcp"
  source_port_range           = "*"
  destination_port_range      = "22"
  source_address_prefix       = "*"
  destination_address_prefix  = "*"
  resource_group_name         = azurerm_resource_group.default.name
  network_security_group_name = azurerm_network_security_group.nomad_servers.name
}
We also want to access the Nomad UI on port 4646. To allow for this we add a similar rule as before, but with a higher priority and a new destination_port_range:
resource "azurerm_network_security_rule" "nomad_servers_http" {
  name                        = "allow_http_from_lb"
  priority                    = 1100
  direction                   = "Inbound"
  access                      = "Allow"
  protocol                    = "Tcp"
  source_port_range           = "*"
  destination_port_range      = "4646"
  source_address_prefix       = "*"
  destination_address_prefix  = "*"
  resource_group_name         = azurerm_resource_group.default.name
  network_security_group_name = azurerm_network_security_group.nomad_servers.name
}
Note how we still allow traffic from * (in the source_address_prefix). This is required because we are using a public load balancer. So even if the traffic is coming via the load balancer we don’t know what the source IP will be (unless we lock it down to our own current public IP).
From a security standpoint this is only marginally better than what we had before. We will come back to configure network security later.
Access the Nomad UI#
Run through terraform init, terraform plan, and terraform apply to provision the new Nomad cluster.
In the accompanying GitHub repository code there is an additional change in this part, an output has been added:
output "nomad_ui_url" {
description = "Nomad UI URL"
value = "http://${azurerm_public_ip.nomad_servers_lb.ip_address}:4646"
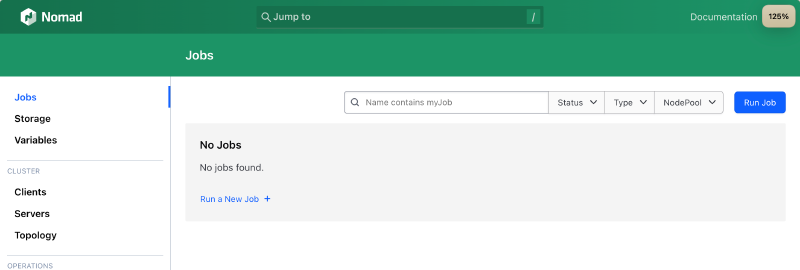
}So once the terraform apply completes you can copy the value of the nomad_ui_url output and open it in your browser. There will be a short delay before the UI loads because the clusters (Consul and Nomad) need to be bootstrapped correctly first.
Summary of Part 4#
In this part we added an Azure load balancer to our solution. The load balancer sits in front of the Nomad servers. We also removed the public IP-addresses from the Nomad servers.
We also added explicit configuration for the Nomad UI to the server configuration file. This was not strictly required because the UI is exposed by default.
Now we are ready to start strengthening the security of our Nomad cluster. There are two primary security features we will look at in the next part:
- Gossip encryption.
- TLS.
In addition to this we will add a DNS name where we can access the Nomad cluster instead of using IP-addresses.
Stay tuned!