
In the previous post we introduced Consul to help us to bootstrap a Nomad cluster. The Nomad servers only make up a small part of the Nomad cluster as a whole. To complete our Nomad cluster we also need Nomad clients.

Configuring Nomad clients requires a bit more work than configuring the Nomad servers.
Nomad relies on task drivers to execute different types of tasks. An example of a task driver is docker. There are a few task drivers that comes bundled with Nomad:
- Docker
- Isolated Fork/Exec
- Java
- QEMU
- Raw Fork/Exec
Drivers still require some extra work. For instance, the Docker driver interacts with, and manages, docker containers on the client but you still need to install Docker itself on the client. Docker is not bundled with Nomad, only the Docker task driver for Nomad.
In this blog post we will launch a simple Nomad job that uses the exec2 task driver. This task driver allows us to run commands on the Nomad client machine. This task driver is complex enough to show the full workflow of configuring clients, because it does not come bundled with Nomad.
Once we have the task driver installed and everything configuring we will run a job that does one thing before it shuts down: it echos “Hello, World!”.
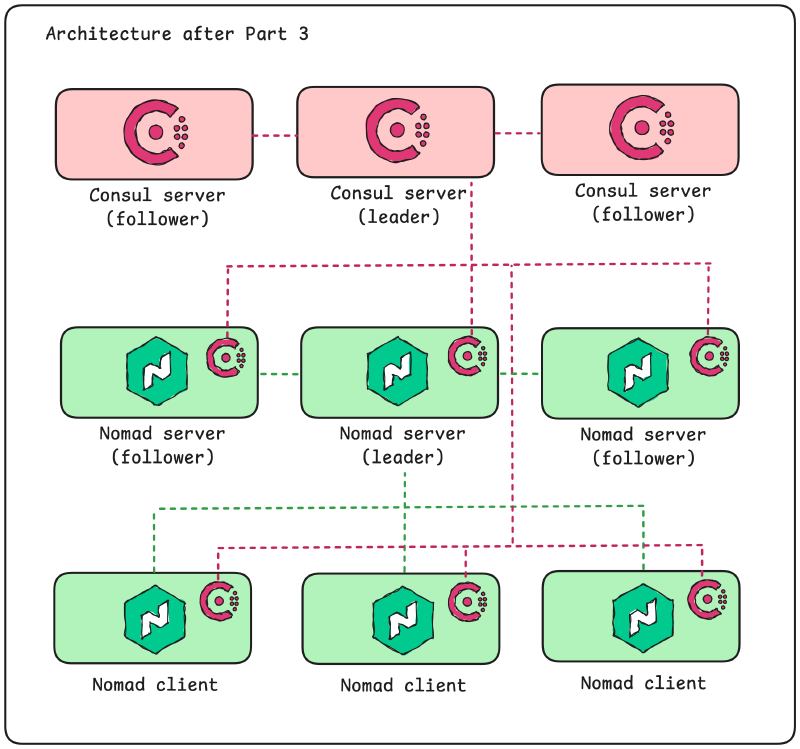
When we are done with this work we will have the following architecture on Azure:
The source code presented in this blog post is available on the accompanying GitHub repository. Look in the part03 directory.
Provisioning Nomad clients#
The Nomad clients will run as an Azure VMSS, just like our Nomad servers. Since this is the third VMSS we create it is time to start thinking about Terraform modules.
Another thing we realize is that the number of subnets in our VNet will now reach three, so it could be time to think about refactoring the VNet and subnet code a bit.
Refactor the VNet Terraform code#
To simplify creating subnets in our VNet we will configure all subnets in local values:
locals {
  vnet_cidr_range = "10.0.0.0/16"

  subnets = {
    consul_servers = {
      name = "snet-consul-servers"
      cidr = cidrsubnet(local.vnet_cidr_range, 8, 0)
    }

    nomad_servers = {
      name = "snet-nomad-servers"
      cidr = cidrsubnet(local.vnet_cidr_range, 8, 1)
    }

    nomad_clients = {
      name = "snet-nomad-clients"
      cidr = cidrsubnet(local.vnet_cidr_range, 8, 2)
    }
  }
}
Then we can use these local values when configuring the VNET and subnet resources:
resource "azurerm_virtual_network" "default" {
  name                = "vnet-nomad"
  location            = azurerm_resource_group.default.location
  resource_group_name = azurerm_resource_group.default.name
  address_space = [
    local.vnet_cidr_range,
  ]
}

resource "azurerm_subnet" "all" {
  for_each             = local.subnets
  name                 = each.value.name
  resource_group_name  = azurerm_resource_group.default.name
  virtual_network_name = azurerm_virtual_network.default.name
  address_prefixes     = [each.value.cidr]
}
The subnets are created using for_each, this means we must update the references to subnets to use the form azurerm_subnet.all["nomad_servers"].id.
A Terraform module for a VMSS#
It seems like a good idea to combine the VMSS and its managed identity into a module. Maybe we want to include more things into the module later, e.g. the subnet and network security group.
To build this module we create a new Terraform module under modules/vmss and parametrize the managed identity and VMSS resources using Terraform variables.
The most interesting part to review here is the VMSS resource:
resource "azurerm_orchestrated_virtual_machine_scale_set" "default" {
  name                = var.vmss_name
  resource_group_name = var.resource_group_name
  location            = var.azure_location

  identity {
    type         = "UserAssigned"
    identity_ids = [azurerm_user_assigned_identity.default.id]
  }

  platform_fault_domain_count = 1
  single_placement_group      = false
  zone_balance                = false
  zones                       = ["1", "2", "3"]

  sku_name  = var.vmss_instance_sku
  instances = var.vmss_instance_count

  user_data_base64 = var.user_data_base64

  network_interface {
    name    = "nic-${var.vmss_name}"
    primary = true

    ip_configuration {
      name      = "primary"
      subnet_id = var.subnet_id
      version   = "IPv4"

      public_ip_address {
        name = "pip-${var.vmss_name}"
      }
    }
  }

  os_disk {
    storage_account_type = "Premium_LRS"
    caching              = "ReadWrite"
    disk_size_gb         = 30
  }

  os_profile {
    linux_configuration {
      admin_username                  = var.admin_username
      computer_name_prefix            = var.vmss_name
      disable_password_authentication = true

      admin_ssh_key {
        username   = var.admin_username
        public_key = var.public_key
      }
    }
  }

  source_image_reference {
    offer     = "ubuntu-24_04-lts"
    publisher = "canonical"
    sku       = "server"
    version   = "latest"
  }

  tags = var.tags

  lifecycle {
    ignore_changes = [
      instances,
    ]
  }
}
This resource should look familiar from the previous blog posts. The difference here is that most of the arguments are configured using variables. Specifically, note how the userdata script is passed in through the user_data_base64 variable.
There are some arguments we left hardcoded here. For instance the availability zones configuration. We will not bother configuring these anymore right now.
Using this module for our previous Nomad servers and Consul servers requires some refactoring, but in the end we create the VMSS and its managed identity like this:
module "nomad_servers" {
  source = "./modules/vmss"

  vmss_name           = "nomad-servers"
  resource_group_name = azurerm_resource_group.default.name
  public_key          = azurerm_ssh_public_key.servers.public_key
  user_data_base64    = data.cloudinit_config.nomad_servers.rendered
  subnet_id           = azurerm_subnet.all["nomad_servers"].id
  azure_location      = var.azure_location

  identity_roles = {
    reader = {
      role  = "Reader"
      scope = azurerm_resource_group.default.id
    }
  }

  tags = {
    nomad = "server"
  }
}
We might need to revisit this module in the future. For now it fulfills its purpose.
Client configuration#
The Nomad binary on the clients should execute as the root user. This is because Nomad needs to interact with the underlying Linux system when launching tasks through the different task drivers.
This means we need to make a few changes to the userdata script we pass to the Nomad clients compared to what we pass to the Nomad servers.
First of all, in the Nomad systemd unit file specify that the root user should run Nomad:
# the rest of the file omitted ...
[Service]
User=root
Group=root
The Nomad configuration file for clients require some additions as well. These additions are highlighted in the following code block:
data_dir   = "/opt/nomad/data"

# add the plugin_dir to tell Nomad where plugins
# (task drivers) are located
plugin_dir = "/opt/nomad/plugins"

bind_addr  = "0.0.0.0"
datacenter = "dc1"

tls {
  http = false
  rpc  = false
}

# add the client stanza (and remove the server stanza)
client {
  enabled = true
}

# configure the exec2 driver this is required because
# otherwise Nomad will skip loading the plugin
plugin "nomad-driver-exec2" {
  config {
    unveil_defaults = true
    unveil_paths    = []
    unveil_by_task  = false
  }
}

consul {
  address = "127.0.0.1:8500"
}
We can remove the step where we create the Nomad user for the Nomad clients since it is not needed. We can also remove the steps where we change owners of Nomad files and directories because they will be owned by the root user by default.
Finally, we need to download any task drivers we need that are not bundled with Nomad.
In this case we need to download the exec2 task driver. This driver is available through releases.hashicorp.com under the name nomad-driver-exec. Make sure to move the downloaded task driver to the same directory that is specified as the plugin directory in the Nomad client configuration file (i.e. /opt/nomad/plugins).
#!/bin/bash

driver="nomad-driver-exec"
version="0.1.0"

curl \
  --silent \
  --remote-name "https://releases.hashicorp.com/$driver/$version/$driver_$version_linux_amd64.zip"
unzip "$driver_$version_linux_amd64.zip"
mv "$driver" /opt/nomad/plugins
With the Nomad client userdata in place we can provision the Nomad clients using our Terraform module for VMSS:
module "nomad_clients" {
  source = "./modules/vmss"

  vmss_name           = "nomad-clients"
  resource_group_name = azurerm_resource_group.default.name
  public_key          = azurerm_ssh_public_key.servers.public_key
  identity_roles = {
    reader = {
      role  = "Reader"
      scope = azurerm_resource_group.default.id
    }
  }
  user_data_base64 = data.cloudinit_config.nomad_clients.rendered
  subnet_id        = azurerm_subnet.all["nomad_clients"].id
  azure_location   = var.azure_location

  tags = {
    nomad = "client"
  }
}
Run a Nomad job#
Run through terraform init, terraform plan, and terraform apply to provision the Consul and Nomad clusters with servers and clients.
Later on we will launch jobs on Nomad using the Nomad provider for Terraform (also the Nomad UI), but now we will launch a job using the Nomad CLI.
Nomad jobs are defined in HCL files (using the .hcl file ending, or sometimes using the .nomad file ending).
A job can contain one or more tasks. Tasks can be grouped into groups. Tasks in the same group are run on the same Nomad client. A task is one application, or workload to use a more generic term.
As mentioned in the introduction, we will run a job that simple echoes Hello, world and then shuts down. The task will use the exec2 task driver we installed on our Nomad clients.
The job definition looks like this:
job "workload" {
  datacenters = ["dc1"]
  type        = "batch"

  group "commands" {
    task "echo" {
      driver = "exec2"
      config {
        command = "echo"
        args    = ["Hello, world!"]
      }
    }
  }
}
The job is named workload. We can use this name later to find the job when interacting with the Nomad CLI.
The job is of type batch. There are four different types of jobs:
serviceis run as a long-running service on a single client.batchis intended for short-lived jobs that execute once until it completes and then shuts down.systemis for jobs that should run on each Nomad client as a long-running job. This is similar to daemonsets on Kubernetes.sysbatchis likebatchbut for short-lived jobs that should run once on each Nomad client.
We can tell Nomad in which datacenters we want the job to execute. We have not discussed datacenters in this series yet, so for now we only have a single datacenter named dc1.
The echo task is placed inside a group named commands. Since we only have a single task it is not necessary to use a group, you could omit it.
The task is configured with the correct driver (exec2) and the config stanza takes specific configuration arguments for this driver. Basically we tell the driver to run echo with the argument "Hello, world!".
Connect to one of the Nomad client machines. In the accompanying GitHub repository there is a script in part03/scripts/connect.sh that you can use to connect to an instance. Simply run:
$ cd part03
$ ./scripts/connect.sh nomad-clients
Once connected to one of the Nomad clients, create a file named job.hcl and paste the job definition from above. Save the file and launch the job:
azureuser@nomad-clientsWTXBYZ:~$ # create job.hcl ...
azureuser@nomad-clientsWTXBYZ:~$ # ...
azureuser@nomad-clientsWTXBYZ:~$ nomad job run job.hcl

==> 2025-06-26T21:14:12Z: Monitoring evaluation "f8ce024f"
    2025-06-26T21:14:12Z: Evaluation triggered by job "workload"
    2025-06-26T21:14:13Z: Allocation "55a0070b" created: node "a2e207e3", group "commands"
    2025-06-26T21:14:13Z: Evaluation status changed: "pending" -> "complete"
==> 2025-06-26T21:14:13Z: Evaluation "f8ce024f" finished with status "complete"
A job on Nomad is the desired state. This is similar to when we write Terraform code that represents the desired state of whatever infrastructure we want to provision.
When you run a job Nomad creates an evaluation. Evaluations leads to tasks being grouped in allocations that are placed (scheduled) on a node (a Nomad client). We might dive deeper into how scheduling works if required, but for now these are enough details.
To verify that the job we launched actually did something we cann check the logs that it produced. We expect there to be a single log with the text Hello, world!.
To see the logs we must use the allocation ID associated with the job. The allocation ID is visible in the output from the nomad job run command above. Copy the allocation ID and check the logs using the nomad logs command:
azureuser@nomad-clientsWTXBYZ:~$ nomad logs 55a0070b
Hello, world!
That looks like a successful (albeit useless) job!
Summary of Part 3#
In this part we extended our Nomad cluster to include Nomad clients. Then we ran our first Nomad job on one of our clients.
Now would be a good idea to take a step back and begin to strengthen our Nomad cluster with all the security features that are available. However, before we do this we will see if we can expose the Nomad UI and interact with our Nomad cluster using it. This allows for an alternative way to launch jobs and visualize what is going on in the cluster.
Stay tuned!