
One issue we discovered in the previous blog post in this series was that to use cloud auto-join to bootstrap a Nomad cluster we need to read tags set on the NICs attached to the VMs in a VMSS. But we can’t set the tags in a convenient manner because we use a VMSS (virtual machine scale-set). Tags set on the VMSS are not automatically propagated to the NICs.

We could set up automation to handle this. One option would be to create an Azure Policy. Another option would be to have an Azure Function that is triggered on an appropriate event. However, there is no ideal and convenient solution to this issue. Remember that we need to account for the fact that an instance could be replaced with a new instance where we once again need to set the correct tags.
There is an option to configure cloud auto-join to discover NICs for a given VMSS in a given resource group. The cloud auto-join string you use would look something like this:
provider=azure subscription_id=x resource_group=y vm_scale_set=zUnfortunately this does not work for scale sets with flexible orchestration . It only works for scale sets with uniform orchestration. Scale sets with flexible orchestration is the recommended type of scale sets on Azure.
Read more on the difference between the two in the Microsoft documentation.
A good alternative to using cloud auto-join is to use HashiCorp Consul. This is especially convenient if you already have a Consul cluster provisioned in your Azure environment.
By running Consul client agents on our Nomad servers and configure the servers to be aware of Consul the Nomad server cluster bootstrapping will take care of itself.
A fair warning: in the last post I said that I am not an expert on HashiCorp Nomad. Well, I am not an expert on HashiCorp Consul either!
This blog series is not primarily about Consul, so I will not go deep into Consul unless required. In fact, I will configure Consul as simple as possible for now and come back to its configuration if we need to do so later.
There is one unfortunate caveat with this solution!
To provision Consul we also need to rely on some mechanism to join the servers into a cluster. We will need to fall back to using cloud auto-join, and we will encounter exactly the same issue as for Nomad.
In a sense we are only moving the problem from Nomad to Consul. This has to be fine for now, we will think of something to do to resolve this later on.
If you want to see the finished code for this blog post, it is available at the accompanying GitHub repository.
What is HashiCorp Consul?#
HashiCorp Consul is a network automation, service discovery, and service mesh solution. We will use some of these features later in this blog series when we come to a point where we provision workloads on Nomad that need to discover and communicate with each other.
You can think about Consul as a layer on top of your network infrastructure. Through Consul you can let workloads discover how to reach each other, and you can programmatically allow or deny traffic to take place between different workloads.
A consul cluster consists of servers and clients. A consul cluster should ideally have three, five, or seven servers but could have any number of clients. This is similar to what we learned about Nomad.
Consul can run on virtual machines or basically any other compute platform. In the previous post we learned that it would not make sense to run Nomad on Kubernetes (since we might want to replace Kubernetes with Nomad), but running Consul on Kubernetes is a valid use case. You need service discovery, service mesh, and the other features that Consul offers on any type of compute platform. In this blog post we will run Consul on virtual machines.
This is about as deep into Consul we need to go for now. In this blog post Consul will be used to automate establishing a cluster of Nomad servers.
Introducing Consul to our infrastructure#
At a high level, the steps we need to take to introduce Consul to automatically bootstrap our Nomad cluster are:
- Provision a Consul cluster of servers.
- Add Consul clients to our Nomad servers.
- Configure Nomad to integrate with Consul.
There are only three steps, yet there is a lot of work to be done!
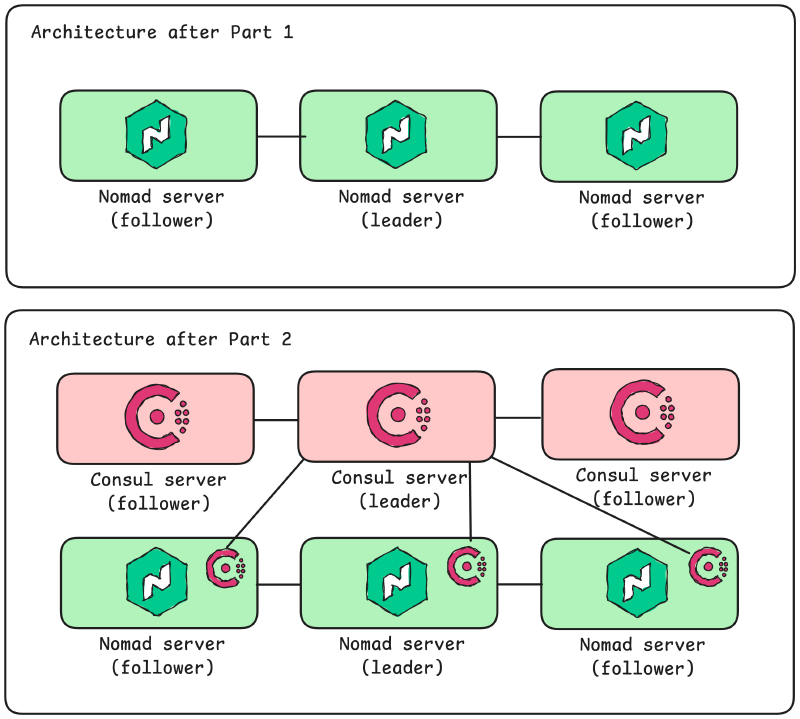
The following simplified architecture diagram shows where we currently are and where we are planning to go.
Provision a Consul cluster of servers#
Provisioning a Consul cluster follows much the same steps that we did to provision our Nomad cluster. In fact, a lot of the configuration we built last time can be reused (with minor changes of course).
The only major difference is in the cloud-init part for the userdata script that will run on the Consul virtual machines as they start up.
First of all, we need to install the Consul binary. The latest version at the time of writing is 1.21.2 (the selected version is set in a local value in the Terraform configuration). The Consul binary is available through the HashiCorp releases page where we found the Nomad binary.
#!/bin/bash

# download and install Consul
curl \
  --silent \
  --remote-name https://releases.hashicorp.com/consul/${local.consul.version}/consul_${local.consul.version}_linux_amd64.zip
unzip consul_${local.consul.version}_linux_amd64.zip
chown root:root consul
mv consul /usr/bin/
We should create a dedicated Linux user for Consul:
#!/bin/bash

# ...

useradd --system --home /etc/consul.d --shell /bin/false consul
Create a systemd unit file for the Consul service at /etc/systemd/system/consul.service with the following content:
[Unit]
Description="HashiCorp Consul - A service mesh solution"
Documentation=https://www.consul.io/
Requires=network-online.target
After=network-online.target
ConditionFileNotEmpty=/etc/consul.d/consul.hcl

[Service]
EnvironmentFile=-/etc/consul.d/consul.env
User=consul
Group=consul
ExecStart=/usr/bin/consul agent -config-dir=/etc/consul.d/
ExecReload=/bin/kill --signal HUP $MAINPID
KillMode=process
KillSignal=SIGTERM
Restart=on-failure
LimitNOFILE=65536

[Install]
WantedBy=multi-user.target
Create a Consul server agent configuration file at /etc/consul.d/consul.hcl with the following content:
datacenter = "dc1"
data_dir   = "/opt/consul"

server           = true
bootstrap_expect = 3

retry_join = [
  "provider=azure tag_name=consul tag_value=server subscription_id=${data.azurerm_client_config.current.subscription_id}"
]
This configuration file looks similar to what we created for our Nomad servers. Note that the retry_join argument uses tag-based discovery. As was discussed above, this will lead to the same issue we had for Nomad where the NICs do not automatically inherit the tags from the VMSS. We will need to update the script we created for tagging NICs later to work for the Consul server NICs.
The rest of the cloud-init script is the same (replacing nomad with consul, of course).
Add Consul clients to our Nomad servers#
We will run Consul clients on the Nomad servers. This is what will allow the Nomad server agents to automatically form a working cluster, through the use of Consul.
The only thing we need to do is to modify the cloud-init part of our Nomad server deployment. Specifically, we need to:
- Download the Consul binary.
- Create a Consul user.
- Create necessary Consul directories and configuration files.
- Create a Consul systemd service file.
- Modify the Nomad service to wait for Consul to start first.
All of these steps, except for the last one, have already been implemented in the previous section. There is also a difference in the Consul configuration, because now we need a client agent configuration instead of a server agent configuration. It is similar, but simpler:
datacenter = "dc1"
data_dir   = "/opt/consul"

retry_join = [
  "provider=azure tag_name=consul tag_value=server subscription_id=${data.azurerm_client_config.current.subscription_id}"
]
To tell Nomad to wait for the Consul client to start we modify the Nomad systemd unit file:
[Unit]
Wants=consul.service
After=consul.service

# ... the rest of the file omitted
Configure Nomad to integrate with Consul#
The last step is simple. We need to modify the configuration of our Nomad server agents to use Consul and remove the cloud auto-join configuration.
The Nomad configuration from the previous part in this blog series looked like this:
data_dir  = "/opt/nomad/data"
bind_addr = "0.0.0.0"

datacenter = "dc1"

tls {
    http = false
    rpc  = false
}

ports {
    http = 4646
    rpc  = 4647
    serf = 4648
}

server {
    enabled          = true
    bootstrap_expect = ${var.server_count}

    server_join {
      retry_join = [
        "provider=azure tag_name=nomad tag_value=server subscription_id=${data.azurerm_client_config.current.subscription_id}"
      ]
    }
}
We can remove the server_join stanza from the configuration, and add a consul stanza. The new Nomad server agent configuration file will look like this:
data_dir  = "/opt/nomad/data"
bind_addr = "0.0.0.0"

datacenter = "dc1"

tls {
  http = false
  rpc  = false
}

ports {
  http = 4646
  rpc  = 4647
  serf = 4648
}

server {
  enabled          = true
  bootstrap_expect = ${var.server_count}
}

consul {
  address = "http://127.0.0.1:8500"
}
The consul stanza has many more configuration options. For now, this is all we need. Note how we no longer have the server_join stanza inside of the server stanza.
Provision the update#
Run through terraform init, terraform plan, and terraform apply to provision the cluster. Note that if you have the cluster from part 1 running you need to destroy it before you provision the new cluster.
We can already guess that the Consul cluster has not been formed properly because we have not tagged our Consul VMSS NICs. Update the tag.sh script from the last part to specifically tag the Consul NICs (we no longer need to tag the Nomad VMSS NICs):
#!/bin/bash

resourceGroup="rg-nomad-on-azure"

az network nic list \
    --resource-group "$resourceGroup" \
    --query "[?starts_with(name, 'nic-consul-servers')].{name:name}" -o tsv | \
while read -r nicName; do
    az network nic update \
        --name "$nicName" \
        --resource-group "$resourceGroup" \
        --set tags.consul="server"
done
Run the script to tag the appropriate NICs. After the script completes the Consul cluster bootstrap should finish in a few seconds.
Grab the public IP of one of the Nomad servers and connect to it using SSH:
$ ssh -i ssh_keys/nomad-servers.pem azureuser@<public ip>
List the members of the Nomad cluster to verify that there are three servers that have formed a cluster:
$ nomad server members
Name                   Address    Port  Status  Leader  Raft Version  Build   Datacenter  Region
nomadsrvCPPJUO.global  10.0.10.6  4648  alive   true    3             1.10.2  dc1         global
nomadsrvNKMVP8.global  10.0.10.4  4648  alive   false   3             1.10.2  dc1         global
nomadsrvXSHJAS.global  10.0.10.5  4648  alive   false   3             1.10.2  dc1         global
Since Nomad successfully formed a cluster we can suspect that Consul did as well. Grab the public IP of one of the Consul server virtual machines and connect to it over SSH. Actually, for convenience let’s create an Azure CLI command to grab the public IP of a Consul server:
$ az network public-ip show \
    --ids "$(az network nic list \
        --resource-group rg-nomad-on-azure \
        --query "[?starts_with(name, 'nic-consul-servers')] | [0].ipConfigurations[0].publicIPAddress.id" \
        -o tsv)" \
    --query "ipAddress" --output tsv
Once connected to a Consul server, list the Consul cluster members:
$ consul members
Node             Address         Status  Type    Build   Protocol  DC   Partition  Segment
consulsrv3DOLKC  10.0.20.5:8301  alive   server  1.21.2  2         dc1  default    <all>
consulsrvR1X9FJ  10.0.20.6:8301  alive   server  1.21.2  2         dc1  default    <all>
consulsrvYGVJDH  10.0.20.4:8301  alive   server  1.21.2  2         dc1  default    <all>
nomadsrvCPPJUO   10.0.10.6:8301  alive   client  1.21.2  2         dc1  default    <default>
nomadsrvNKMVP8   10.0.10.4:8301  alive   client  1.21.2  2         dc1  default    <default>
nomadsrvXSHJAS   10.0.10.5:8301  alive   client  1.21.2  2         dc1  default    <default>
This list contains the three Consul server agents along with three Consul client agents. The node name of the client agents show that it is the Nomad server agents.
Summary of Part 2#
In this part we introduced HashiCorp Consul to automate Nomad cluster bootstrapping. Later on we will use Consul for more than this single use case.
To achieve what we did we needed to provision a Consul cluster with three Consul server agents. We also needed to install Consul client agents on our Nomad servers. With the Consul client agents running on the Nomad servers we only had to tell Nomad where Consul could be reached and that was enough to bootstrap the Nomad cluster.
In the end, we have not really come any further on our Nomad journey and the issue we encountered in the previous post has just been moved to Consul instead of Nomad. This is a little bit like sweeping the problem under the rug! However, it’s a good thing this blog series is about Nomad so we do not really care what is under the Consul rug for now.
Before we start strengthening our Nomad cluster (after all, there are some glaring security issue right now) we will provision a number of Nomad client agents and also get a small workload provisioned on our cluster. This is what the next part in this blog series will be all about.
Stay tuned!